A SCORM-ready template: Part 1A. Features
A SCORM-Ready Template Tutorial Series, Part I: Setting up the module
| Part 1B. Plan the Navigation >>
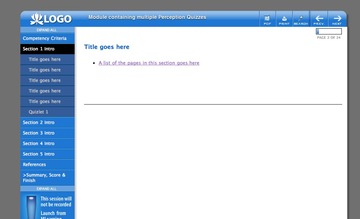
Here’s a screenshot of the template, showing part of the left-hand navigation expanded. Note the previous/next navigation buttons at upper right, which are automatically created based on your list of pages, as is the progress bar and page numbering at upper right. |

Example of a finished module based on the template. Note: the look of the navigation column has changed slightly since this article was first written.
p style=”display: block; background: #F7FFA4; padding: 6px; border: 1px solid #FF9C3E;width:150px;”>>> View a live demo of the template here
>> Download the template files here
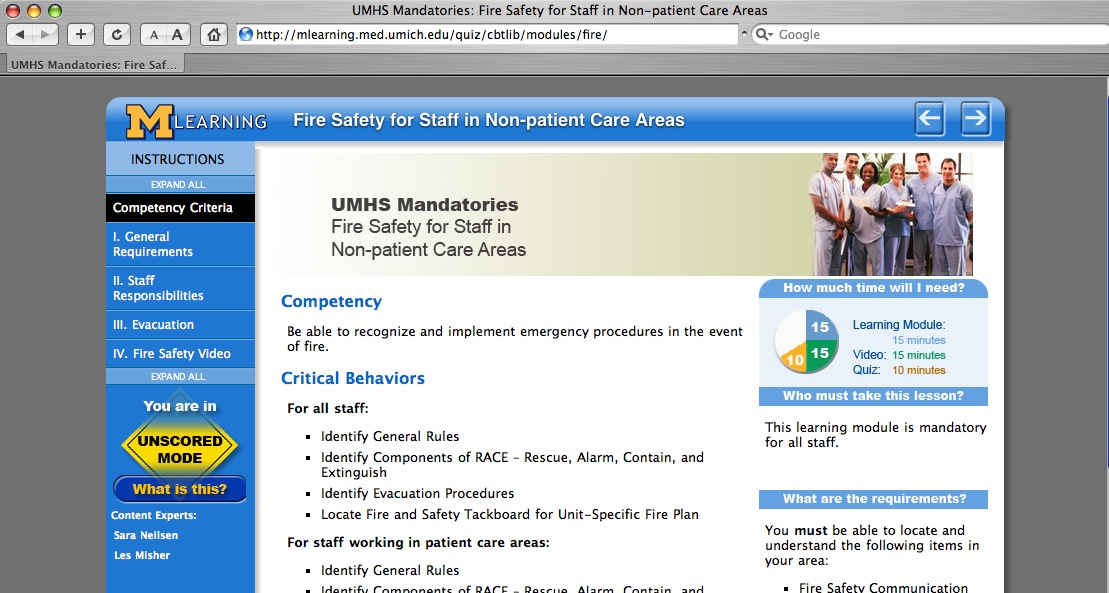 |
| Another example of a module based on the template. The navigation bar shown here is the latest version. |
>> View a live demo of the template here
>> Download the template files here
Features
This HTML template is designed to simplify the creation of SCORM-compatible learning modules. Some of the features include:
- SCORM compatibility: The required elearning SCORM communication functions are built in so the module can communicate its status to a Learning Management System (LMS).
- Can be used with no LMS as well -scorm-function buttons are hidden when module is viewed outside an LMS
- Requires no server-side languages or processing other than Server Side Includes (SSI’s). Javascript/DHTML-based. NOTE: Your server must be set up to process the extension “.htm” for SSI’s. This can usually be done even if you are on a hosted server, using the control panel. Instructions for making this change on an IIS server are here.
- Bookmarking: last page browsed is automatically stored in the LMS.
- Dynamic navigation: The navigation, page titles, and pages left to view are all automatically generated.
- Built-in styles: The look and feel has been set up so all you need to do is add text and use styles like H1, H2, and a few classes. The styles adapt to different browsers and screen sizes.
- Pretty printing: Navbar disappears when printing, creating a cleaner, more efficient printout.
- Branching capability:
- replace entire page list with a single click to create another version of the module.
- Insert pages with a single click.
- Add pages to end of current page list.
- Deep linking. Although the module is structured as a frameset by necessity, linking directly to specific pages is possible, now both when under scorm control and when used outside the LMS.< /li>
- Versions: easily make multiple versions from the same set of pages.
- Embedded Questionmark Perception Quizzes (requires Questionmark server and an LMS)
- Soon to come: Embedded Captivate Quizzes
Getting Started
Module-specific folders
You will notice that several of the directories have two versions – a “global” version and a “local” version (“css-local,” “includes-local,” and “js-local”). There is also a “media” folder which is where you will put your module-specific images. This is because on our production server, we use a version control process where the global folders are replaced with symlinks, so that changes to the template will immediately update all templates on the server. Changes made in the local folders will affect that module only.
The files in the “local” directories and files can be modified as needed, and can be used to override many global settings. For example, the CSS styles can be changed by adding styles to the file “css-local/userStyles.css.”

Outline your module’s structure
Start by outlining your entire learning module. List all the pages you want to include. You can change the list after you get started, so don’t worry if there are items you aren’t sure about.The module structure can be very simple as shown in Example 1, or more structured with chapters and sections as shown in Example 2. This template can accommodate up to four levels if needed.
Example 1The outline below shows a flat structure, with all pages on the same hierarchical level. In this example, all items would be on level 1. |
This is the navbar that results from this outline. Links to all items are visible at all times. |
 |
 |
Example 2This outline shows a more complex hierarchical structure with chapters and sub-sections. In this example, the Competency Criteria page and the Chapter Introductions would be on level 1 and the Subtopics would all be on level 2. |
This is the navbar that results from this outline. Only the top level (level1) items are visible at all times. Other levels are visible when browsing any page in the respective chapter. NOTE: each page on level 1 should have a different chapter number. |
 |
 |
A SCORM-Ready Template Tutorial Series, Part I: Setting up the module
| Part 1B. Plan the Navigation >>
Hello,
Great ressource!! I was searching something like that while some time and now I’m happy to have find it.
I just want to ask you a little question about a problem I meet after downloading the template. I don’t know what I’m doing wrong, but I’m not able to show it correctly localy in a browser needer in Dreamweaver. But, when I go to the online live demo everything look ok. Just to have an other view on the problem I capture this part of the site with HTTrack and the pages downloaded on my pc look like the online demo.
What I’m doing wrong when downloading the template.zip file?
Thanks
grizzou
P.S.: Sorry for my english I’m french canadian…
Hi,
The template makes extensive use of Server Side Includes (SSI’s). This is why there is so little code at the top of each content page (page01.htm, page02.htm, etc.). Most of it is contained in included files.
Older versions of Dreamweaver do a poor job of displaying the SSI’s. You will need either Dreamweaver 8 or the CS3 version to see them displayed in place.
Note the text in red on this page which says:
“Requires no server-side languages or processing other than Server Side Includes (SSI’s). Javascript/DHTML-based. NOTE: Your server must be set up to process the extension “.htm” for SSI’s. This can usually be done even if you are on a hosted server, using the control panel. Instructions for making this change on an IIS server are here.”
Try uploading the files to a server that has had this change made. To make this change on a hosted server using CPanel, you would click on “Apache Handlers” and add “.htm” as “server-parsed”.
Hello,
If I uncomment the code for index.htm file to allow:
<!–use the following line if you want the module to complete only after all pages have been looked at (do not use if you have embedded quizzes):
–>
<frameset rows=”100%,*%” onunload=”completeIfLastPage()” onbeforeunload=”completeIfLastPage()” id=”moduleFrameset”>
Does this mean that the course will be marked as complete in the LMS if the student just visits the last page or do they have to click through each page in the course and the completion status gets updated when the get to the last page?
Thanks,
RF
The former – it will complete if they are on the last page. It was a very minimal attempt to ensure they at least looked at the module. We abandoned it quickly, which is why it is commented out.
It would not be very hard to modify things to do what you want. You’d add a “done” property to each item on the pageArray to record if that page had been visited. Then you could decide when and how often to loop through the array and check if all pages have been read, upon which the module would be marked complete. That way the user could view the pages in any order, but would ultimately have to view them all.
My tendency is to avoid such restrictive requirements. The goal is to have them learn something, not to have them page through a document, so the real test is if they have achieved whatever your learning objectives are. Usually forcing them to turn pages is not the best way to determine that.
Hi,
I noticed that adding menu items to the pageArray.js file under level:4 do not show up in the left menu navigation. Furthermore, anything after that level:4 do not show up. Surprisingly, when I ‘Expand All’, level:4 items show up.
Is there a fix that you recommend in the pageNavigation.js?
Thank you!
RF
Hi Rich,
We never use level 4 so I didn’t spend much time in checking its CSS styles. I’ll take a look and get back to you. It’s probably a fairly minor fix.
Thanks Ellen. That would be great. I’ve tried everything and can’t get both the 3rd level and 4th level working correctly without showing everything in the menu.
RF
quick and dirty fix:
try adding
else if (currentPage.chapter == chapter&&(currentPage.level==level||level==currentPage.level+1)){expand=’open’}
just after the line:
else if (currentPage.branch==branch && (currentPage.level==level||level==currentPage.level+1)){expand=’open’} //current page on same level And in same branch
in js/pageNavigation.js
Keep it all on one line from “else” to ” the final “}”, even though it is wrapped here.
I don’t have time to test thoroughly right now, so can’t guarantee it works in all cases.
Can you provide some instructions for how to use the template with an LMS, specifically with Moodle? I’m having trouble understanding how the SCORM components actually integrate with Moodle, and how the template would be uploaded into Moodle, etc…
Thanks.
I’ll write something on this soon.
See “How to use the HTML SCORM template with Moodle – unscored example”
http://thedesignspace.net/MT2archives/000646.html
hi,
i use php server but it seems that you suppose to use IIS?can yu help me in this way?
AND where can i open your template?i use reload editor to make scorm coursesbut i couldn’t open your template there?
Regards
Neda
This template works on both IIS and Linux. It doesn’t require php or asp to run: it is entirely HTML/Javascript based.
It does require SSI’s (server side includes) as described under “Features” above.
You need to unzip the files to use them (using winzip, stuffit, Archive Utility, or other similar software). Then you can edit them within Dreamweaver or any text editor. The reload editor is not a course editor, but it serves to create the scorm structure and settings for a course by creating the manifest and metadata files.
hi,
thanx a lot for your reply.As i need to work with a database like moodle to store or retrieve data from tables of database, i really need to have server side transactions.As my course should be scorm i have to use SSIs.Now i don’t know how to Make other extensions besides “.shtml” process for Server Side includes in apache.can you help me in this way and do you have any sample of such thing?I’m really in hurry and need your guidance as soon as possible.
Regards
Neda
OK – looks from your other comments that you found my Moodle-ized version of the template.
http://thedesignspace.net/MT2archives/000646.html
Hi Ellen… Nice ressource…
I work on a SCORM project where I will use your template (the Moodle version).
I plan to have 4 levels of pages. But, with the original css/allBrowser.css file, the 4th level appear like the level 1. So I have make a little change to this CSS file.
Here is the code I add to that file (a copy of the a.navlevel3):
#NavBar a.navlevel4 {
background-color:#113868;
color:#FFF;
border-top:1px solid #113868;
border-bottom:1px solid #000;
border-left:1px solid #0D2E58;
/*text-indent:-3px;*/
padding-left:30px;
I will change the color of the navlevel4 to fit with our own look.
A note, I also changed the padding-left for the level 2 to 4 to be abble to show correctly the level 4. Here are the padding-left settings for all these three levels:
– for navlevel2 padding-left:18px;
– for navlevel3 padding-left:24px;
– for navlevel4 padding-left:30px;
Hope that could help somebody else…
See you and thanks again for that great ressource!
JF
Hello Ellen!
My tests in IE 8 give me a compatibility error. The template seem to be optimize for IE 7 and before…
When I launch the template with IE 8 (launch from Moodle), the menu don’t appear to me and an icon of a broken page appear on the top right corner of the page. It said that this problem is relate to the code of the page. When I click on it, the page is reload correctly. I can also reload the page with + and everything appear OK.
The problem is that I whant my page to load directly on the correct way.
I found on msdn (http://msdn.microsoft.com/en-us/library/cc288325.aspx#SetMode) it is possible to include in the HTML code a metadata to say to IE we whant him to load the content with a specific mode. In the example we found in that page, it’s propose to write the code below in the HEAD section of the page.
I must test that code on other versions of IE (such as 5.5, 6, 7), but it could fix that problem…
Do you think I am on the good way?
Thanks for troubleshooting this – I’ll take a close look at what is causing the problem soon. It sounds like you’re on the right track.
Hi again – my preliminary tests in IE8 through a corporate LMS (non-Moodle) and on my own Moodle installation seem fine. From what you are describing, it sounds like it’s possible that the “return to your bookmarked page?” alert that comes up at the beginnning of the course if you’ve ever viewed it before may possibly be delaying the rendering of the navigation buttons, especially on a slower system. If you can tell me anything more about the exact errors shown in your debugger, or anything else about the behavior you are observing, I could help you troubleshoot this better. We can also shut off the bookmarked location warning:
in js-local/userScripts.js
put the following line:
function bookmarkAlert() { }
it should shut off the alert. See if that helps.
I cant give you more infos from the debug mode… I loose that kind of setting when the guys from the IT service decide to secure the system. Now I’m a kind of admin in our Moodle installation with limited rights.
I will take a look at your bookmark solution, but it’s sound a nice idea…
I’ll give you more news later
—–