November 30, 2009
Gallery site suddenly stops working: check file permissions
Today I found that a Menalto Gallery v.2.3 site I run had simply stopped working. I had made no changes in weeks, so this was peculiar.
Browsing to the front page brought up only the standard error page which shows up for 403 and 404 (page not found) errors and probably for 500 errors (permissions issues) as well.
I was able to run the Gallery installer again, but still no improvement. Then I decided to overwrite all the files with clean files. That's when the problem became obvious: one file could not be overwritten because of its permissions settings: main.php (the front page) page. NO viewing or writing permissions were set on that file.
Upon resetting main.php's permissions to 644, everything started working again. I'm not thrilled that the permissions changed spontaneously, but it's faintly possible that Gallery itself did that, since it can change permissions on its own files.
So if your Gallery installation suddenly fails and you have not changed anything, check permissions on main.php!
November 28, 2009
.htaccess: allow anyone from one IP but require password from everywhere else
If you want your linux-hosted site to be accessible by anyone coming from a particular IP address, as say from within a corporate firewall, but also accessible from anywhere else as long as they authenticate with username and password, use this formula in the .htaccess file for the directory:
#this section may need to be modified to suit your password authentication setup:
AuthUserFile "/home/pathTo/.htpasswds/directory_name/passwd"
AuthType Basic
AuthName "webroot"
require valid-user
# allow users from inside firewall
Allow from 111.222.33
Satisfy Any
If you aren't sure what the path to the passwords file is on your server, use Cpanel to password protect the directory. It will add the correct path to the .htaccess file in the directory, then you can add the rest of the snippet above.
If Cpanel is available, you can use it to add the users and passwords as well.
November 25, 2009
Mail.app generates multiple copies of email in "Recovered Messages" folder
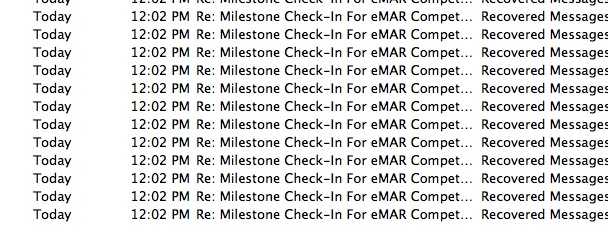
After upgrading to SnowLeopard a new bug in Mail.app has appeared. About once a week, one or more emails will decide to reproduce themselves hundreds of times in a folder called "Recovered Messages". If that email has a large attachment, it can quickly fill up the limited space allotted to my email account.
The temporary fix is to find the invisible folder called .OfflineCache in that mailbox and delete its contents:
~/Library/Mail/IMAP-@domain.com@imap.domain.com/.OfflineCache
Then delete the Recovered Messages folder in Mail.app.
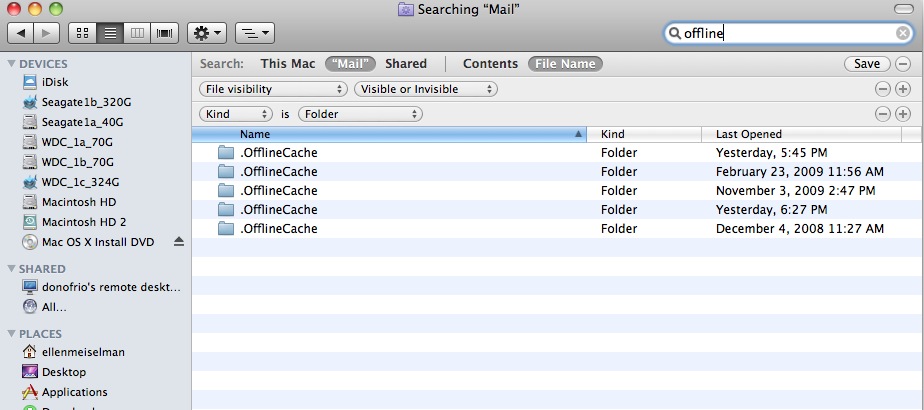
If you do not have the Finder set to display Invisible files, an easy way to find the .OfflineCache folders is to navigate to the Library folder in your Home folder, then use Spotlight to find Invisible files with "Offline" in the file name. For some reason Spotlight will not find Invisible files just anywhere on the disk, as shown here:

You must select the folder you know they are in, then search for them.
Select the folder for the account with the issue, and delete the files inside it:
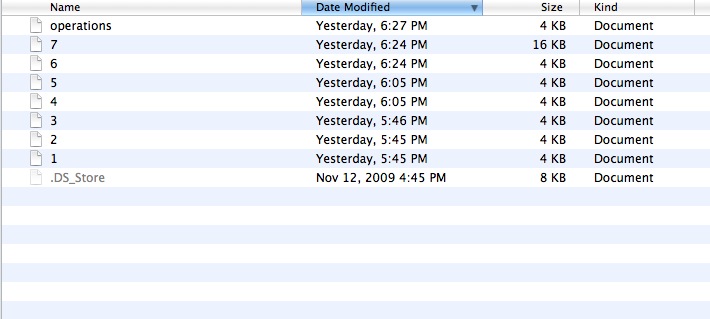
Then delete the Recovered Mail folder from the "ON MY MAC" area in Mail.app.
November 23, 2009
Adobe Presenter tip: use mp3 audio format to sync long audio to slides
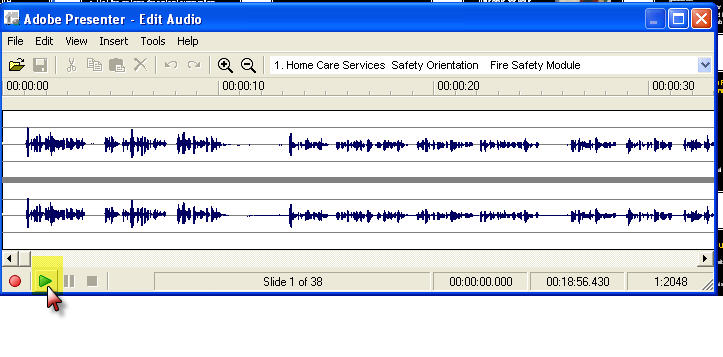
If you need to sync Powerpoint slides to a lengthy pre-recorded audio file in Presenter, the choice of format for the audio file is important. Save audio files intended for import into Presenter in mp3 format rather than WAV.
Presenter has a bug which shows up when using the Edit Audio window. WAV files will not play back beyond about 5 minutes into the timeline, making it impossible to sync slides to long WAV files using the Edit Audio window.
November 22, 2009
Create photo-illustration effects with Photoshop
I've been experimenting with enhancing some of my photos in Photoshop to create more interesting images. I use a Canon PowerShot SD 990IS point-and-shoot camera that does a good job on the whole, but because the lens isn't very high quality, images sometimes come out somewhat hazy. The camera actually captures a lot of detail but it takes some processing to bring it out. I'm not against using some tricks to emphasize what's good about the picture, even to the point where it crosses the line into illustration.
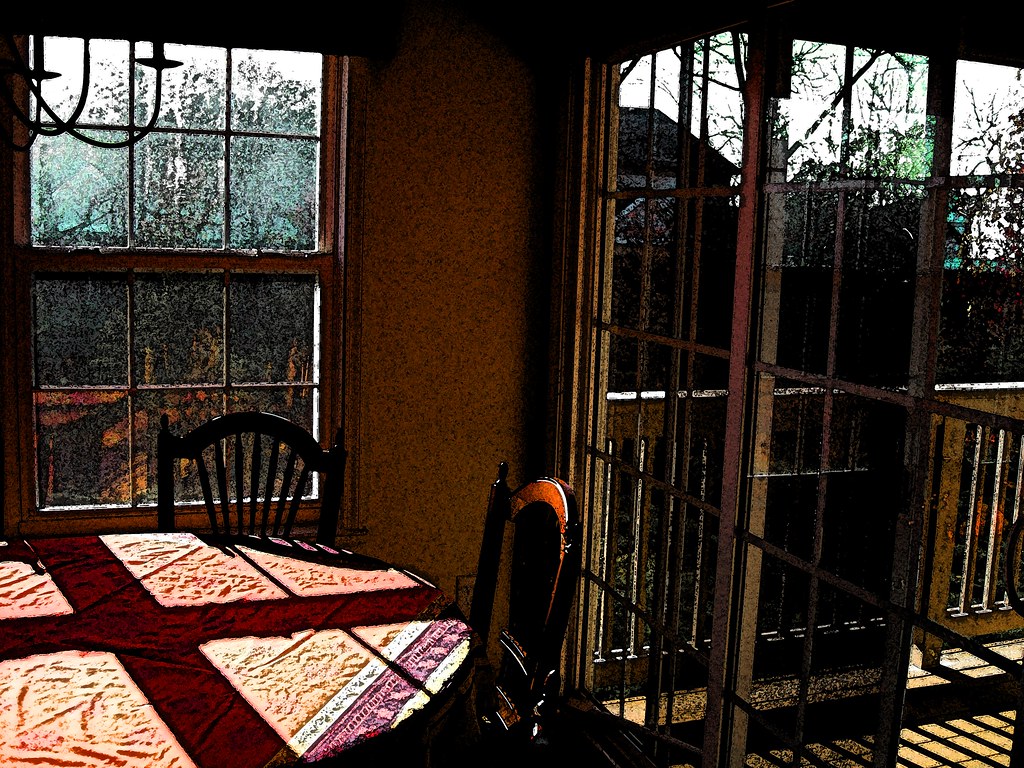
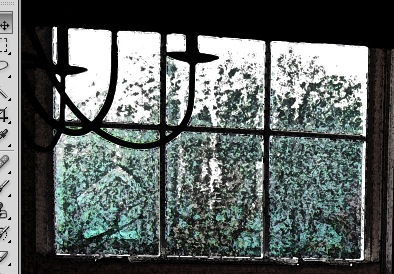
For this project, I started with a fairly unexciting picture of my dining room. Its one strong point was the sunlight streaming in the windows which brought out the colors in the wood chair and tablecloth. This picture was one of several shots of the same scene with different exposure settings.
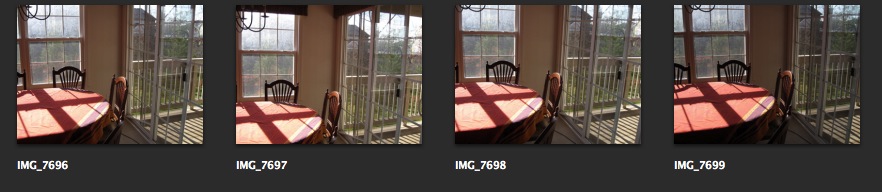
This was the lightest one, chosen for the detail visible through the windows. However in choosing the lightest exposure, the tablecloth lost a lot of its color. However I thought it had potential.
Original image

The finished picture
I always begin by duplicating the original Background image layer (cmd-J) so the original stays completely untouched.
Nondestructive editing is usually preferable since it retains settings and makes it possible to change your mind after closing the file, so I converted the new layer for smart filters.
The picture needed more contrast, saturation and generally speaking, more visual energy. So, I turned to some of the built-in filters in the Filter Gallery.
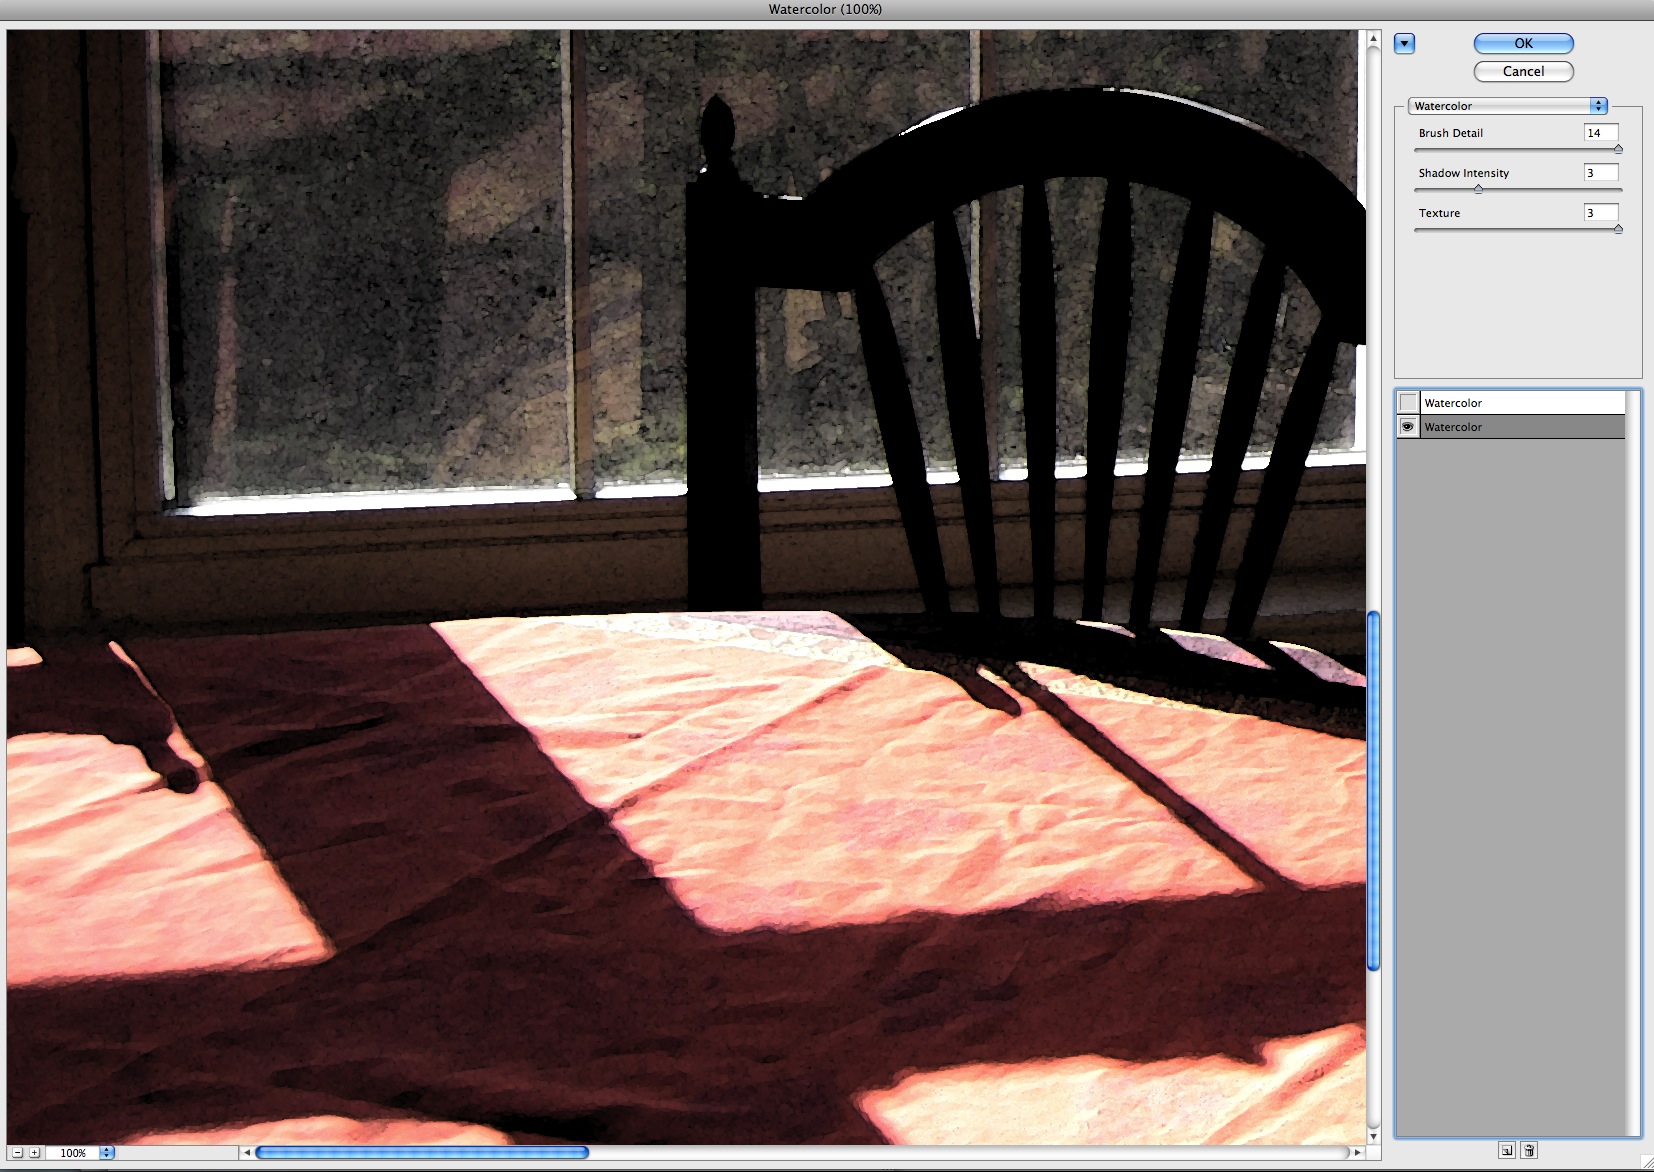
The watercolor filter does a nice job of maintaining the color and structure of the image but it adds a little bleed through around the edges of every shape and a bit of texture where the "daubs" of paint intersect and overlap. I often use multiple filters, and sometimes double them up on themselves to accentuate an effect. In this case using the watercolor filter on itself added some additional texture and a sort of reticulation pattern to otherwise plain areas.
Here is the image with the first watercolor filter applied.
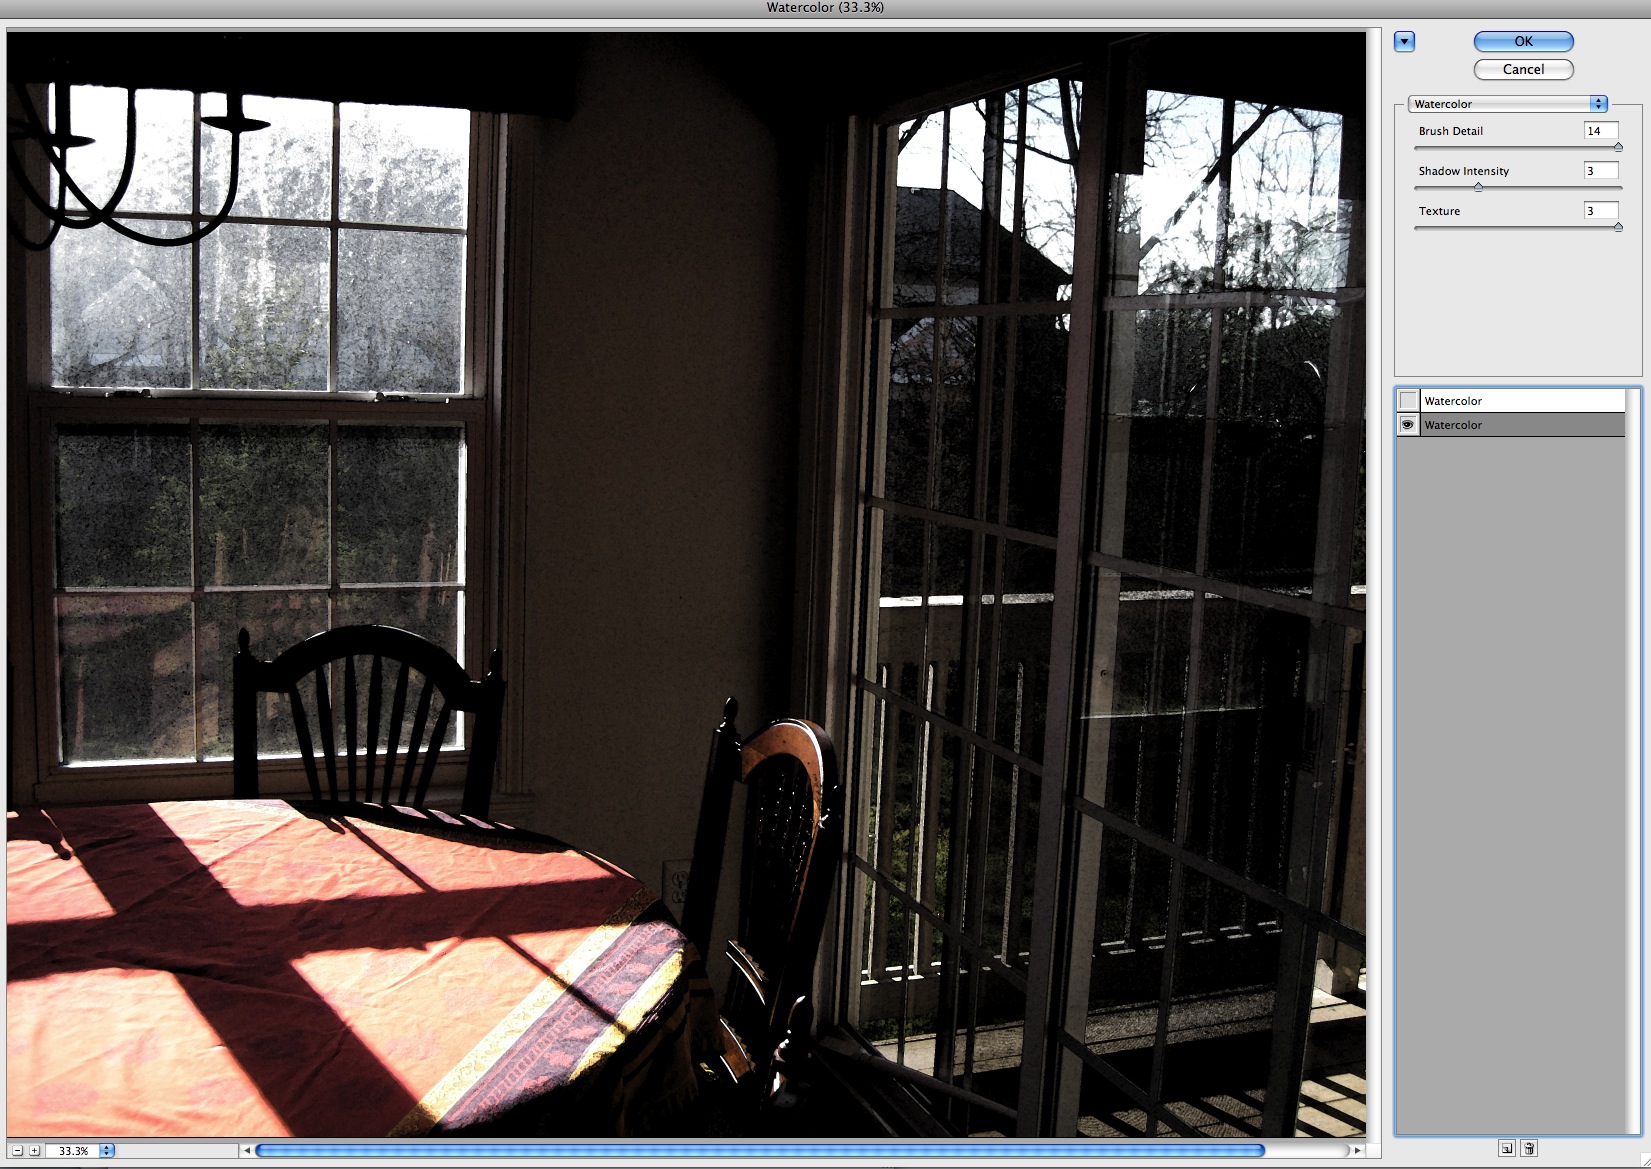
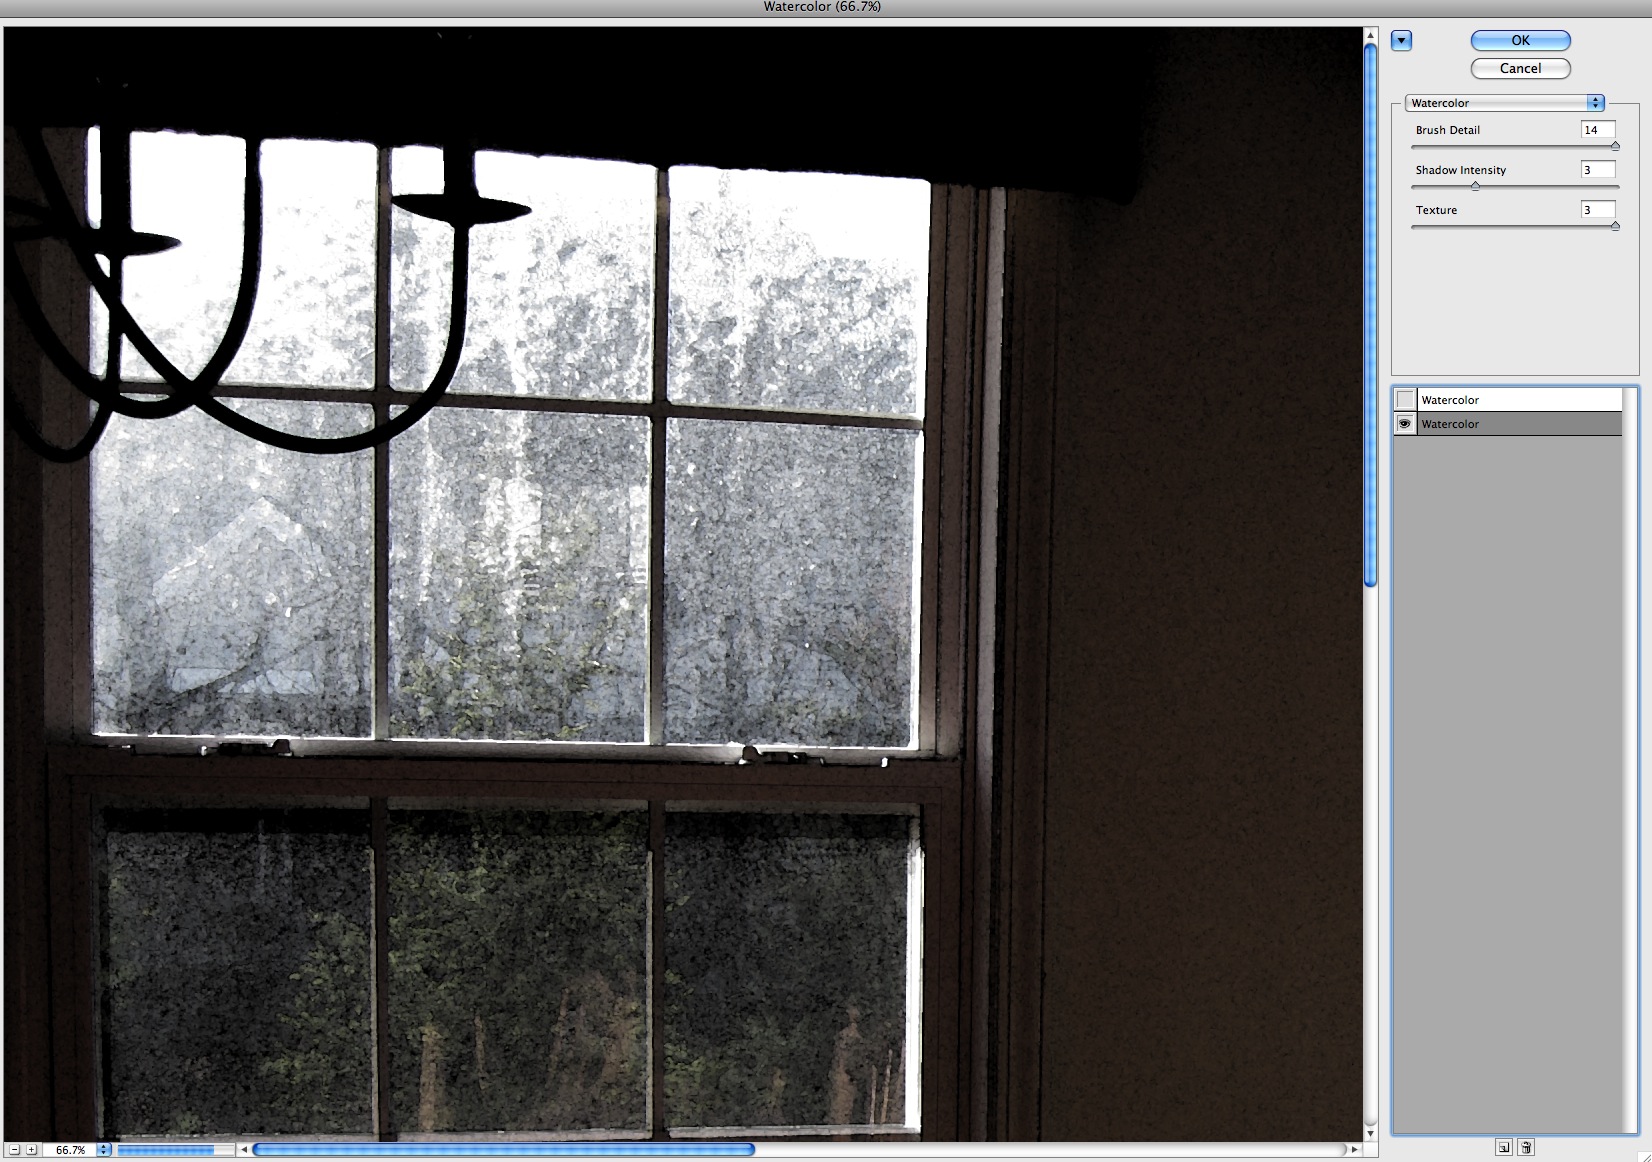
This enlargement of the tablecloth area shows the effect on the wrinkles in the tablecloth using the single watercolor filter layer. This first watercolor filter uses these settings:
- Brush Detail - 14
- Shadow Intensity - 3
- Texture - 3
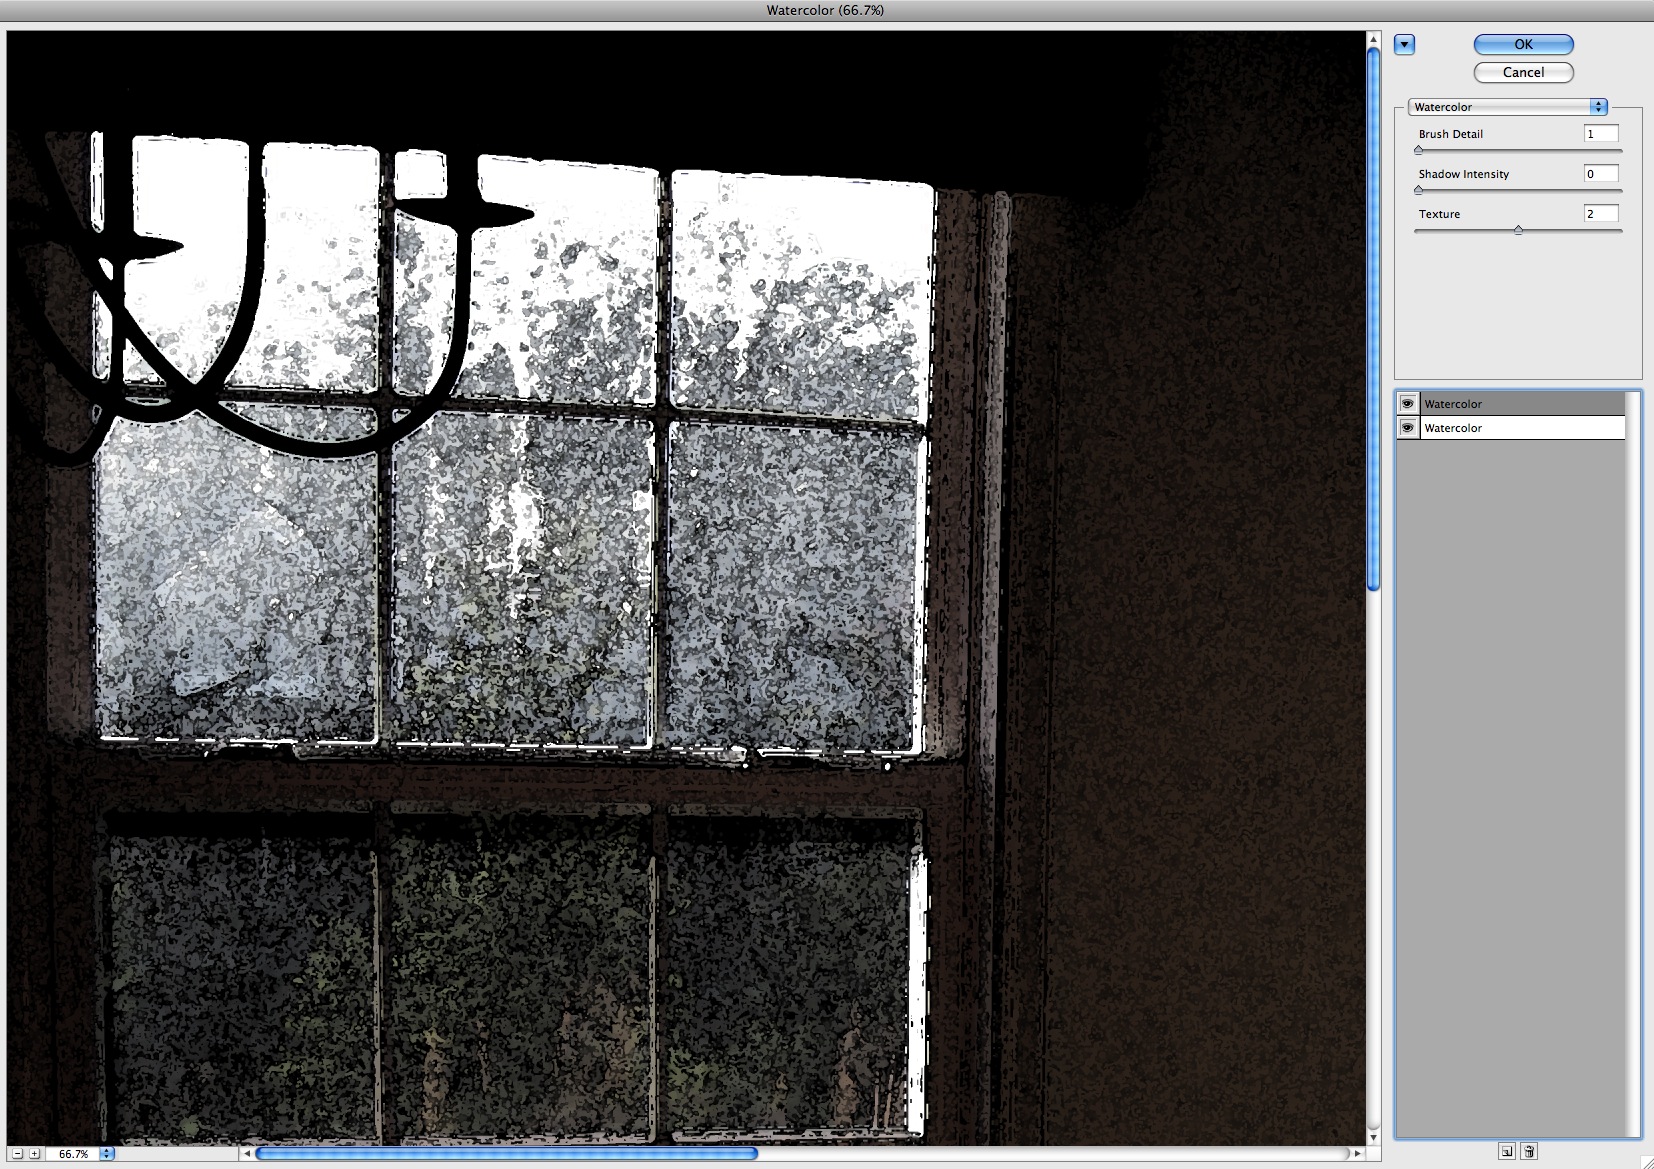
Adding a second watercolor layer on top of itself emphasizes the edges of the shadows on the tablecloth as shown below. The settings for this layer are
- Brush Detail - 1
- Shadow Intensity - 0
- Texture - 2
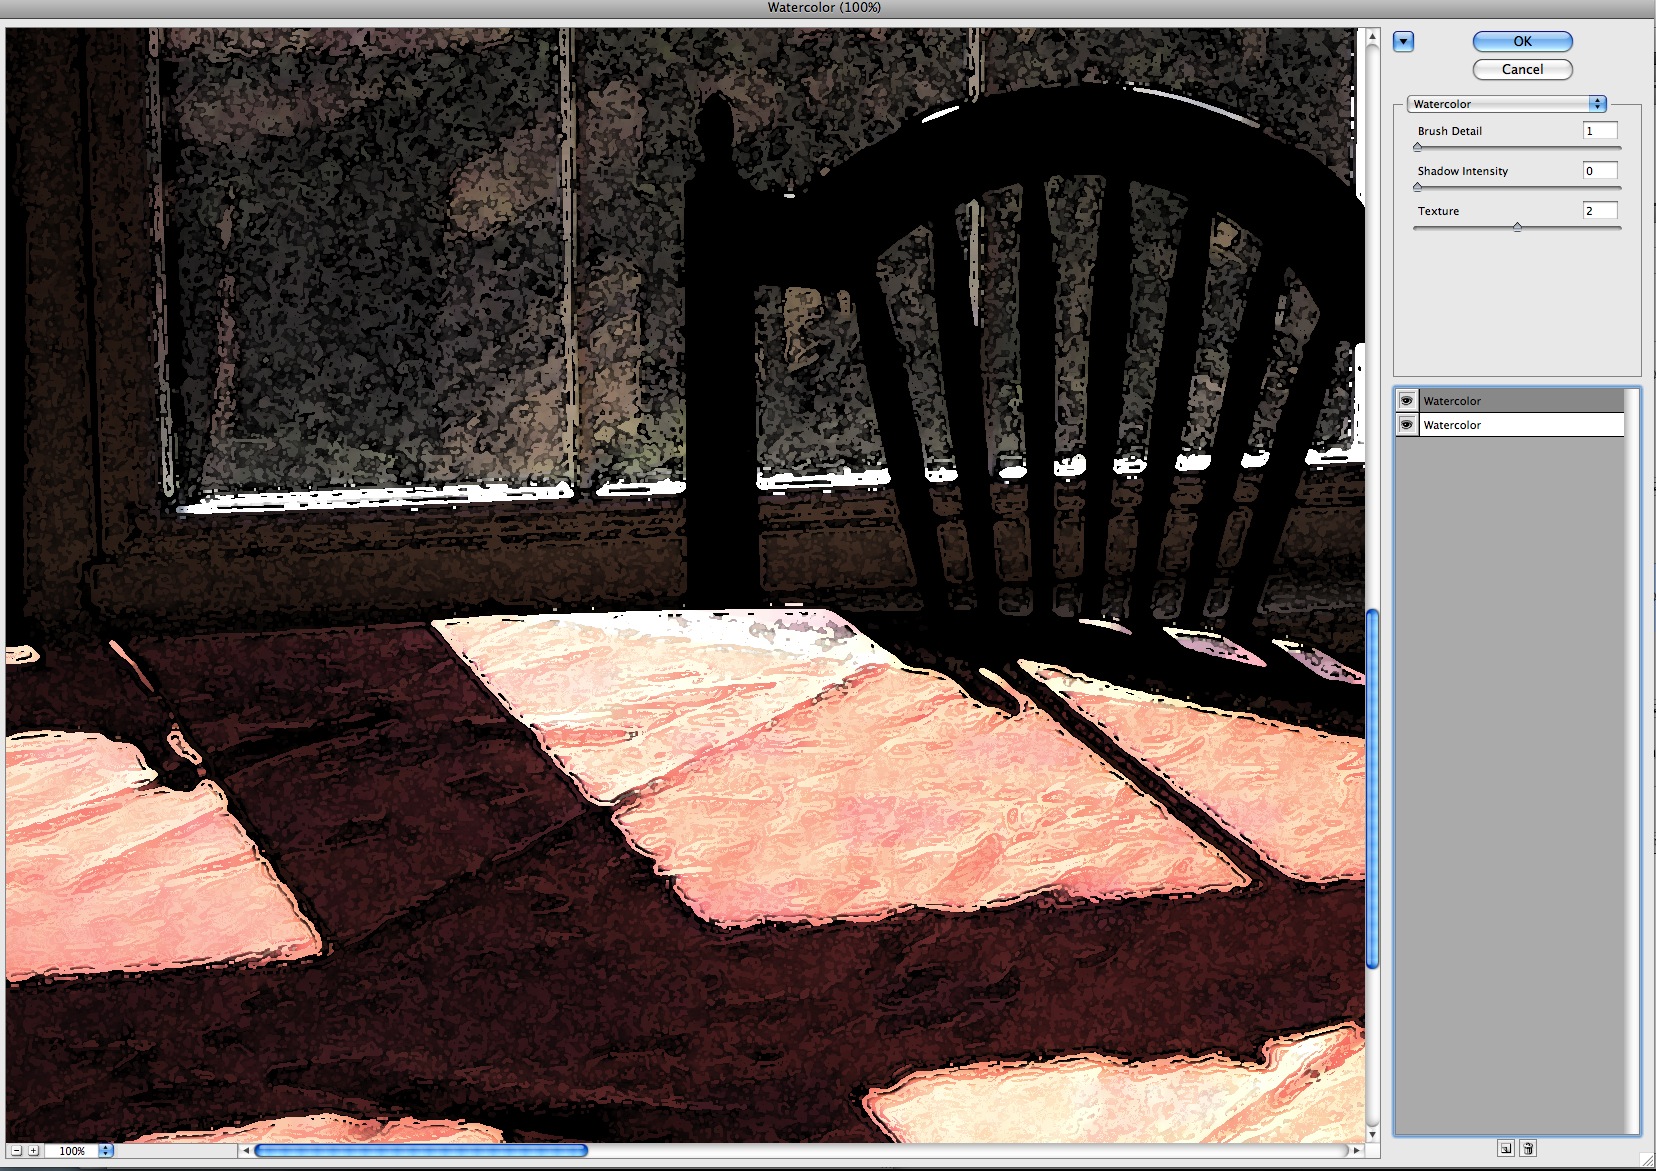
As each of these two alterations is applied, to my mind it makes the scene a little less "specific" to a time and place, and a little more timeless. Arbitrary detail is removed and what is left is the color, composition and interesting texture is added.
Another detail of the shot shows the change in the texture of the window area as successive filters are applied. The first filter greatly increases the contrast between the inside wall and the outside view through the window, but leaves the view through the window an even gray tone.
Applying the second filter adds some textural activity to the window scene and helps separate the bushes in front from the trees behind.
Here is the entire image with both watercolor filters applied. There are still big open areas in the tablecloth, and very little color in the image except in the tablecloth. But their is now also an interesting focal point where the light hits the top of the chair in the foreground.
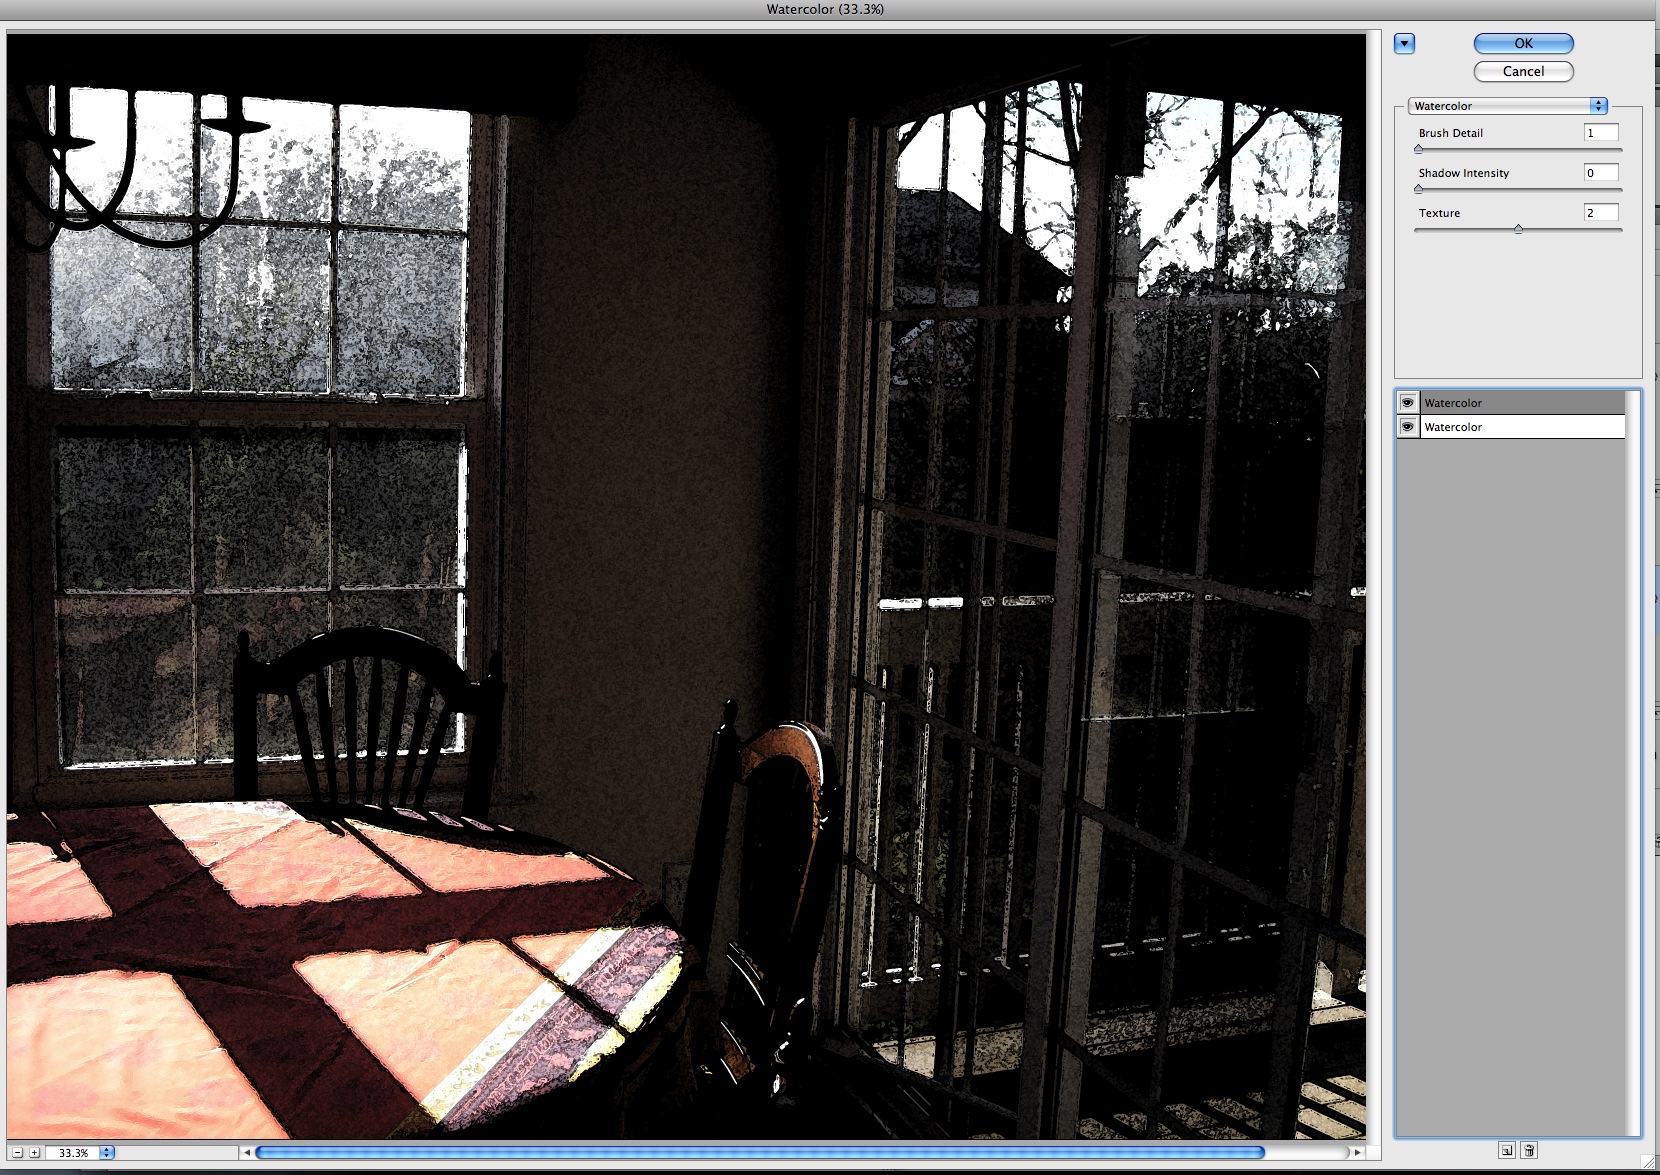
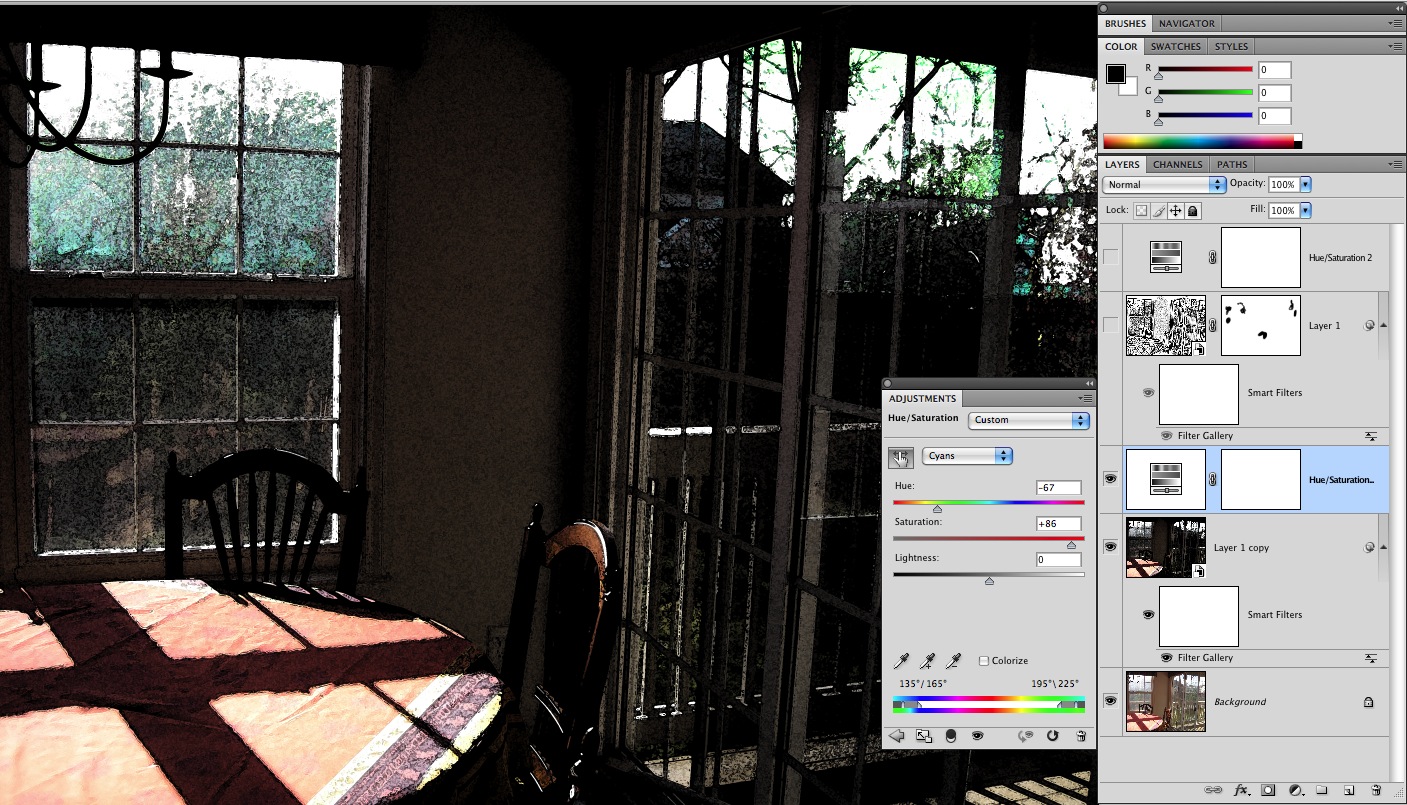
We've also lost almost all color in the windows. There is still a faint cyan tint which can be boosted by adding saturation and a color shift to that color range.
At this point the image looks like this, with a blue/green tint in the window areas.
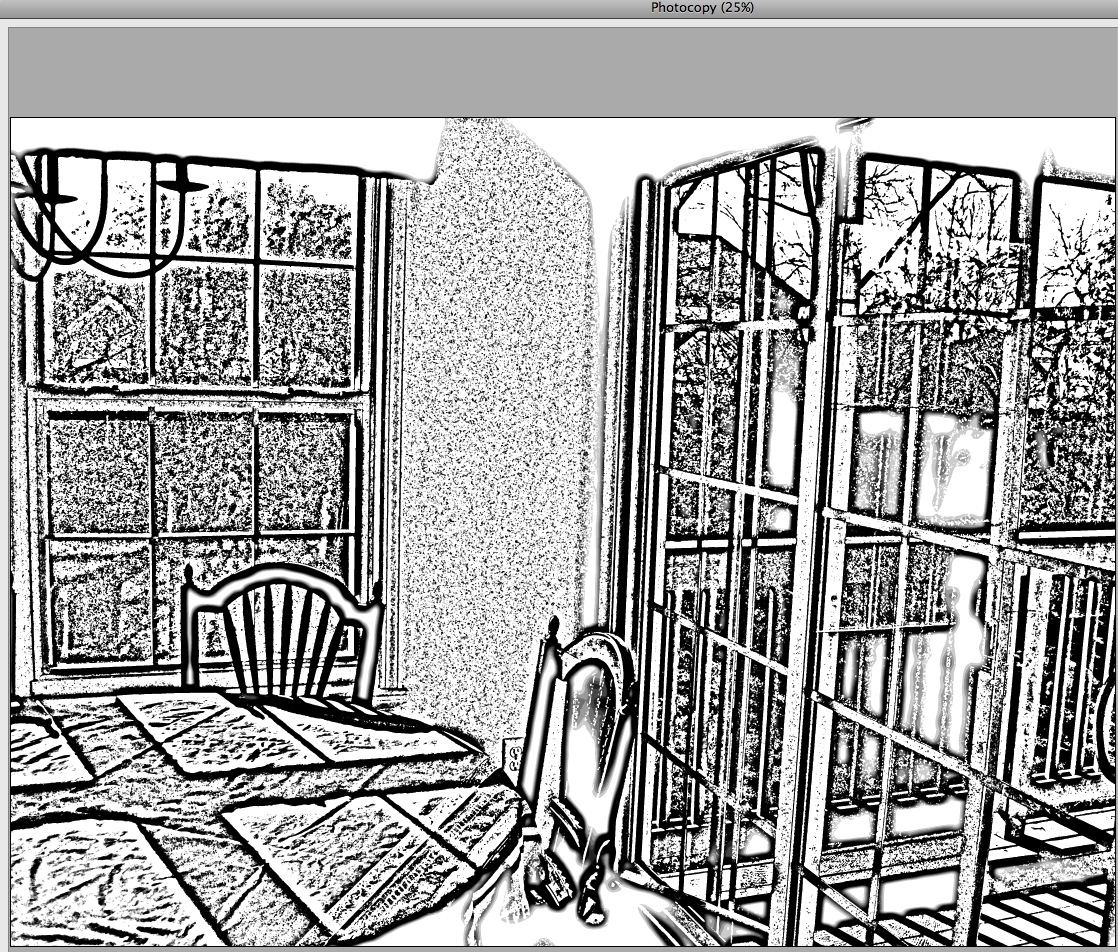
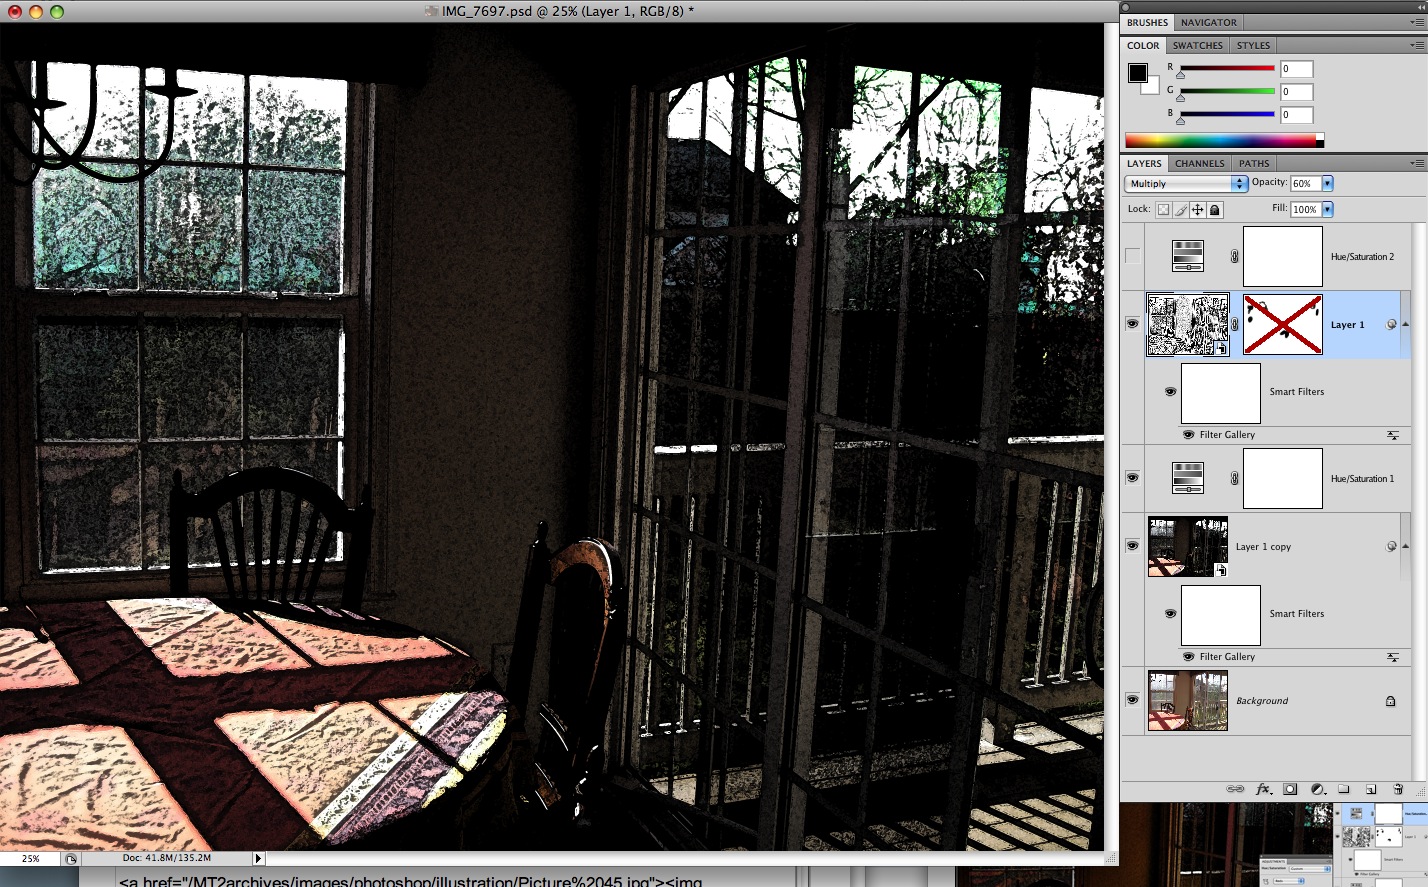
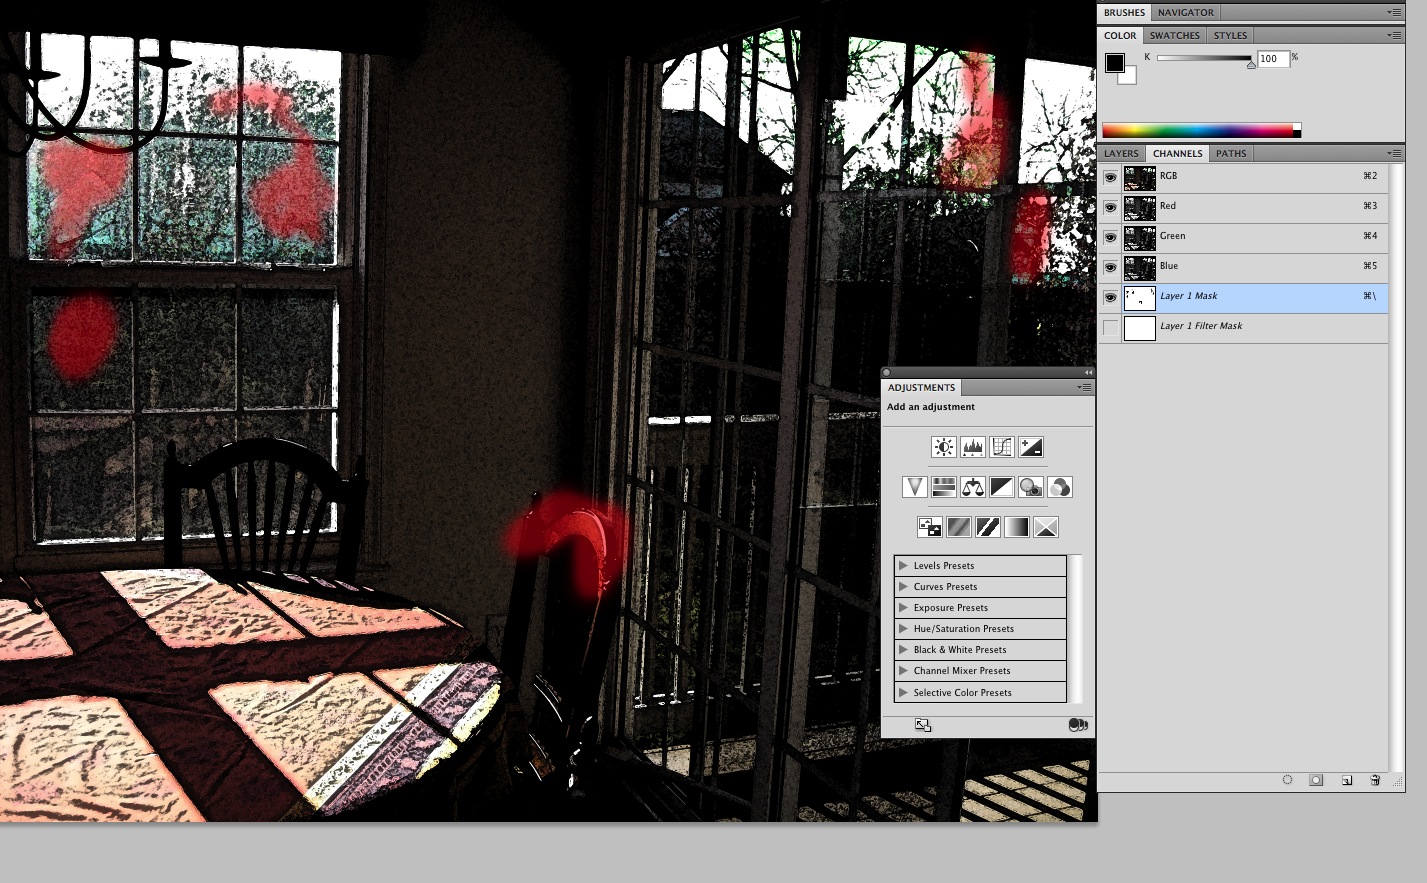
There could still be more textural interest in the tablecloth and windows. I created a new layer, converted it to smart filters and added another multiple filter: Photocopy over Watercolor.


This created a grayscale image that strongly emphasizes the edges of the shadow areas and trees.
I added this in to the picture using the Multiply Blend mode and pulled it back, reducing the layer opacity to 60%.
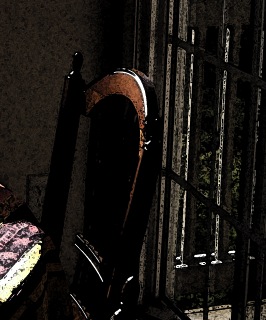
Looking closely at the top of the chair it now looks dirty. The texturing from the grayscale filter went a bit too far in this area and also in the windows: it reduced the amount of color visible there.

Adding a layer mask to the grayscale filter layer allows this problem to be fixed by simply brushing over areas to hold them out from the added texture.
Here's the back of the chair before applying the mask...

...and after.
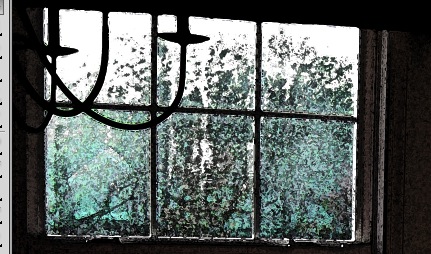
Here's the window area with the mask applied.
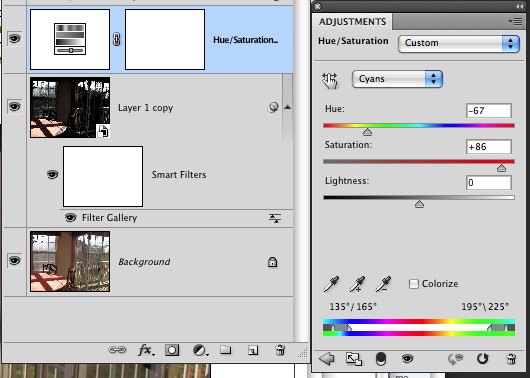
One last color boost is now applied, to the red tones in the image: a saturation layer is applied.

Here is the finished picture:
November 20, 2009
Make a Movie Clip on the Stage appear above a dynamically loaded Movie Clip
A while back, I worked on a flash game that teaches medical professionals how to find objects in a cardiac cart. A cart with 6 drawers isshown at left. When a drawer is clicked, it slides in from the top of the screen so that all the objects inside can be seen. The object of the game is to drag whichever object has been selected at random to a target at bottom right.The original design allowed plenty of room for the drawers to move down to their open position without obscuring the target area.
But as time went on and more requirements came to light, the dimensions of the game had to be shortened so that the drawer overlapped the hand target when it was in its "open" position.

I thought I'd just move the target clip up over the level of the drawer but that turned out to be more complicated than I expected. The drawer is loaded into a loader instance on the stage. To make the hand appear above the loaded clip the hand clip must be added as a child to the loaded clip.
First, declared the symbol as a variable in the Document class, which is to say a variable on the Stage. Then in the loaded clip's INIT event handler function, add
stage.addChild(pathTo.yourSymbol);Doing this means that the loaded clip will be taken into account when determining what the topmost member of the Display list is.
Stage: "Cart" class
public class cart extends MovieClip
	{
	     public static var M:cart; //this instance of the cart class
	     public var loadedSwf:MovieClip;
	     public var theloader:drawerLoader = new drawerLoader();
	     public var closerBtn:MovieClip;
	     public var playAgainBtn:*;
	     public var invisBtn:*;
	     public var currentLoader:Loader;
	     public var isUnloaded:Boolean;
	     public var currentDrawer:Number;
	     public var correctItem;
	     public var currentItem;
	     public var feedbackArea:TextField;
	     public var instructionsArea:TextField;
	     public var xmlItemData:XML;
	     public var itemList:XMLList;
	     public var correctItems:String;
			var ori_x:Number;
			var ori_y:Number;

var checkerTgt:MovieClip;


	     public function cart():void
	      {
	        M = this;
	        M.theloader.x = 310;
	        M.theloader.y = 10;

	        instructionsArea = TextField(getChildByName("instructionsArea_dt"));
	        instructionsArea.text = "loading, please wait...";
	        feedbackArea = TextField(getChildByName("feedbackArea_dt"));
	        closerBtn = MovieClip(getChildByName("closeDrawer_btn"));
	        closerBtn.buttonMode = true;
	        closerBtn.addEventListener(MouseEvent.MOUSE_DOWN, clickCloserBtnHandler);
	         closerBtn.alpha = 0;
	        M.theloader.addEventListener(MouseEvent.MOUSE_DOWN, itemMouseDownHandler);
	         M.theloader.addEventListener(MouseEvent.MOUSE_UP, stopDragItem);
	        LoadXML();
	        M.playAgainBtn = MovieClip(getChildByName("playAgainBtn1"));
	        M.playAgainBtn.addEventListener(MouseEvent.MOUSE_DOWN, chooseAnotherItem);
//setting this up for moving it on top of the loader in drawerHandle.as
	         M.checkerTgt = MovieClip(getChildByName("checkerTarget_mc"));
etc....
INIT event handler in the Loaded clip's class
. . .
	     public function mouseDownHandler(evt:Event):void
		{
	            var currentHandle:String = evt.target.name;
		    dn = Number(currentHandle.substr(12,1));
		    cart.M.currentDrawer = dn;
		    var request:String = ("drawers/drawer"+dn+"moving.swf");
		   _loader = cart.M.theloader;
		   _loader.load( new URLRequest(request) );
		   cart.M.loadedSwf = MovieClip( _loader.content);
 _loader.contentLoaderInfo.addEventListener( Event.INIT, doneLoading );
			  }


	   public function doneLoading(event:Event):void
	   {
           cart.M.loadedSwf = event.target.loader.content;
           stage.addChild( _loader);
	   cart.M.loadedSwf.isInited = true;
//this pops checkertarget up OVER the loader
	   stage.addChild(cart.M.checkerTgt);
           }
November 19, 2009
Can't export more than 30 seconds of Windows Media from Quicktime
In the last year or so, I got used to being able to export to just about any format from Quicktime Pro using Quicktime Conversions. When I upgraded to Snow Leopard, I installed Flip4Mac's Snow Leopard-compatible beta build and tried to export to Windows Media. The speed with which the progress bar was moving was truly awe-inspiring, but it would only complete 30 seconds of the video.
Apparently this is a symptom of a much larger shift by Apple away from the functionality of Quicktime Pro. There IS no Quicktime X pro, as far as I can tell, but you can backtrack and install an optional Snow Leopard-compatible version of QuickTime 7 Pro (assuming you had a Quicktime Pro license previously) from the SnowLeopard Install disk.
It would be interesting to know the strategy behind this, because there are plenty of us that rely on all those features. In any case I installed QuickTime 7 today and the video exported without a problem, and screamingly fast. What a change from the early days of Flip4Mac!
Breakthrough in Down Syndrome - Cognitive dysfunction reversed in mice
Back in the 90's, a woman named Dixie Lawrence made a splash on the internet by describing how her daughter with Down Syndrome experienced improved growth, health and cognition after starting a regimen of nutritional supplements and piracetam. I recall reading that she noticed that her infant daughter was not actually retarded - at least not yet.
Dixie's routine for changing diapers always ended with a playful rub of Madison's stomach. One morning, when Madison was eight months old, a fatigued Dixie said to her, "Well, honey, I'm tired, you're going to have to rub your stomach yourself." And Madison did just that.It hit Dixie like a ton of bricks. She realized that her daughter was not retarded, and that if she wasn't retarded, she would develop retardation. If this was the case, there had to be something that could slow it down or stop it! In a modest bedroom in rural Louisiana, Dixie Tafoya "looked through the telescope," and in spite of what everyone "knew," she saw perfectly round planets. With that insight, she jumped light years ahead of all the "experts."
from Looking Through A Telescope, by Julian Whitaker M.D., Whitaker Wellness Institute
In other words, this was a view of Down Syndrome as a developmental problem, where the cognitive deficits increase with age.
Now studies are confirming the developmental aspect of Down Syndrome's effects on learning. Researchers at Stanford have linked the cognitive deficits associated with Down Syndrome with neuronal breakdown in an area responsible for mediating the formation of memories in the hippocampus. When memories are being formed, neurons in an area called the Locus Coreolus use norepinephrine to carry information to areas of the hippocampus which perform contextual discrimination and allow important learning processes to take place.
When the neurons in the Locus Coreolus break down or don't exist in great enough numbers, contextual and spatially encoded memories can't be created, and it is much harder to learn many types of tasks. Interestingly, what are called "Cued recall" tasks, in which memory is elicited by sensory cues like color or sound, are not affected, because they are controlled by a different area of the brain. As children with Down syndrome age they fall further and further behind because they can't use spatial and contextual information to learn as well as normal children.
It's important to note that the receptors for the neurotransmitters exist, but they simply don't get the chemical messages they need to perform their tasks. The Stanford study used this fact to try to improve learning performance in the mouse model of Down Syndrome by restoring normal concentrations of norepinephrine in the brain, using the norepinephrine precursor drug Droxidopa. The mice, who had cognitive deficits resulting in impaired nesting behaviors improved rapidly.
The authors suggest that it may be possible to treat Down Syndrome-related cognitive disability in humans by improving norepinephrine neurotransmission using targeted drugs such as Droxidopa.
Update: I've recently learned from Dixie Lawrence that her daughter is doing very well, graduating from highschool with a 3.5 grade point average. She also mentions
Never have I said that targeted nutritional intervention "cures" Down syndrome. However, we know enough now to have a prevention level that exceeds or at least equals the prevention level of neuro-tube defects - which is a big deal and due directly to a theory I had that was proven correct in 1999 by a study I participated in with Jill James of the NCTR. "( The study is described in this article in american Journal of Clinical Nutrition)
She goes on to say
"targeted nutritional intervention stopped being a theory many years ago. While it is not called 'standard of care' most parents are provided with the option by their pediatricians."
References
- Science Daily: Cognitive Dysfunction Reversed in Mouse Model of Down Syndrome
- Science Translational Medicine: Restoration of Norepinephrine-Modulated Contextual Memory in a Mouse Model of Down Syndrome: DOI: 10.1126/scitranslmed.3000258
More on Dixie Lawrence , Targeted nutritional intervention, and the research study on maternal risk factors for Down Syndrome, related to abnormal folate metabolism in the mother
- Looking Through A Telescope, by Julian Whitaker M.D., Whitaker Wellness Institute
- Targeted Nutritional Intervention (TNI) in the Treatment of Children and Adults with Down Syndrome
- James SJ, Pogribna M, Pogribny IP, Melnyk S, Hine RJ, et al. Abnormal folate metabolism and mutation in the methylenetetrahydrofolate reductase gene may be maternal risk factors for Down Syndrome, Am. J. Clin. Nutr., 70: 495-501, 1999.
November 16, 2009
Problems with Photoshop filters
Recently I've been using the Photoshop Filter Gallery filters more than usual, and experienced a few apparent problems, particularly with the grayscale filters. First all the grayscale filters suddenly seemed to stop working. All of them showed nothing but a completely blank screen, no matter what settings were tried.
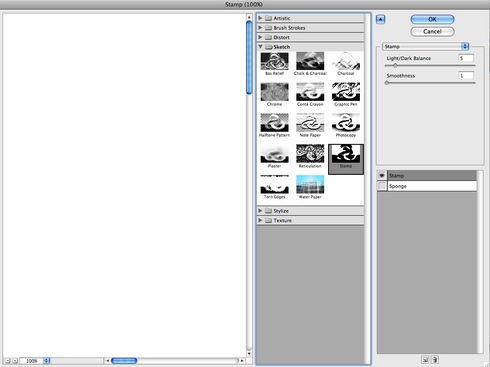
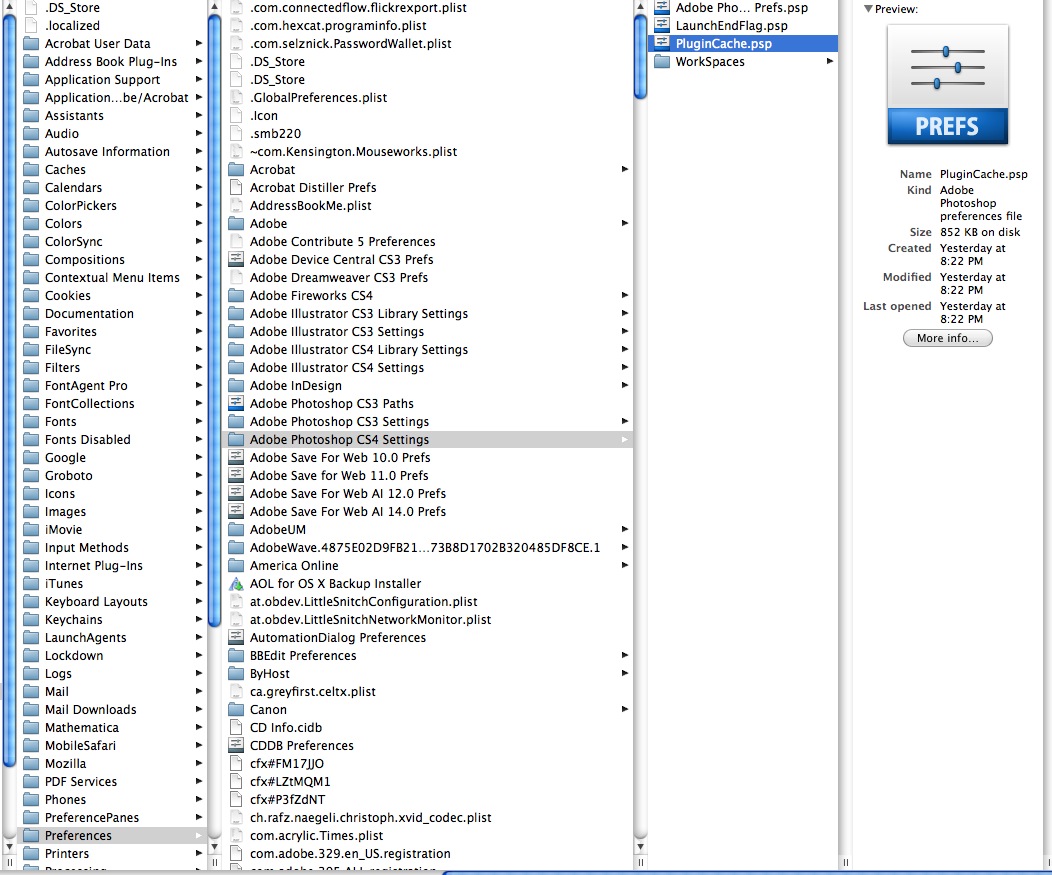
I really thought this was some sort of bug with CS4. But a search of the Adobe forums turned up nothing. Clearing the plugin cache and Filter Gallery preferences reverted the filters to their defaults, and fixed the problem.
Clear the plugin cache: ~/Preferences/Adobe Photoshop CS4 Settings/PluginCache.psp/
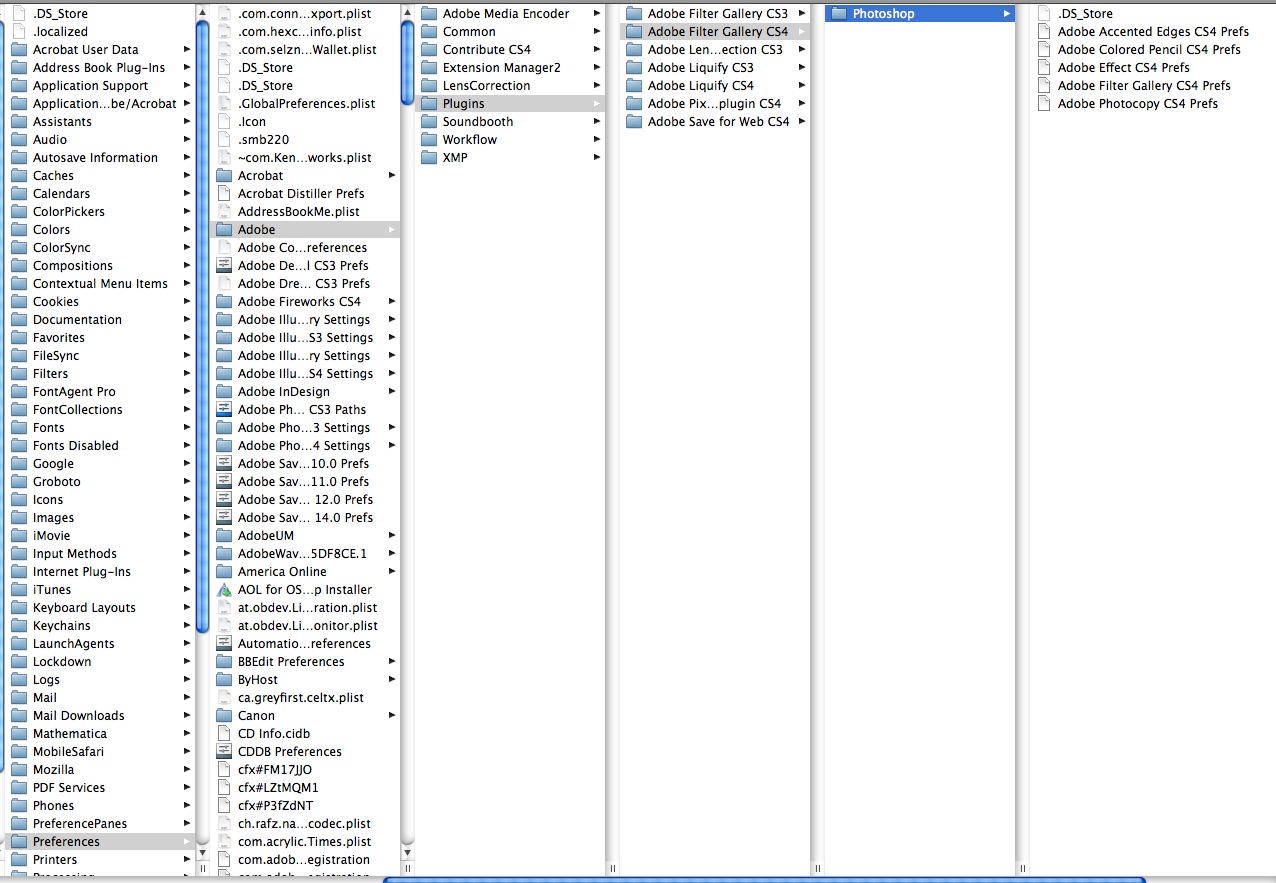
Delete the Filter Gallery preferences: ~/Preferences/Adobe/Plugins/Adobe Filter Gallery CS4/Photoshop/
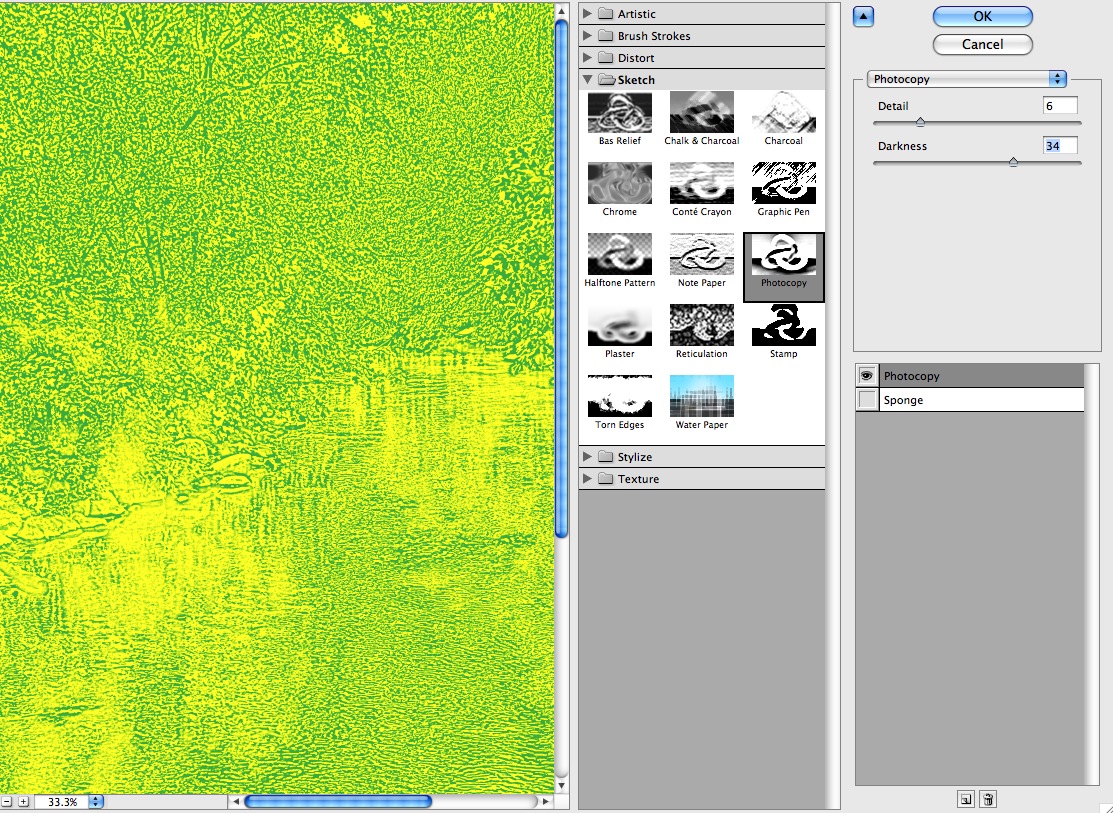
After working well for a while, the grayscale filters began showing up in green! Then I guessed what was really happening. The grayscale filter gallery filters take their colors from the Foreground and Background colors. I must have accidentally clicked a color swatch to turn the foreground green, and that caused the filters to turn green also. When both colors are white, it simply looks like nothing is happening because the image goes blank.
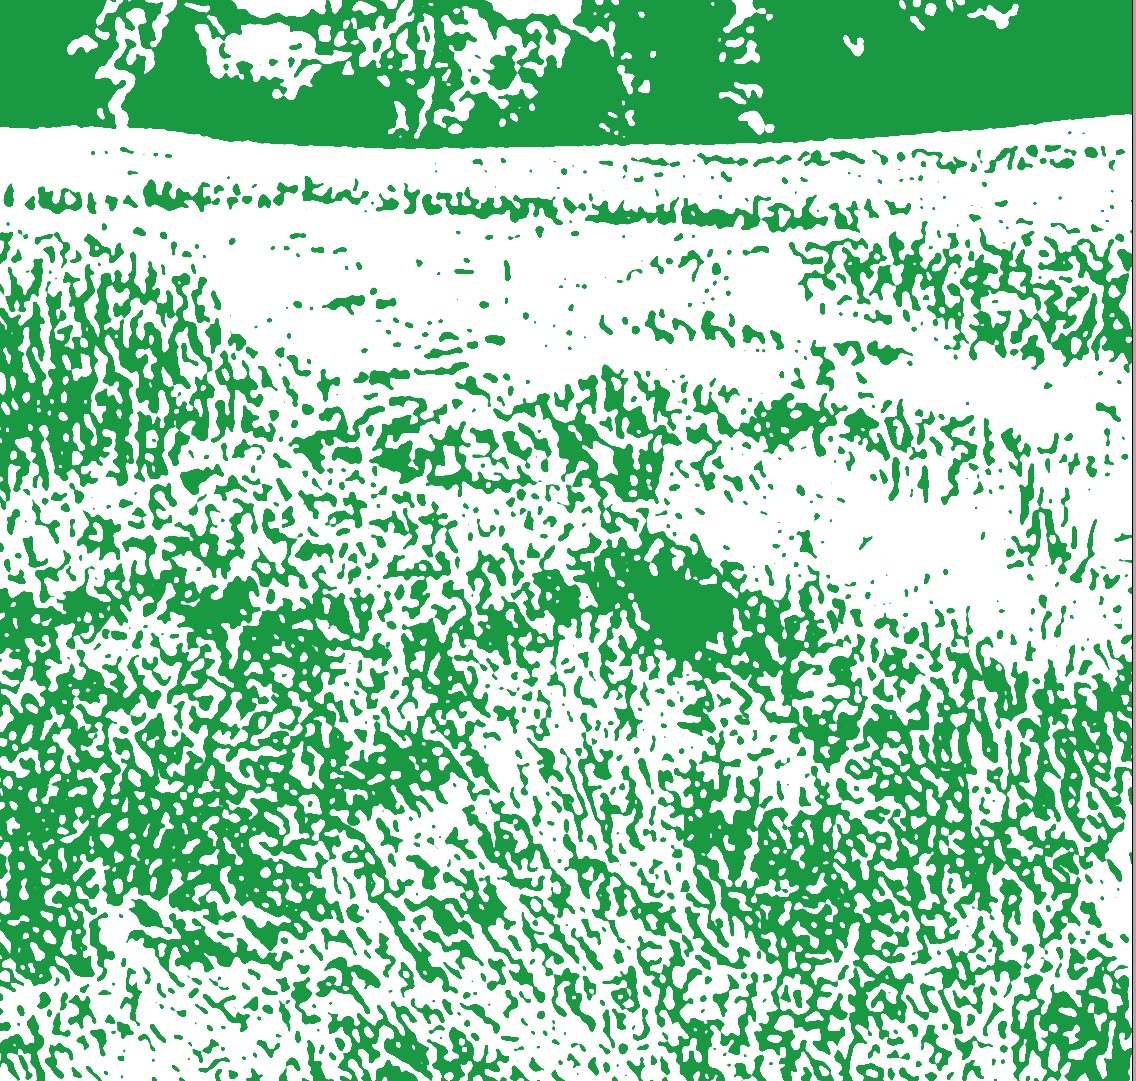
The colors that caused the image above.

So the original "bug" must have been caused by setting both colors to white.

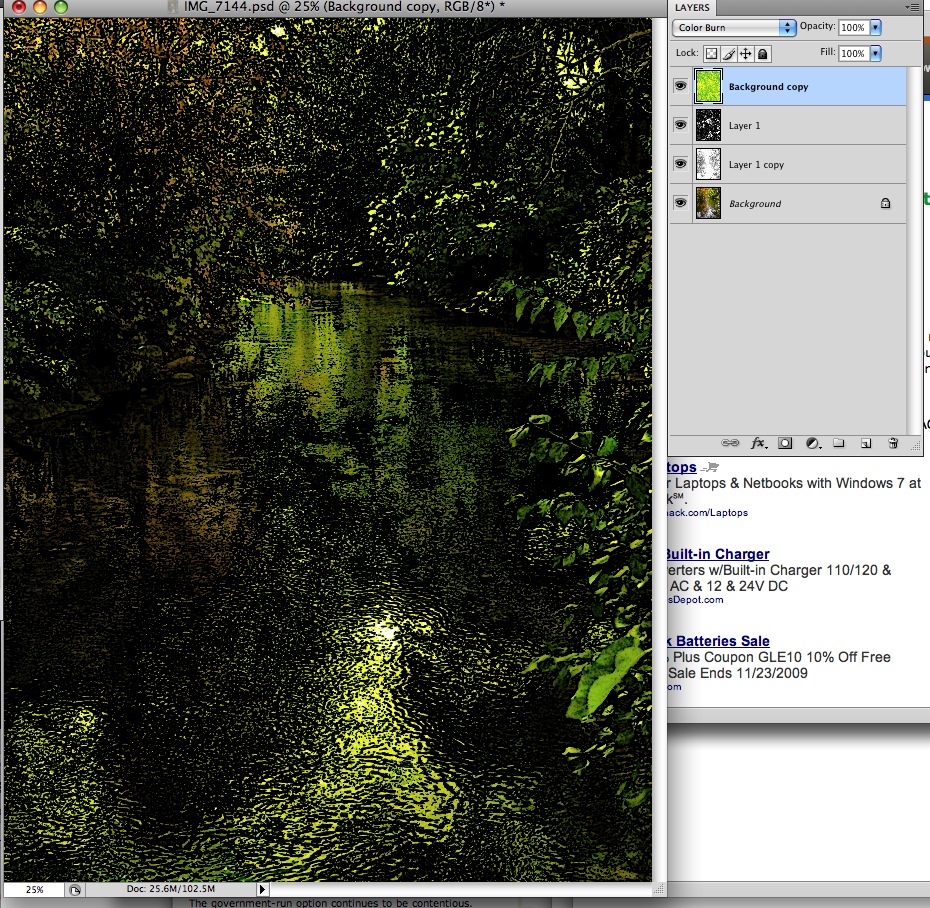
This colorizing feature can be very useful, as shown in the image below. With colors set to bright yellow and green as below...

Use the photocopy filter to create a colorized line drawing of a highly detailed photo - in this case a forest scene.
Composite this on top of other layers to add a sunlit tone to the image, using Color Burn blend mode. In the image below, I've also added a couple of black and white layers in the middle, which are set to allow the background color image to show through using multiply or darken blend modes. This creates a colorized ink drawing effect like an old illustration.
November 13, 2009
Drupal: set up a draggable card sort view - Part 8
<= Back to previous section "Part 7 of 8"Further settings adjustments to your Draggable table
- You may not be happy with the order of the fields in your table. For example in mine, I want the All Terms field over on the left.
- Click the arrows icon next to the word Fields in the middle column.
- Rearrange the fields by dragging them into a new order. Click Update.
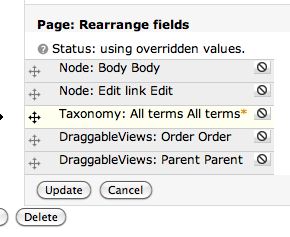
- You probably only want to display certain types of fields in your table, so let's narrow down what can be displayed by adding a filter to the view. Click the + symbol next to Filters.

- For this example we'll use filter using a Node Type, but you may find it more useful to filter using Taxonomy terms to give yourself extra flexibility in displaying exactly the nodes you want to.
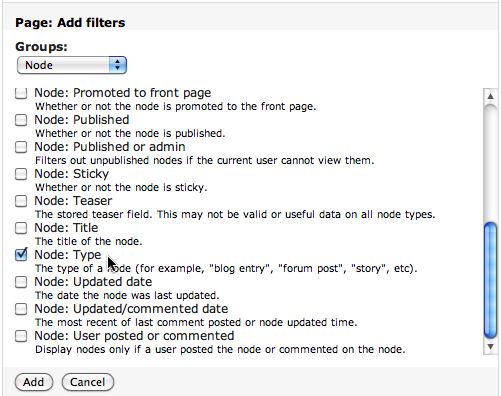
- Select whatever Node type you want to display.
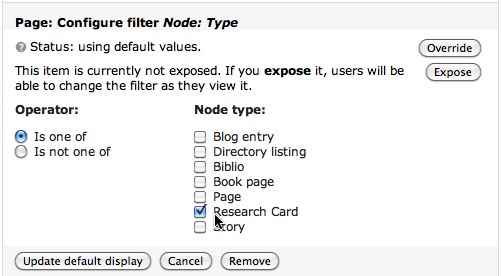
- Click Override, then Update, then be sure to click the Save button!
Congratulations! Your table is ready. Here's the preview of our example table:
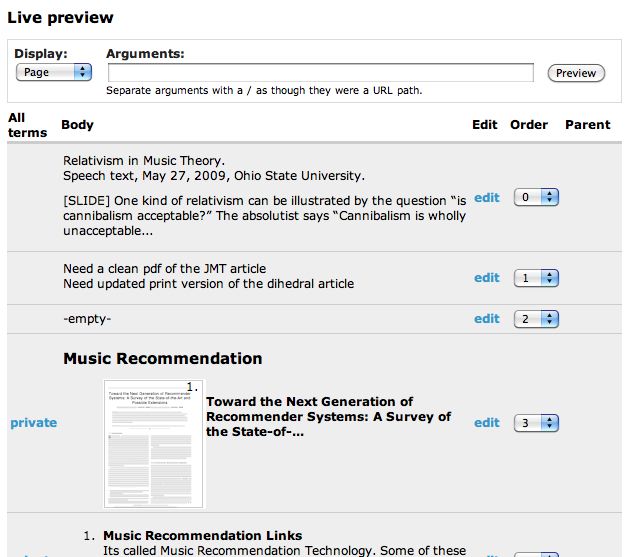
- To see what the real table looks like - which is a bit different than the preview - click View Page or go to the URL you specified when setting the path:

This is the way the real table looks: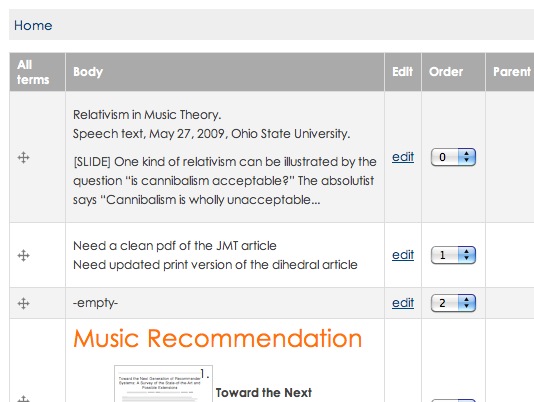
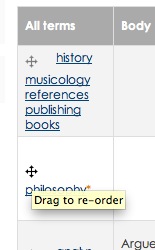
- Closeup of the dragging handles
Drupal: set up a draggable card sort view - Part 7
<= Back to previous section "Part 6 of 8"
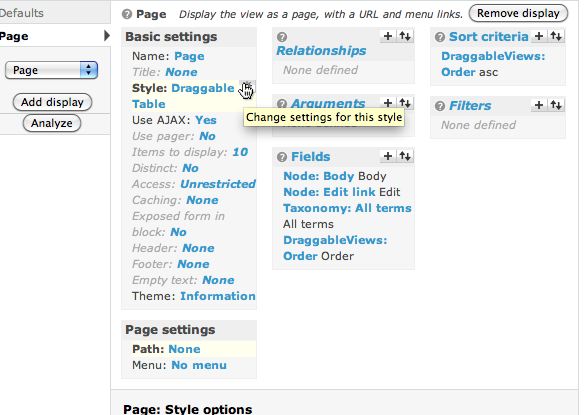
Finish formatting the table.
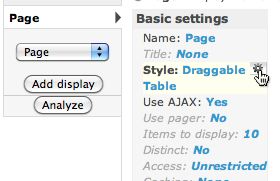
- Click Page > to get back on the Page settings pane.

- Under Basic settings, click the gear icon next to Style: Draggable Table.
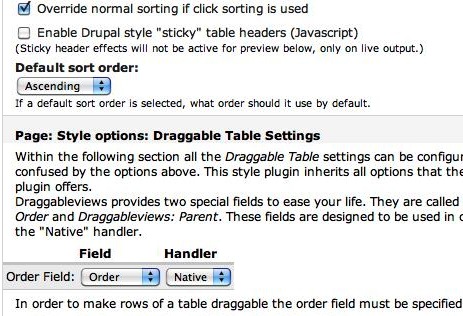
Select Ascending from the Default sort order drop-down menu.
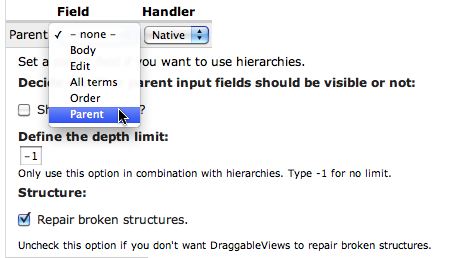
Under Page: Style options: Draggable Table Settings, set the Order field to Order with Native Handler.
- If you are using Parent-child relationships, select Parent from the Parent drop-down list as shown. There is no parent-child hierarchy in the example shown.
- Click Update to save your settings, and remember to click the Save button to save the entire view.
- It will save and change to the Defaults pane. Click back on the Page display pane again. At this point your Live preview shows the table, but will not show the draggable handles. You will not see those until you view the real page.
Continue to next section "Part 8 of 8" =>
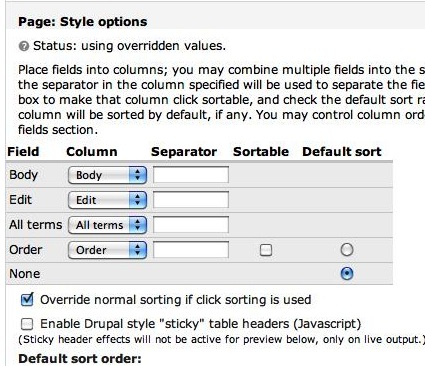
You'll see that the Order field has been added to the list of fields. If you are using Parent/Child relationships you will see the Parent field as well. The default options are correct: The Default sort radio button should be selected next to "None", and "Override normal sorting if click sorting is used." should be checked.
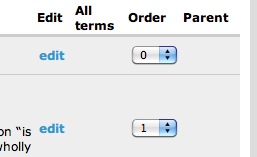
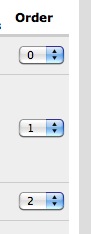
If you left the order field visible back when you added the Order field, you'll see the following choice:

This simply provides another means of re-ordering the rows.
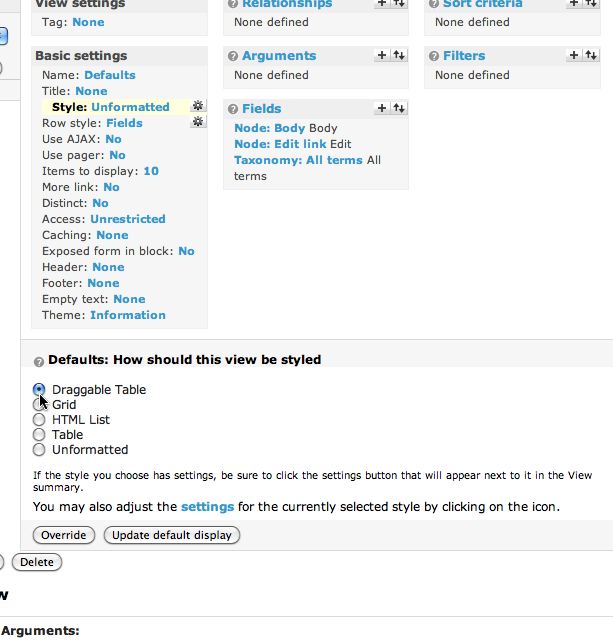
Drupal: set up a draggable card sort view - Part 6
<= Back to previous section "Part 5 of 8"Configuring the Order field.
Click Draggable Views Order to configure the order field.
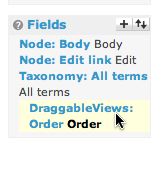
- Click Override. The Update Default Display button at the bottom will change to "Update."
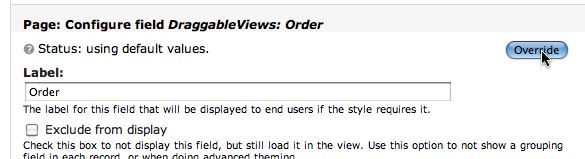
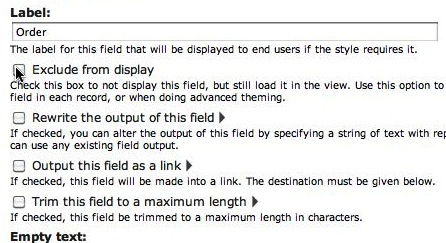
- Click Exclude from display. This will allow the draggable View to USE the order field to keep track of the order of the rows, but it will not show up in the table as a separate cell. In my example screenshots, I leave it exposed so that you can see what it does. Click Update.
- Click Save to save all the changes to the View so far.

- At this point you may want to start previewing your Page display as you make changes. Select Page from the Live Preview drop-down menu and click the Preview button. Your table will show up below.

Drupal: set up a draggable card sort view - Part 5
<= Back to previous section "Part 4 of 8"
Add the sort criteria
- Click the + symbol next to Sort criteria in the right column.

- Select DraggableViews from the drop-down menu under Page: Add sort criteria.
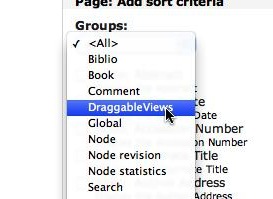
- Check Draggable Views: Order.
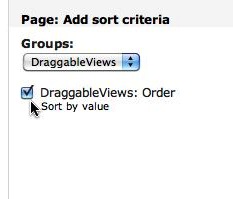
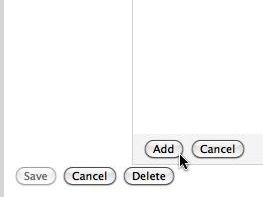
- Click Add.
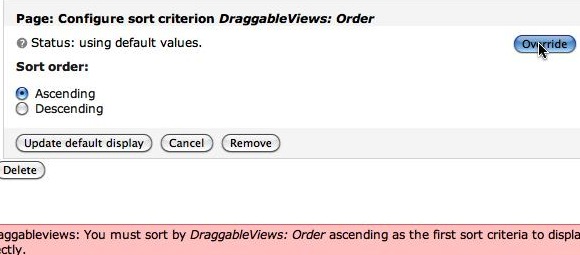
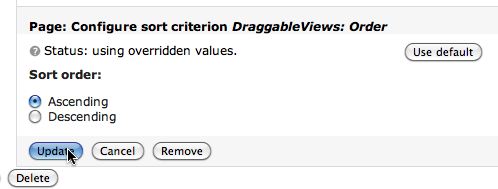
- The Configure sort criterion settings will be displayed for DraggableViews: Order. If you see an Override button, click it, then click the Update button.
- If Status is already set to "using overridden values" you can just click the Update button.
Drupal: set up a draggable card sort view - Part 4
<= Back to previous section "Part 3 of 8"Set up the Draggable table
- Click Page to show the Page settings pane again.
- Click Style: Unformatted to select how the view should be styled.
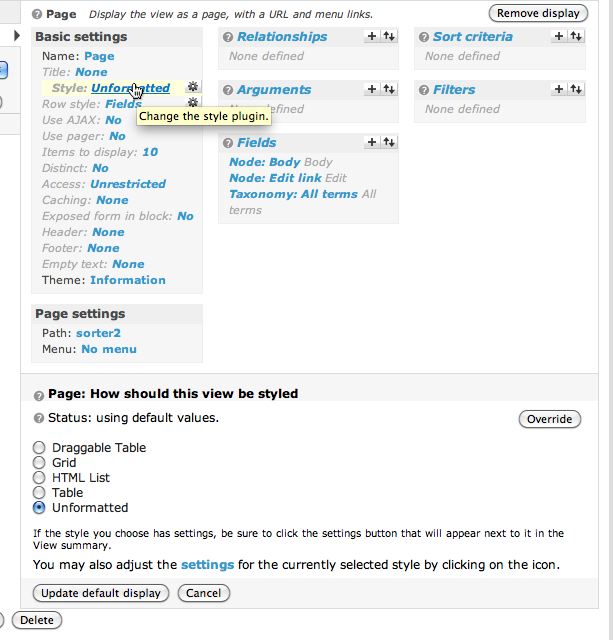
- Select Draggable Table.
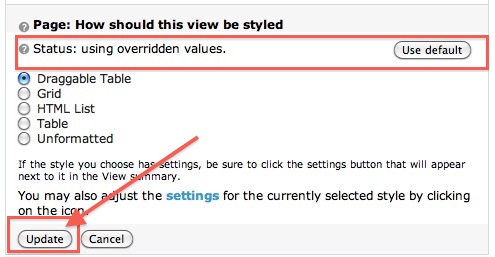
Click the Override button - we are just changing this setting for the Page display.
- When you click Override, a new message will appear: "Status: using overridden values." This indicates that these settings vary from the Defaults.
The Override button changes to Update. Click it AGAIN!
- Click the tiny gear icon next to Draggable Table. This is where you change its settings.
-
Now you'll see a long list of options down below. Ignore it for the moment. First we need to add a new field required by Draggable Views.
Click the + sign to the right of Fields. Select DraggableViews from the Groups menu at the bottom as shown.
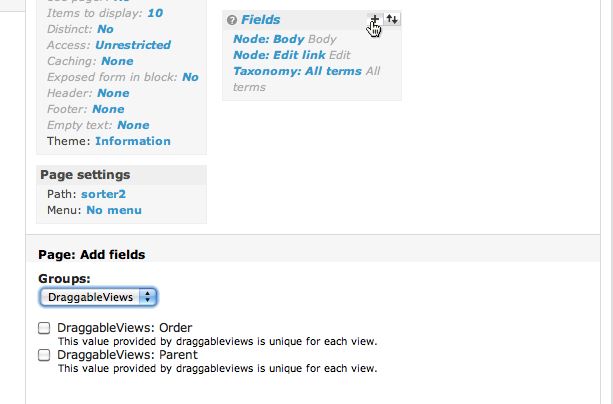
- Check DraggableViews: Order.
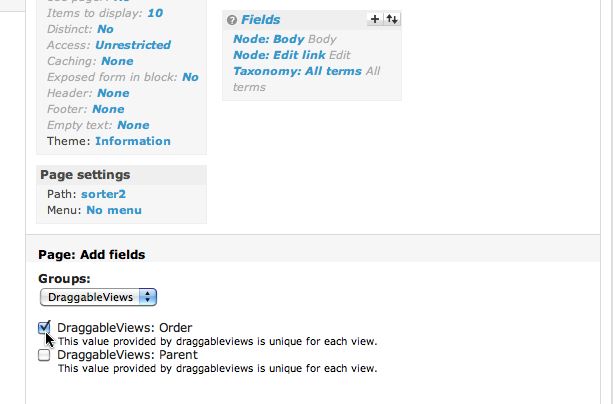
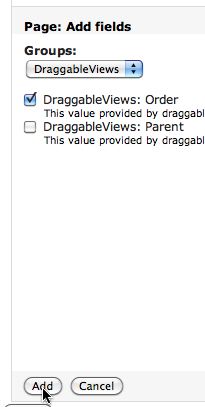
- If you want to be able to use parent-child relationships between the rows in your table (to create a tree structure or outline) check DraggableViews: Parent as well. Click Add.
- The DraggableViews: Order field will be added to the list of Fields in the middle column.
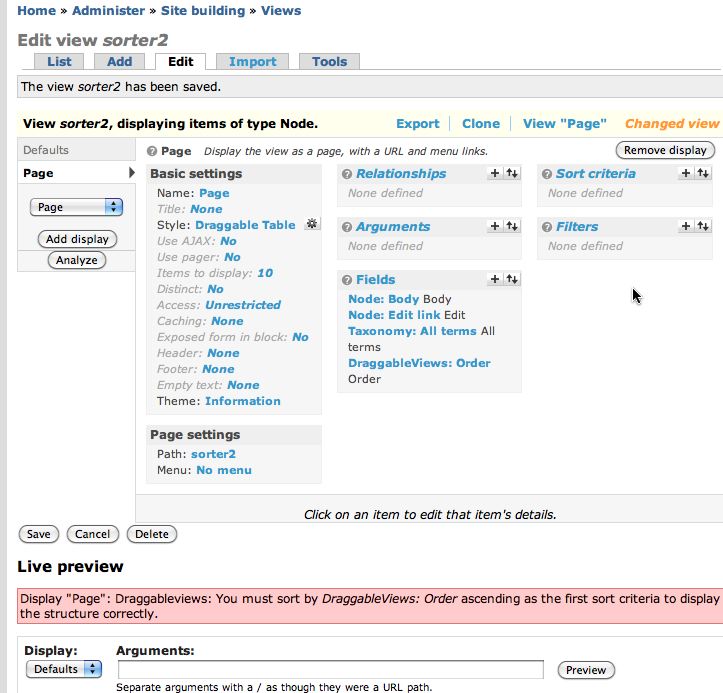
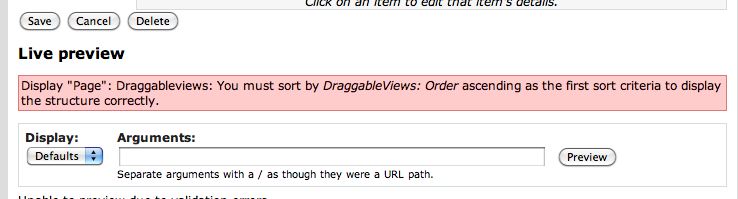
-
Once you add the Order field, you will see the error message shown below: Display "Page": Draggableviews: You must sort by DraggableViews: Order ascending as the first sort criteria to display the structure correctly. All this means is that we need to add the proper sort criteria.
Drupal: set up a draggable card sort view - Part 3
<= Back to previous section "Part 2 of 8"- Once the fields have been selected, each can be configured with display and behavior settings.
Under Fields, click the blue text "Node: Body" to view the settings for that field. If you wish, enter some text that will be displayed if there is no body text in a node or, alternatively, check "Hide if empty."
(see below)
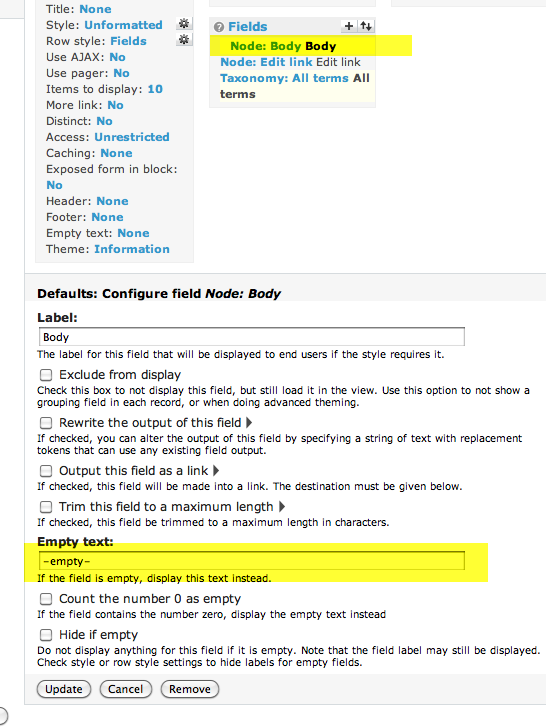
- In the Page: Configure field Node: Body settings, check Trim this field to a maximum length and enter "250" in the box. Leave Trim only on a word boundary and Add an ellipsis checked by default. Click Update.

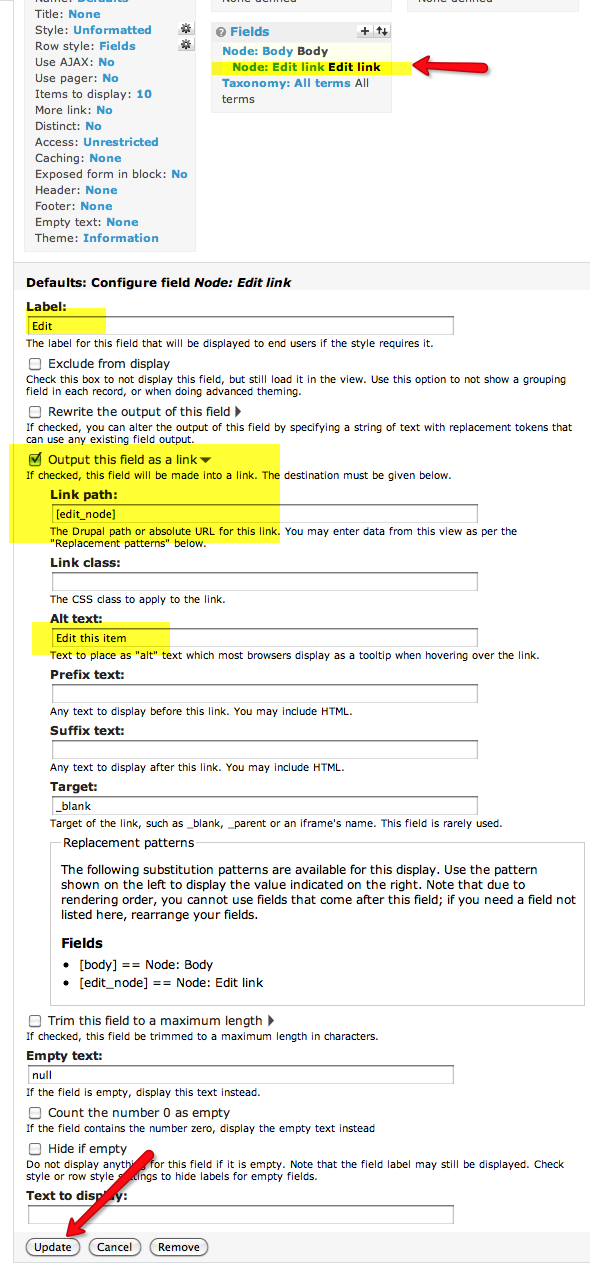
- Click Node: Edit Link to display the settings for the Edit link field.
Change the Label to whatever you prefer - this is what will show up as the text of the link.
Check Output this field as a link.
Set the link path to [edit_node].
Click Update.
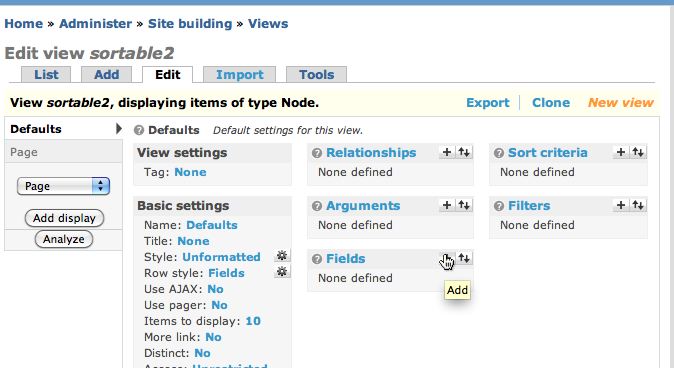
- That's enough Defaults settings for now - we can alter them later if needed. Now we'll create the full page format version of this View. Select Page from the drop-down menu in the left column. Click Add display to add the new Page display.
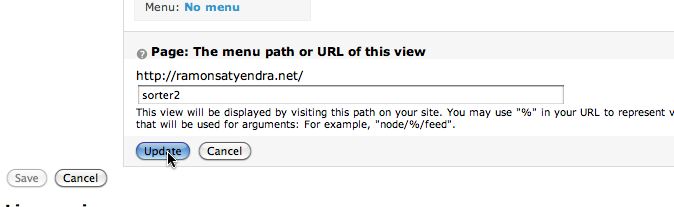
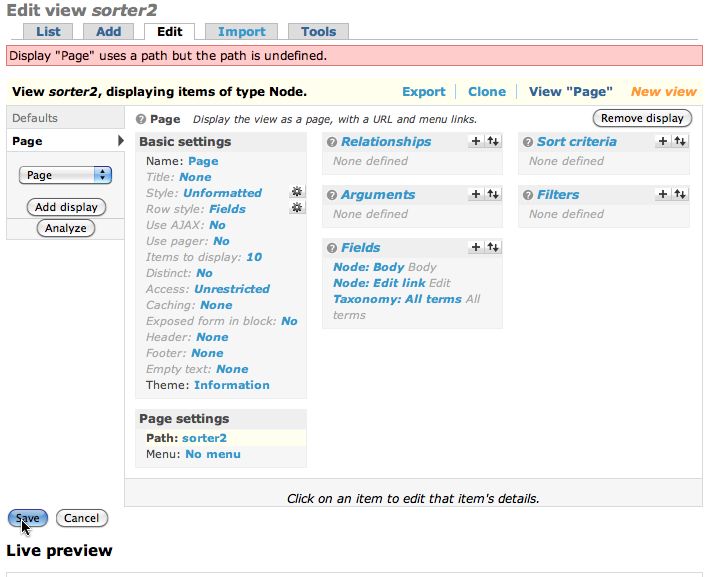
You will see an error: "Display "Page" uses a path but the path is undefined." To fix that, simply add a path. Under Page settings, click the word None as shown:
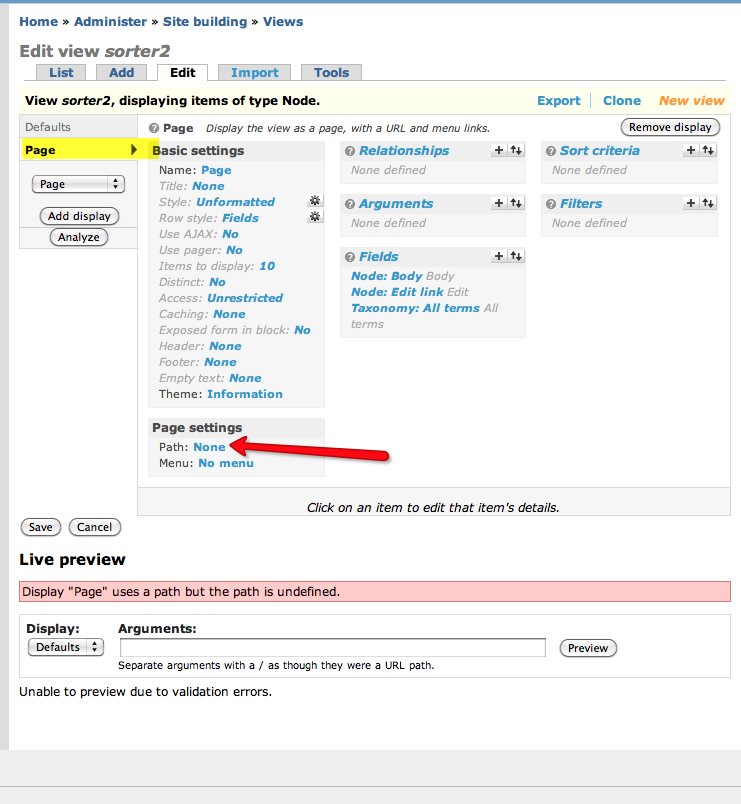
- Enter a name for the path. Click Update. This updates the Page format, but does not save the entire View.
- Since the changes to the view have not yet been saved, the error is still displayed. Click Save at bottom left to save the View and the error message will go away. It will switch back to the Defaults settings pane.
Note: It is fairly easy to get confused between saves, updates, overrides, etc. I've tried to emphasize them in this tutorial, so it becomes more comprehensible.
Drupal: set up a draggable card sort view - Part 2
<= Back to previous section "Part 1 of 8"Add some fields to the view
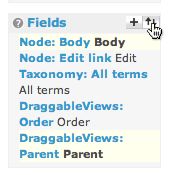
- Our new View needs some data to display or it's not going to be very useful, so first we need to select the fields that will be incorporated into the View. Click the + symbol by Fields in the middle column.
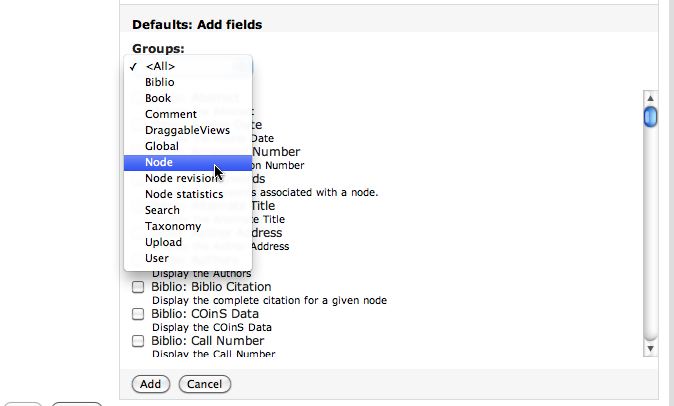
- You'll see a very long list of all the fields available to be used by a View. Fortunately you can filter the list to make it easier to find the fields you want.
Select NODE from the Groups menu.
- Check the boxes beside Node: Body and Node: Edit link
Click Add.
- Click the + symbol next to Fields again. Select Taxonomy: All terms. This means we want to list all taxonomy terms associated with the node.
Click Add.
Continue to next section "Part 3 of 8" =>
Posted by ellen at 2:53 PM
November 10, 2009
My Creative Commons Images
All my public images on Flickr are licensed under the Creative Commons. You are free to share and remix them as long as you attribute them to me by including a link back to the original flickr page or by including the following link code back to this page:
<a href="http:thedesignspace.net/MT2archives/000704.html" target="_blank">Photo by ellenm1</a>
View the pictures that have been used so far
Random images from my collection by subject:
| "Nature" or "Landscape" |
November 4, 2009
Acer Aspire One charge light does not light up and battery does not charge
My Linpus Acer Aspire One was laying idle for a few months, then I pulled it out to use it, and was dismayed when it would not charge. The orange battery charging light would flash for a second, then turn off.
Problem 1: The Acer would not power up with the AC adapter.
After scanning the web for a while, it appeared there were several possible reasons for this:
- Bad battery
- Bad AC adapter
- BIOS update needed
- Loose jack on the motherboard, necessitating service.
The easiest possibility to deal with was to assume that the AC adapter cable had gone bad so I ordered a new one. Fortunately they are inexpensive. I found one through Buy.com for a total of $19.84 including the shipping and handling.
It showed up after a few days and worked like a charm. But I still wasn't out of the woods.
Problem 2: Once the Aspire One booted up, it still would not run unless it was plugged in - the battery would not charge.
The power indicator said "battery: 100%" but it was clear that the battery had not charged at all. At that point I decided to try the recommended BIOS update. That turned out to be pretty easy. I downloaded the BIOS updater for the AOA110 from Acer's site here. To use, you will need a USB thumb drive. Open the archive, and find the file 3310.fd inside the folder "Dos_Flash". Change the name of the file to zg5ia32.fd. Copy zg5ia32.fd and Flashit.exe to USB flash drive. Be sure the AC adapter is plugged in. Insert the USB flash drive into a USB port. Press and hold down the Fn and Esc keys together and press the power button. When the unit's power light comes on, release the Fn and Esc keys. The power light will start to blink. Let it run, and after 1-7 minutes, it should reboot and the BIOS will be updated.
At this point, you should see the battery icon in the task bar is now indicating charging - it will show a few percent charged after about 5-10 minutes.
If the battery still will not hold a charge, the battery may need to be replaced, or the netbook may need service.
copy all the files from inside the folder "Dos_Flash" to the thumb drive.
Lessons learned: Do not leave the Acer idle for too long. Start it up once a week, at least.
Resources