October 30, 2009
Infinite JW FLV players on a page, with error catching for Red5 bug
NOTE: this has been revised to make it more flexible, and allow multiple streamers and multiple video types, using the same code.
This is a script that allows you to add as many JW FLV players to a page as you want, using a single block of code. The players all have separate event listeners to keep them from interfering with each other. Events or actions executed in one player do not affect others.
This particular demo also corrects for a problem we have noticed recently with Red5, where RTMP streams will hang with a "BUFFER.EMPTY" status code. I've set up meta-monitoring so that it catches "BUFFER.EMPTY" codes and starts the player up again a little bit previous to the break. It creates player names and function names dynamically, based on how many players you request. If this function seems to be giving you problems, if your videos start jumping back and restarting a lot, search for the following line and comment it out by adding "//" in front of it:
window["player_"+obj.id].sendEvent('SEEK', parseInt(window["positionarray_"+obj.id][3])+100);
We've also had problems with some videos that simply refuse to stream, although they will play using progressive download. You can use a mixture of streaming and non-streaming by altering the playlist for each video.

Instructions
In the head of the document, add and alter this line to point to your copy of swfobject.js
<script src="swfobject2.1.js" type="text/javascript"></script>
In the body of the document, add this placeholder code wherever you want players to appear. Name them "placeholder001, placeholder002, placeholder003, placeholder004", etc for as many players as you need. Number them in order - do not skip any numbers. Start with 001. Every placeholder must have a unique name.
<div id="placeholder001"></div>
Make an xspf playlist for each player called "playlist1_1, playlist1_2, playlist1_3" etc. The number that comes right after the word "playlist" represents the page (in case you are making multiple pages with multiple players on them), and the number that comes after the underscore represents which player out of all the players on that particular page. So player 5 on page 1 would be "playlist1_5".
<?xml version="1.0" encoding="utf-8"?>
<playlist version="1" xmlns="http://xspf.org/ns/0/">
<trackList>
<track>
<title>Video Title goes here</title>
<creator>50-75</creator>
<annotation>Proper Use</annotation>
<location>chloraprep.flv</location>
<type>rtmp</type>
<image>media/Poster.jpg</image>
<meta rel="start">0</meta>
<meta rel="duration">1553</meta>
<meta rel="tags">tag1,tag2,tag3</meta>
<meta rel="streamer">rtmpt://yourstreamingserver.com:80/oflaDemo/topicfolder/</meta>
</track>
</trackList>
</playlist>
Add a call to the init() function to the body tag:
<body onload="init();">
If one or more of your videos do not stream well for some reason you can alter the playlist to use a blank "streamer" and type "video" instead of type "rmpt", so that it will be a progressive download file. Note that if you do this your server must be set up to correctly serve FLV files (see this technote for more information).
<?xml version="1.0" encoding="utf-8"?>

<playlist version="1" xmlns="http://xspf.org/ns/0/">

<trackList>

<track>

<title>Video Title</title>

<creator>place holder</creator>

<annotation>Placeholder</annotation>

<location>http://yourwebserver.com/pathto/yourfile/videofilename.flv</location>

<type>video</type>

<image>media/Poster.jpg</image>

<meta rel="start">0</meta>

<meta rel="duration">913</meta>

<meta rel="tags">tag1,tag2,tag3</meta>

<meta rel="streamer"> </meta>

</track>

</trackList>

</playlist>
Add this script just before the closing </HEAD> tag. Change the settings and width and height of the player (see red text)
<script type="text/javascript"> var playerscount = 2; //how many players do you want? var page = 12;//give it a unique number to distinguish these players from players on other pages./* ********set these settings appropriately for all the players ****** */ var positionarray = new Array("","","","",""); function createPlayer(thePlaceholder,thePlayerId,theStreamer, theFile, theAutostart) { var flashvars = { streamer:theStreamer, file:theFile, autostart:theAutostart, repeat:'none', shuffle:'false', volume:'50', icons:'none', playlist:'none', debug:'console', bufferlength:5 } var params = { allowfullscreen:"true", allowscriptaccess:"always" } var attributes = { id:thePlayerId, name:thePlayerId } swfobject.embedSWF("includes/jw_media_player/player-licensed.swf", thePlaceholder, "350", "282", "9.0.115", false, flashvars, params, attributes); //alert('thePlaceholder'+thePlaceholder+'\n thePlayerId= '+thePlayerId+'\n theStreamer= '+theStreamer+ '\ntheFile= '+ theFile + '\ntheAutostart= '+theAutostart); }//end function createPlayer
/* ********don't touch anything below this line. ****** */ function init2() { for (var i=1; i<=playerscount; i++) { createPlayer("placeholder00"+i, "player"+i, "", "media/playlist"+page+"_"+i+".xml", false ); window["player_player"+i] = window.document.getElementById("player"+i); //dynamic variable names using window[] } }; function playerReady(obj) { for (var i=1; i<=playerscount; i++) { var tm = 'window["timeMonitor"+i]'; var mm = 'window["metaMonitor"+i]'; window["player_"+obj.id].addModelListener('TIME', 'tm'); window["player_"+obj.id].addModelListener('META', 'mm'); window["positionarray_"+obj.id]=new Array("","","","",""); // alert('obj.id='+obj.id); } };
function tm(obj) //dynamic function names using window[] { console.info(window["positionarray_"+obj.id]); window["positionarray_"+obj.id].push(obj.position); window["positionarray_"+obj.id].shift(); if((obj.position > 0) && (seekFlag)) { seekFlag = false; window["player"+obj.id].sendEvent('SEEK', seekto); } window['currentTime'+obj.id] = obj.position; }; function mm(obj) { //alert('in metaMonitor'); window['currentCode_'+obj.id] =obj.code; //alert( obj.id +obj.position); // if (window['currentCode_'+obj.id]=='NetStream.Buffer.Empty'){ //alert('player_'+obj.id+' is at buffer.empty'+window.positionArray[3]); //alert(parseInt(window["positionarray_"+obj.id][3])); window["player_"+obj.id].sendEvent('SEEK', parseInt(window["positionarray_"+obj.id][3])+100); //bugfix for red5 bug - under testing. //window["player_"+obj.id].sendEvent('STOP'); // window["player_"+obj.id].sendEvent('PLAY', 'true'); } } function gid(name) { return document.getElementById(name); }; </script>
October 27, 2009
JW FLV Player and Red5 apparent buffering bug
The JW FLV player v. 4.6 is included in the learning module template and enables us to display the videos with a high degree of flexibility.
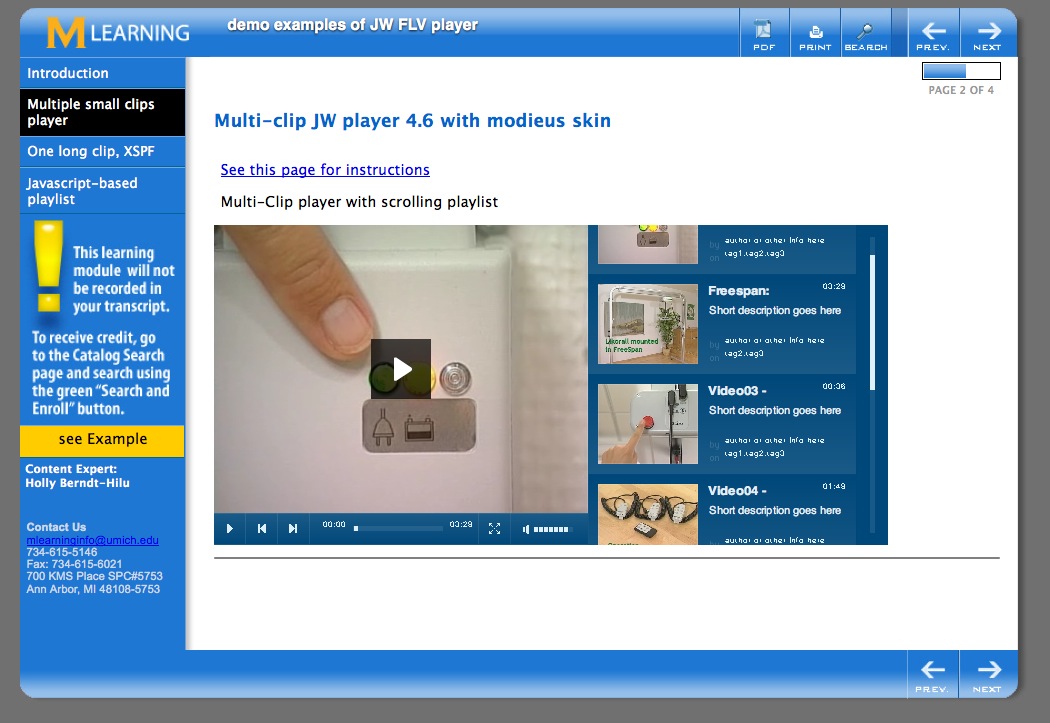
Example of a player that contains multiple short video clips.
The player generates a navigation listing on the right from the XML playlist.
To break a long clip into chapters, it is possible to specify in and out points in the playlist for each segment desired. So recently, I put online a 57-minute video clip, with 16 chapters. A screenshot is shown below.
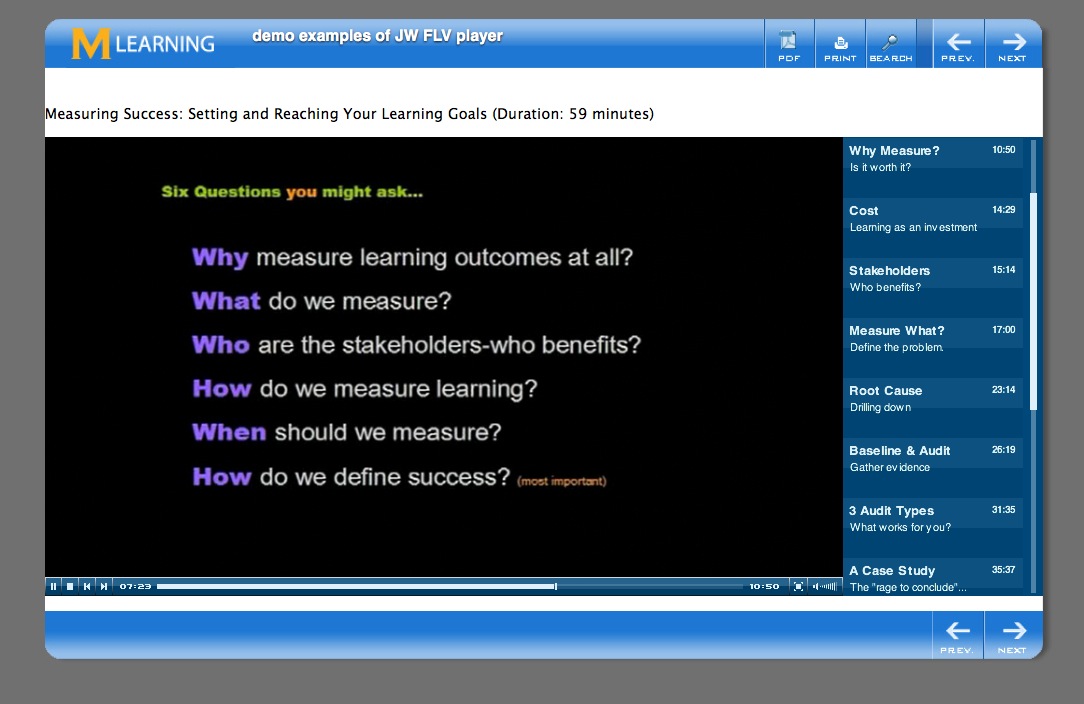
Out of the 16 segments, all played fine except the last two. Those two would play for a few seconds, then stop. Checking the debugging output in Firebug's console, showed a "Buffer Empty" entry at that point. The file would play fine once or twice, then never again, for anyone, on any browser.
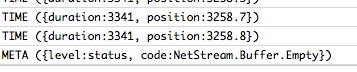
Buffer.Empty error
Thinking there might be something wrong with the video file or the encoding, I had the author re-output the video to DVD, then I encoded it to FLV using several different conversion tools and settings. All of the new test files also had the same issue. I also tried using the metadata injector, even though I was pretty sure the metadata was OK.
At that point, I thought of using a javascript playlist since javascript allows you to build in some error-catching into the functions for seeking and playing items in the playlist. But, once a basic javascript-based playlist was built, I was very surprised to find that all the video's segments now played just fine without adding in any special error-catching or modification of the standard functions.
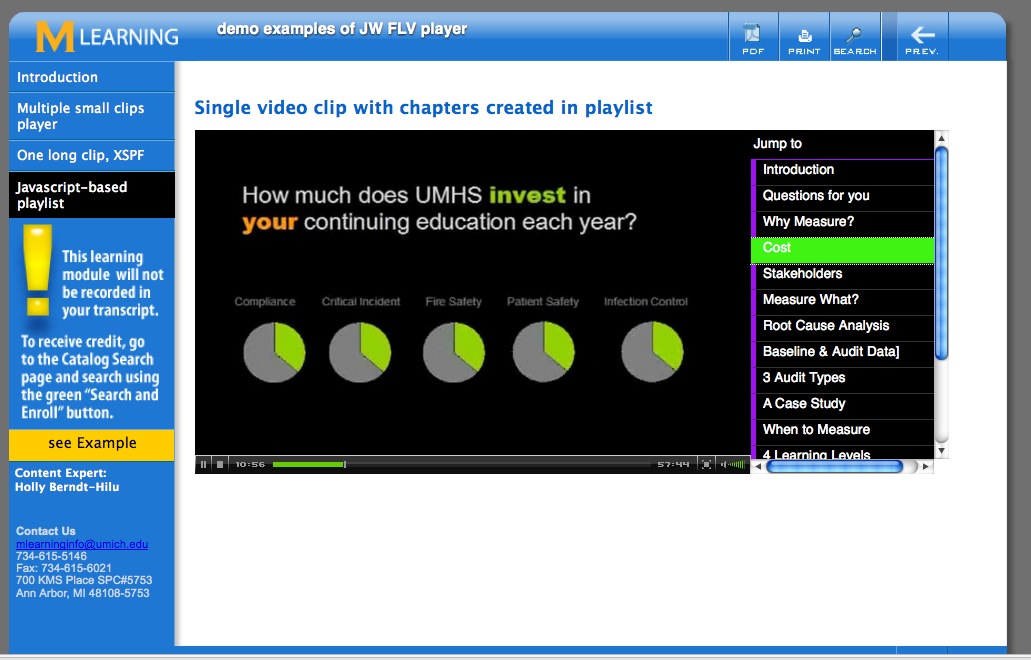
This is what the Javascript-based playlist looks like. I used the same timings for all the segments as on the XML-based playlist, and the exact same streaming video file.
I suspect the cause of the problem is a bug in Red5, but am not sure why using the Javascript functions works when the FLV-player playlist functions do not.
I've posted some demo pages, but since I don't have an external red5 server to use, the video cannot be seen. However they will be of use to understand the code and structure of the player.
Source code for the javascript-based page
<!DOCTYPE html PUBLIC "-//W3C//DTD XHTML 1.0 Transitional//EN"
"http://www.w3.org/TR/xhtml1/DTD/xhtml1-transitional.dtd">
<html xmlns="http://www.w3.org/1999/xhtml">
<head>
<TITLE> </TITLE>
<link href="css/allBrowsers.css" rel="stylesheet" type="text/css" />
<link href="css/header.css" rel="stylesheet" type="text/css" />
<style>
/*these shut off the navbar & progress bar on this page*/
#whiteArea { background:url(images/whiteAreaAllWhite.jpg) repeat-y; }
#leftColumn { display:none;}
#subTitleBar {visibility:hidden;}
#leftColumn.leftColumnOpen {display:block;}
</style>
<!--#include file="includes/headContent.htm"-->
<script>
function showNavbar(){
document.getElementById('whiteArea').style.background = 'url(images/whiteArea2shadows.jpg)';
document.getElementById('leftColumn').style.display = 'block';
document.getElementById('leftColumn').className = 'leftColumnOpen';
document.getElementById('subTitleBar').style.visibility = 'visible';
}
</script>
<script type="text/javascript">
var flashvars = {
resizing: 'true',
backcolor: '#00487a',
frontcolor: '#dff0fb',
playlist: 'right',
playlistsize: '200',
shuffle: 'false',
icons: 'true',
bufferlength: '2',
autostart: 'false',
debug: 'console',
repeat: 'list',
stretching: 'exactfit',
file: 'media/playlist_10-5.xml',
streamer: 'rtmpt://red502.mcit.med.umich.edu:80/oflaDemo/lms/measuringsuccess/'
};
var params =
{
allowscriptaccess: 'always',
allowfullscreen: 'true',
bgcolor: '#000000'
};
var attributes =
{
id: 'player',
name: 'player'
};
swfobject.embedSWF('includes/jw_media_player/player-licensed.swf', 'player', '898', '413', '9.0.124', false, flashvars, params, attributes);
//function loadFile(theFile){ player.sendEvent('LOAD',theFile); };
// -->
</SCRIPT></head>
<body>
<!--#include file="includes/header.htm" -->
<div id="leftColumn"><!--#include file="includes-local/navbar.htm" --> </div>
<div id="rightColumnFullWidth">
<div id="subTitleBar">
<div align="right"><!--<span id="pageTitle"></span>--><span id="pageNumberHolder"></span> <a href="javascript:window.print()" id="printIcon"><img src="images/images.jpg" alt="print this page" /></a> </div>
</div>
<div id="contentFullWidth">
<!--*********************put content below this line!!!!************-->
<br />
<span id="VideoPageTitle">Measuring Success: Setting and Reaching Your Learning Goals (Duration: 59 minutes)</span>
<p><a id="player" name="player" class="player" href="http://www.adobe.com/shockwave/download/download.cgi?P1_Prod_Version=ShockwaveFlash"><img src="media/poster001.jpg"/>Get the Adobe Flash Player to see this video.</a>
<!--*********put content above this line!!!!!*****-->
</div><!--end content-->
</div><!--end rightColumn-->
<div id="footer"><!--#include file="includes/footer.htm" --></div>
</div>
</body>
</html>
<script language="JavaScript" src="js/endScripts.js" type="text/javascript"></script>
Source code for the javascript-based page
XML playlist
<!DOCTYPE html PUBLIC "-//W3C//DTD XHTML 1.0 Transitional//EN"
"http://www.w3.org/TR/xhtml1/DTD/xhtml1-transitional.dtd">
<!--http://www.longtailvideo.com/support/forum/Feature-Suggestions/2756/Multiple-playlists-a-Success-#msg109471-->
<html xmlns="http://www.w3.org/1999/xhtml">
<head>
<!--/*v 1.5 12-11-2007*/-->
<title>single clip player with javascript playlist</title>
<meta http-equiv="Content-Type" content="text/html; charset=iso-8859-1"/>
<link href="css/allBrowsers.css" rel="stylesheet" type="text/css" />
<link href="css/header.css" rel="stylesheet" type="text/css" />
<!--#include file="includes/headContent.htm"-->
<!--<script src="http://ajax.googleapis.com/ajax/libs/swfobject/2.2/swfobject.js"></script>-->
<style type="text/css">
/* these shut off the navbar & progress bar on this page
#whiteArea { background:url(images/whiteAreaAllWhite.jpg) repeat-y; }
#leftColumn { display:none;}
#subTitleBar {visibility:hidden;}*/
#leftColumn.leftColumnOpen {display:block;}
div#subnav a,#subnav a:link,#subnav a:visited {border-left:6px solid #9F12F3;display:block;width:164px;background-color:#000;font:12px normal Arial, Helvetica, sans-serif;text-decoration:none;color:#FFF;padding:3px 3px 6px 6px;border-bottom:1px solid #333;}
#subnav a:hover{background-color:#9F12F3;color:#000;}
#subnav a.navbtn.current{background-color:#3FF312;color:#FFF;border-left:6px solid #3FF312;}
#subnav h2 {width:164px;height:20px;padding:6px 3px 0px 3px;background-color:#000;font:12px bold Arial, Helvetica, sans-serif;color:#FFF;margin-bottom:0px;border-bottom:1px solid #9F12F3;}
#rightColumn {padding-top:0px;}
#content #contenTable td {padding:0px;}
</style>
<script type="text/javascript" language="javascript">
function showNavbar(){
document.getElementById('whiteArea').style.background = 'url(images/whiteArea2shadows.jpg)';
document.getElementById('leftColumn').style.display = 'block';
document.getElementById('leftColumn').className = 'leftColumnOpen';
document.getElementById('subTitleBar').style.visibility = 'visible';
}
</script>
<!--[if IE]>
<script>
</script>
<style type="text/css">
#rightColumn, #contentTable{width:755px; }
</style>
<![endif]-->
</head>
<body>
<!--#include file="includes/header.htm" -->
<div id="leftColumn"><!--#include file="includes-local/navbar.htm" --> </div>
<div id="rightColumn">
<div id="subTitleBar">
<div align="right"> <!--<span id="pageNumberHolder"></span>--> <a href="javascript:window.print()" id="printIcon"><img src="images/images.jpg" alt="print this page" /></a> </div>
</div>
<div id="content">
<!--*********************put content below this line!!!!************-->
<table width="auto" border="0" id="contenTable" cellpadding="0" cellspacing="0">
<tr>
<td valign="top" class="col1"><h1>Single video clip with chapters created in playlist</h1>
</td>
</tr>
<tr>
<td valign="top">
<script type="text/javascript">
var player=document.getElementById('player');
var seek = 0;
var seekFlag = false;
var currentTime;
function gid(name) {
return document.getElementById(name);
};
var flashvars =
{
fullscreen: 'true',
resizing: 'true',
width: '356',
height: '288',
backcolor: '#111111',
frontcolor: '#999999',
lightcolor: '#66cc00',
playlist: 'none',
repeat: 'none',
shuffle: 'false',
icons: 'false',
bufferlength: '2',
autostart: 'false',
stretching: 'fill',
skin: 'includes/mediaplayer4.5/modieus.swf',
oncomplete: 'none',
file: 'mpegStreamclipOutput.flv',
streamer: 'rtmpt://red502.mcit.med.umich.edu:80/oflaDemo/lms/measuringsuccess',
debug: 'console'
};
var params ={
allowscriptaccess: 'always',
allowfullscreen: 'true',
bgcolor: '#000000'
};
var attributes ={
id: 'player',
name: 'player'
};
swfobject.embedSWF('includes/jw_media_player/player-licensed.swf', 'player', '500', '310', '9.0.124', false, flashvars, params, attributes);
</script>
<script type="text/javascript">
function playerReady(obj) {
//alert(gid(obj));
player = gid('player');
player.addModelListener('TIME', 'timeMonitor');
};
//function loadFile(theFile){ player.sendEvent('LOAD',theFile); };
function timeMonitor(obj)
{
//alert('in timeMonitor');
if((obj.position > 0) && (seekFlag))
{
seekFlag = false;
player.sendEvent('SEEK', seekto);
}
currentTime = obj.position;
};
function seekSome(seconds, id)
{
// alert(player);
seekto = seconds;
if(currentTime > 0)
{
//alert('currentTime > 0');
player.sendEvent('SEEK', seekto);
makeCurrent(id);
}
else
{
// alert('currentTime <= 0');
seekFlag = true;
makeCurrent(id);
player.sendEvent('PLAY', 'true');
}
};
function makeCurrent(selectedLayer){
// Written By: WillyDuitt@hotmail.com || 03-22-2005 \\;
var links = getElementsByClass(document, 'navbtn', 'a');
for(var i=0; i<links.length; i++){
links[i].className = 'navbtn';
}
// alert(selectedLayer);
gid(selectedLayer).className = 'navbtn current';
};
function gid(name) { return document.getElementById(name); };
</script>
<a id="player" name="player" class="player" href="http://www.adobe.com/shockwave/download/download.cgi?P1_Prod_Version=ShockwaveFlash">Get the Adobe Flash Player to see this video.</a>
</td>
<td valign="top" class="col1">
<div id="subnav" style="height:309px;overflow:auto;">
<h2>Jump to</h2>
<a href="javascript:seekSome('0', 'int');" id="int" class="navbtn">Introduction</a>
<a href="javascript:seekSome('312', 'q4u')" id="q4u" class="navbtn">Questions for you</a>
<a href="javascript:seekSome('439', 'why')" id="why" class="navbtn">Why Measure?</a>
<a href="javascript:seekSome('651','cst')" id="cst" class="navbtn">Cost</a>
<a href="javascript:seekSome('875','stk')" id="stk" class="navbtn">Stakeholders</a>
<a href="javascript:seekSome('915','msr')" id="msr" class="navbtn">Measure What?</a>
<a href="javascript:seekSome('1021','rca')" id="rca" class="navbtn">Root Cause Analysis</a>
<a href="javascript:seekSome('1395','bsl')" id="bsl" class="navbtn">Baseline & Audit Data]</a>
<a href="javascript:seekSome('1580','aud')" id="aud" class="navbtn">3 Audit Types</a>
<a href="javascript:seekSome('1896','cse')" id="cse" class="navbtn">A Case Study</a>
<a href="javascript:seekSome('2138','whn')" id="whn" class="navbtn">When to Measure</a>
<a href="javascript:seekSome('2344','lvl')" id="lvl" class="navbtn">4 Learning Levels</a>
<a href="javascript:seekSome('2525','chl')" id="chi" class="navbtn">Children & Adults</a>
<a href="javascript:seekSome('2627','stc')" id="stc" class="navbtn">Sticky Learning</a>
<a href="javascript:seekSome('3250','cnc')" id="cnc" class="navbtn">Conclusion</a>
<a href="javascript:seekSome('3342','crd')" id="crd" class="navbtn">Credits</a>
</div>
</td>
</tr>
</table>
<!--*********put content above this line!!!!!*****-->
</div><!--end content-->
</div><!--end rightColumn-->
<div id="footer"><!--#include file="includes/footer.htm" --></div>
<!--</div>-->
</body>
</html>
<script language="JavaScript" src="js/endScripts.js" type="text/javascript"></script>
<?xml version="1.0" encoding="utf-8"?> <playlist version="1" xmlns="http://xspf.org/ns/0/"> <trackList> <track> <title>Introduction</title> <creator>Steve Burdick</creator> <annotation>Steve Burdick</annotation> <location>mpegStreamclipOutput.flv</location> <type>rtmp</type> <meta rel="start">0</meta> <meta rel="duration">311</meta> </track> <track> <title>Questions for you</title> <annotation>...and for me.</annotation> <location>mpegStreamclipOutput.flv</location> <type>rtmp</type> <meta rel="start">312</meta> <meta rel="duration">438</meta> </track> <track> <title>Why Measure?</title> <annotation>Is it worth it?</annotation> <location>mpegStreamclipOutput.flv</location> <type>rtmp</type> <meta rel="start">439</meta> <meta rel="duration">650</meta> </track> <track> <title>Cost</title> <annotation>Learning as an investment</annotation> <location>mpegStreamclipOutput.flv</location> <type>rtmp</type> <meta rel="start">651</meta> <meta rel="duration">869</meta> </track> <track> <title>Stakeholders</title> <annotation>Who benefits?</annotation> <location>mpegStreamclipOutput.flv</location> <type>rtmp</type> <meta rel="start">875</meta> <meta rel="duration">914</meta> </track> <track> <title>Measure What?</title> <annotation>Define the problem.</annotation> <location>mpegStreamclipOutput.flv</location> <type>rtmp</type> <meta rel="start">915</meta> <meta rel="duration">1020</meta> </track> <track> <title>Root Cause Analysis</title> <annotation>Drilling down</annotation> <location>mpegStreamclipOutput.flv</location> <type>rtmp</type> <meta rel="start">1021</meta> <meta rel="duration">1394</meta> </track> <track> <title><![CDATA[Baseline & Audit Data]]></title> <annotation>Gather evidence</annotation> <location>mpegStreamclipOutput.flv</location> <type>rtmp</type> <meta rel="start">1395</meta> <meta rel="duration">1579</meta> </track> <track> <title>3 Audit Types</title> <annotation>What works for you?</annotation> <location>mpegStreamclipOutput.flv</location> <type>rtmp</type> <meta rel="start">1580</meta> <meta rel="duration">1895</meta> </track> <track> <title>A Case Study</title> <annotation>The "rage to conclude"...</annotation> <location>mpegStreamclipOutput.flv</location> <type>rtmp</type> <meta rel="start">1896</meta> <meta rel="duration">2137</meta> </track> <track> <title>When to Measure</title> <annotation><![CDATA[Retrieval & retention]]></annotation> <location>mpegStreamclipOutput.flv</location> <type>rtmp</type> <meta rel="start">2138</meta> <meta rel="duration">2343</meta> </track> <track> <title>4 Learning Levels</title> <annotation>The Kirkpatrick model</annotation> <location>mpegStreamclipOutput.flv</location> <type>rtmp</type> <meta rel="start">2344</meta> <meta rel="duration">2524</meta> </track> <track> <title><![CDATA[Children & Adults]]></title> <annotation><![CDATA[Pedagogy & Andragogy]]></annotation> <location>mpegStreamclipOutput.flv</location> <type>rtmp</type> <meta rel="start">2525</meta> <meta rel="duration">2626</meta> </track> <track> <title>Sticky Learning</title> <annotation>6 Concrete examples</annotation> <location>mpegStreamclipOutput.flv</location> <type>rtmp</type> <meta rel="start">2627</meta> <meta rel="duration">3249</meta> </track> <track> <title>Conclusion</title> <annotation> </annotation> <location>mpegStreamclipOutput.flv</location> <type>rtmp</type> <meta rel="start">3250</meta> <meta rel="duration">3341</meta> </track><track>
<title>Credits</title>
<location>mpegStreamclipOutput.flv</location>
<type>rtmp</type>
<meta rel="start">3342</meta>
<meta rel="duration">3460</meta>
</track>
</trackList>
</playlist>
October 19, 2009
Using toggle javascripts to build an FAQ page.
FAQ pages are sometimes requested in our learning modules so we've built in the scripts to create an easy- to-read, easy-to-use FAQ by applying simple CSS classes to elements on the page. When the FAQ page loads, all the questions appear in a collapsed view which can be quickly scanned.
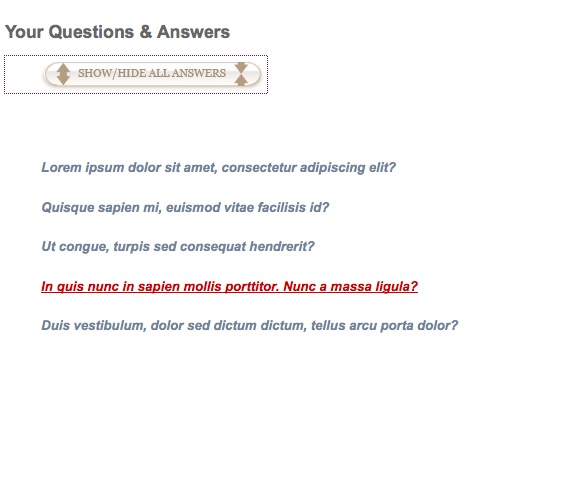
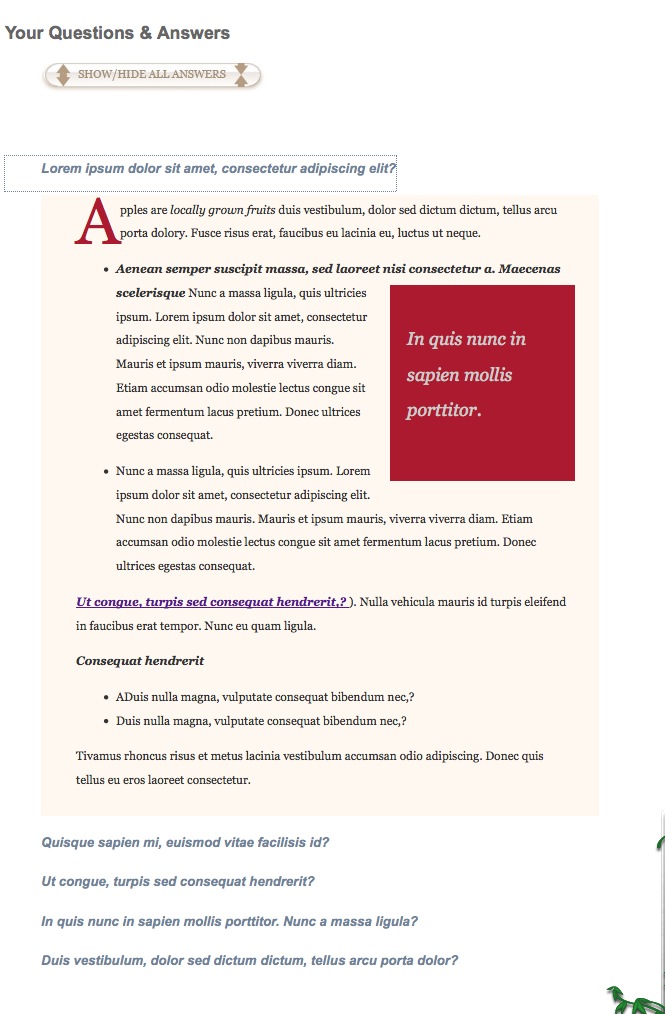
On clicking any question, its associated answer expands and pushes the rest of the questions down. When another question is clicked, the first answer closes and the new answer opens up.
Here's how to add this type of FAQ to your own HTML pages.
Download the sample source files. The HTML page that will contain your FAQ must have a link to the CSS style sheet "styles.css" and the javascript file "toggle.js" Make sure those two files are uploaded along with your HTML file. We also use some graphics to make the "Q" and "A" drop-caps really stand out, and those are included with the source files, along with a button to show/hide all the answers at once.
Each question should be contained in an "a" tag with class QA assigned to it. Give it an id like "Q1, Q2, Q3," etc. Change the number in the function call to correspond to the number in the id. So if this is question Q2, change the function call to read "toggle('A2')".
<a href="#" class="QA" id="Q1" onclick="toggle('A1');return false;">Lorem ipsum dolor sit amet, consectetur adipiscing elit?</a>
The corresponding answer should be contained in a "div" tag with class "toggleQA" assigned to it. Give it the correctly numbered id: "A1, A2, A3, etc."
<div id="A1" class="toggleQA"><span class="dropcap">A</span>pples are <em>locally grown fruits </em> duis vestibulum, dolor sed dictum dictum, tellus arcu porta dolory. Fusce risus erat, faucibus eu lacinia eu, luctus ut neque. </div>
The code is listed below:
The HTML page
<!DOCTYPE html PUBLIC "-//W3C//DTD XHTML 1.0 Transitional//EN"
"http://www.w3.org/TR/xhtml1/DTD/xhtml1-transitional.dtd">
<html xmlns="http://www.w3.org/1999/xhtml">
<head>
<TITLE>FAQ</TITLE>
<link href="styles.css" rel="stylesheet" type="text/css" />
<script type="text/javascript" language="javascript" src="toggle.js"></script>
<style type="text/css">
#content {font:12px Arial, Helvetica, sans-serif;width:600px;}
.pullquote{
float: right;
width: 150px;
background-color: #AC1A2F;
margin-top: 4px;
margin-right: 0px;
margin-bottom: 4px;
margin-left: 16px;
padding-top: 2em;
padding-right: 1em;
padding-bottom: 3em;
padding-left: 1em;
font-family: Georgia, "Times New Roman", Times, serif;
color: #CCC;
font-size: 1.5em;
line-height: 200%;
font-style: italic;
}
</style>
</head>
<body>
<div id="content">
<!--*********************put content below this line!!!!************-->
<table width="100%" border="0" id="contenTable">
<tr>
<td valign="top"><h1> </h1>
<h1>Your Questions & Answers</h1>
<p><a href="#" onclick="toggleAll();"><img src="media/bttnShowHide.jpg" width="262" height="37" alt="Show or Hide Answers" border="0"/></a><br />
<br />
<br />
</p></td>
</tr>
<tr>
<td valign="top">
<p><a href="#" class="QA" id="Q1" onclick="toggle('A1');return false;">Lorem ipsum dolor sit amet, consectetur adipiscing elit?</a></p>
<div id="A1" class="toggleQA"><span class="dropcap">A</span>pples are <em>locally grown fruits </em> duis vestibulum, dolor sed dictum dictum, tellus arcu porta dolory. Fusce risus erat, faucibus eu lacinia eu, luctus ut neque.
<ul>
<li><strong><em>Aenean semper suscipit massa, sed laoreet nisi consectetur a. Maecenas scelerisque</em></strong>
<div class="pullquote">In quis nunc in sapien mollis porttitor.</div>
Nunc a massa ligula, quis ultricies ipsum. Lorem ipsum dolor sit amet, consectetur adipiscing elit. Nunc non dapibus mauris. Mauris et ipsum mauris, viverra viverra diam. Etiam accumsan odio molestie lectus congue sit amet fermentum lacus pretium. Donec ultrices egestas consequat.</li>
</ul>
<ul>
<li>Nunc a massa ligula, quis ultricies ipsum. Lorem ipsum dolor sit amet, consectetur adipiscing elit. Nunc non dapibus mauris. Mauris et ipsum mauris, viverra viverra diam. Etiam accumsan odio molestie lectus congue sit amet fermentum lacus pretium. Donec ultrices egestas consequat. </li>
</ul>
<strong><em>Ut congue, turpis sed consequat hendrerit,?</em></strong>). Nulla vehicula mauris id turpis eleifend in faucibus erat tempor. Nunc eu quam ligula.
<p><strong><em>Consequat hendrerit</em></strong></p>
<ul>
<li>ADuis nulla magna, vulputate consequat bibendum nec,? </li>
<li>Duis nulla magna, vulputate consequat bibendum nec,? </li>
</ul>
Tivamus rhoncus risus et metus lacinia vestibulum accumsan odio adipiscing. Donec quis tellus eu eros laoreet consectetur. </div>
<p><a href="#" class="QA" id="Q2" onclick="toggle('A2');return false;">Quisque sapien mi, euismod vitae facilisis id?</a></p>
<div id="A2" class="toggleQA"><span class="dropcap">P</span>ivamus rhoncus risus et metus lacinia vestibulum accumsan odio adipiscing. Donec quis tellus eu eros laoreet consectetur. <br />
<br />
<div class="pullquote">Fusce risus erat, faucibus eu lacinia eu, luctus ut neque. Maecenas at massa sapien.</div>
Sed posuere semper felis, at pulvinar nulla sollicitudin vitae. Vivamus laoreet sollicitudin elit, quis dignissim lorem eleifend vel. Integer congue eros consectetur orci gravida et bibendum tellus eleifend. Suspendisse potenti.<br />
<br />
In quis nunc in sapien mollis porttitor. Nunc a massa ligula, quis ultricies ipsum. Lorem ipsum dolor sit amet, consectetur adipiscing elit. Nunc non dapibus mauris. Mauris et ipsum mauris, viverra viverra diam. Etiam accumsan odio molestie lectus congue sit amet fermentum lacus pretium. </div>
<p><a href="#" class="QA" id="Q3" onclick="toggle('A3');return false;">Ut congue, turpis sed consequat hendrerit? </a></p>
<div id="A3" class="toggleQA">
<span class="dropcap">S</span><em>ed posuere semper felis, at pulvinar</em>
<div class="pullquote">Sed posuere semper felis, at pulvinar.</div>
A massa ligula, quis ultricies.</em> <span class="red">(Link to UMHHC Policy 03-07-010)</span>. <br />
<br />
Vestibulum placerat velit pellentesque quam ultrices commodo. Sed posuere semper felis, at pulvinar nulla sollicitudin vitae. Vivamus laoreet sollicitudin elit, quis dignissim lorem eleifend vel. Integer congue eros consectetur orci gravida et bibendum tellus eleifend. Suspendisse potenti. </div>
<p><a href="#" class="QA" id="Q4" onclick="toggle('A4');return false;">In quis nunc in sapien mollis porttitor. Nunc a massa ligula? </a></p>
<div id="A4" class="toggleQA">
<span class="dropcap">P</span>Lorem ipsum dolor sit amet, consectetur adipiscing elit. Morbi eget pretium risus. Aenean dapibus molestie commodo. Quisque feugiat purus quis dui ornare molestie. Ut gravida ullamcorper sapien, vitae consequat lectus ultrices nec. Aliquam ut adipiscing purus. Ut velit ante, rutrum sit amet laoreet ut, pellentesque at sapien. Nunc vitae mi nulla. Fusce vulputate lorem quis libero tincidunt dignissim. Fusce vel ante arcu. Nullam rhoncus, felis vitae tempus facilisis, ante urna commodo mi, quis suscipit velit justo ac augue. Duis in dignissim velit.
Quisque sapien mi, euismod vitae facilisis id, tristique non velit. Nulla vehicula mauris id turpis eleifend in faucibus erat tempor. Nunc eu quam ligula. Aliquam a velit massa. Vivamus ac quam at urna vestibulum luctus. Praesent fermentum tincidunt volutpat. Nulla et lorem est. Ut ligula arcu, eleifend eget consequat non, egestas at turpis. Duis sed turpis ac justo egestas vestibulum. Vestibulum et nisi dui. <br />
<br />
Ut congue, turpis sed consequat hendrerit, urna purus vehicula nisl, at sollicitudin sapien est eget lorem. Praesent sapien dui, feugiat laoreet molestie vitae, rhoncus nec arcu. Fusce risus erat, faucibus eu lacinia eu, luctus ut neque. Maecenas at massa sapien. Aenean semper suscipit massa, sed laoreet nisi consectetur a. Maecenas scelerisque, mauris id luctus aliquam, leo elit semper nibh, id sagittis nibh metus vel nulla. Nam quis ultrices dolor. Class aptent taciti sociosqu ad litora torquent per conubia nostra, per inceptos himenaeos. Nam scelerisque aliquet sapien, quis volutpat leo ultricies eget. Vestibulum massa risus, congue vel vulputate at, tristique a nunc. Vestibulum placerat velit pellentesque quam ultrices commodo. Sed posuere semper felis, at pulvinar nulla sollicitudin vitae. Vivamus laoreet sollicitudin elit, quis dignissim lorem eleifend vel. Integer congue eros consectetur orci gravida et bibendum tellus eleifend. Suspendisse potenti. </div>
<p><a href="#" class="QA" id="Q5" onclick="toggle('A5');return false;">Duis vestibulum, dolor sed dictum dictum, tellus arcu porta dolor?</a></p>
<div id="A5" class="toggleQA"><div class="pullquote">Duis vestibulum, dolor sed dictum dictum, tellus arcu porta dolor.</div>
<span class="dropcap">W</span>Ut congue, turpis sed consequat hendrerit, urna purus vehicula nisl, at sollicitudin sapien est eget lorem. Praesent sapien dui, feugiat laoreet molestie vitae, rhoncus nec arcu. Fusce risus erat, faucibus eu lacinia eu, luctus ut neque. Maecenas at massa sapien. Aenean semper suscipit massa, sed laoreet nisi consectetur a. Maecenas scelerisque, mauris id luctus aliquam, leo elit semper nibh, id sagittis nibh metus vel nulla. Nam quis ultrices dolor. Class aptent taciti sociosqu ad litora torquent per conubia nostra, per inceptos himenaeos. Nam scelerisque aliquet sapien, quis volutpat leo ultricies eget. Vestibulum massa risus, congue vel vulputate at, tristique a nunc. Vestibulum placerat velit pellentesque quam ultrices commodo. Sed posuere semper felis, at pulvinar nulla sollicitudin vitae. Vivamus laoreet sollicitudin elit, quis dignissim lorem eleifend vel. Integer congue eros consectetur orci gravida et bibendum tellus eleifend. Suspendisse potenti.<br />
<br />
Vestibulum placerat velit pellentesque quam ultrices commodo. Sed posuere semper felis, at pulvinar nulla sollicitudin vitae. Vivamus laoreet sollicitudin elit, quis dignissim lorem eleifend vel. Integer congue eros consectetur orci gravida et bibendum tellus eleifend. Suspendisse potenti.</div>
</td>
</tr>
<tr>
<td valign="top">
</td>
</tr>
</table>
<!--*********put content above this line!!!!!*****-->
</div><!--end content-->
</body>
</html>
Javascript file: toggle.js
  function getElementsByClass(node,searchClass,tag) {


  var classElements = new Array();


  var els = node.getElementsByTagName(tag); // use "*" for all elements


  var elsLen = els.length;


  var pattern = new RegExp("(^|\\s)"+searchClass+"(\\s|$)");


  for (i = 0, j = 0; i < elsLen; i++) {


  if ( pattern.test(els[i].className) ) {


  classElements[j] = els[i];


  j++;


  }


  }


  return classElements;


  }

 function toggle(selectedLayer){


  // Written By: WillyDuitt@hotmail.com || 03-22-2005 \\;


  var div = getElementsByClass(document, 'toggleQA', '*');


  for(var i=0; i<div.length; i++){


  div[i].style.visibility = 'hidden';


  div[i].style.display = 'none';


  }

 document.getElementById(selectedLayer).style.visibility = 'visible';


  document.getElementById(selectedLayer).style.display = "block";

 }


  var tk=1;


  function toggleAll(){ //this is for the button that expands or closes all answers.


  var div = getElementsByClass(document, 'toggleQA', '*');


  if (tk==0){


  for(var m=0; m<div.length; m++){


  div[m].style.visibility = 'hidden';


  div[m].style.display = 'none';


  } //end for


  tk=1;


  }//end if t==0


  else  {//t==1


  for(var k=0; k<div.length; k++){


  div[k].style.visibility = 'visible';


  div[k].style.display = 'block'


  } //end for


  tk=0;


  }//end else


  }//end function
CSS Stylesheet
.QA {


  font-family: Arial, Helvetica, Verdana, Geneva, sans-serif;


  font-size: 1em;


  background-image: url(../media/Q.jpg);


  background-repeat: no-repeat;


  padding-left: 2.75em;


  line-height: 2em;


  padding-top: .375em;


  padding-bottom: 1.12em;


  font-style: italic;


  font-weight: bold;


  color: #30639A;


  }

a.QA:link {


  color: #069;


  text-decoration: none;


  }


  a.QA:visited {


  color: #708298;


  text-decoration: none;


  }


  a.QA:hover {


  color: #C00;


  text-decoration: underline;


  }


  a.QA:active {


  color: #996D3E;


  text-decoration: none;


  }

/*toggle on or off style for toggle() function in toggleOpen.js*/


  .toggleQA{


  visibility:hidden;


  display:none;


  font-family: Georgia, "Times New Roman", Times, serif;


  color: #333;


  background-color: #FEF8F1;


  padding-top: .25em;


  padding-left: 3em;


  margin-left: 3em;


  padding-right: 2em;


  padding-bottom: 2em;


  /*	border-left-width: 2em;


  border-left-style: solid;


  border-left-color: #e0cab2; */


  background-image: url(../media/A.jpg);


  line-height: 200%;


  font-size: .90em;


  background-repeat: no-repeat;


  }

h1 {


  color:#666;


  display:block;


  width:100%;


  padding-top:3px;


  font-family: Arial, Helvetica, sans-serif;


  font-size: 16px;


  font-weight: bold;


  }

.dropcap


  {


  float:left;


  color:#AC1A2F;


  font-size:5.5em;


  line-height:.65em;


  padding-top:2px;


  font-family: Georgia, "Times New Roman", Times, serif;


  }
October 16, 2009
Hide the playbar in a Presenter presentation
One of our content experts wanted to use Powerpoint to create an interactive presentation. Although Captivate would probably be the ideal choice, she only owns Adobe Presenter, so I suggested she use that to convert the Powerpoint for the web.
The problem is that Presenter, by default, shows a navbar on the side and a playbar below the presentation. In this case, allowing linear movement would break the logical flow of the interactive module. This project is more of a decision-support tool, and less a linear learning module where the user must view every page. To make a module like this function correctly using Adobe Presenter, follow these steps:
- Before entering Presenter, add navigation buttons or hyperlinked images to your Powerpoint slides that allow user interaction to choose the path through the module. Many slides will probably just need a "Next" button, but certain slides will function as decision points where your users will choose which path to follow. You may have to draw out a flow chart to do this correctly if there are a lot of slides and decision points.
[View instructions for adding hyperlinks and action buttons to slides]. - In the Adobe Presenter menu, select Slide Manager. Set all the slides to Advance by User.
- In the Adobe Presenter menu, select Presentation Settings. Click the Appearance tab. Uncheck "Show Sidebar"
- Now we'll remove the Playbar.
- Download and expand this zip file. playbarMod.zip Find the file noPlayBar.swf in the noPlayBar folder.
- Open your Powerpoint file and select the first slide in the presentation.
- Select Adobe Presenter > Insert Flash (swf). Select the file "noPlayBar.swf" and select As Slide animation. Click Open. Publish the Presenter presentation as usual. The playBar should be gone.
If you want to turn the playbar back ON at some point in the presentation, I've included the file "yesPlaybar.swf". Insert it onto a slide to make the playbar visible again. Because Presenter preloads slides, Flash animations and swfs on upcoming slides may begin to play before you have actually arrived on those slides. To prevent the playbar from turning back on a slide too soon, select Adobe Presenter > Presentation Settings and choose the Quality tab. Select Control Preloading and Disable preloading of embedded Flash content.
Thanks to Rob Rode for the tip on creating the noplaybar control.
ResourcesPosted by ellen at 12:33 PM
October 15, 2009
Beginning Eclipse CVS - Branching: Merge changes back to the Trunk
<= Back to previous section "Create a Branch"
When last we left Paul, he was working in the branch p1test. Now he is going to close his branch, open the Trunk and merge his changed files down to the Trunk. If you were playing Paul before, you may still have his branch open. If not, skip to this step.
Continue reading below break...
- Expand the folder containing this branch. The changes Paul made in this folder have all been committed to CVS under the branch so they are completely backed up. So we can replace them with the Trunk version of the files and start merging Paul's changes back in to the Trunk.
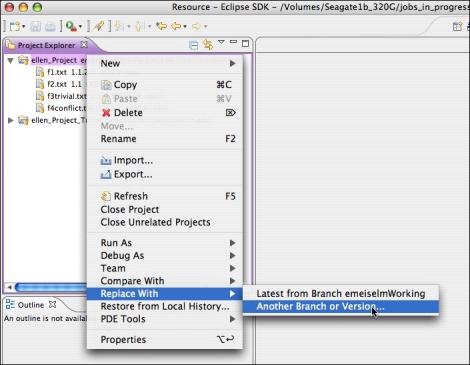
- Right-click the folder containing p1test and select Replace with Another Branch or Version...
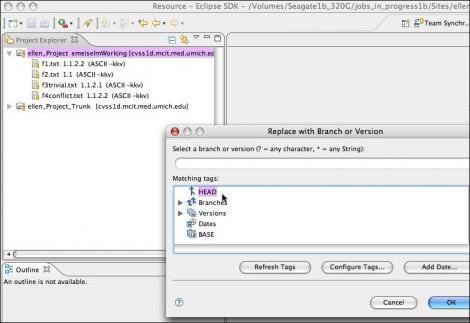
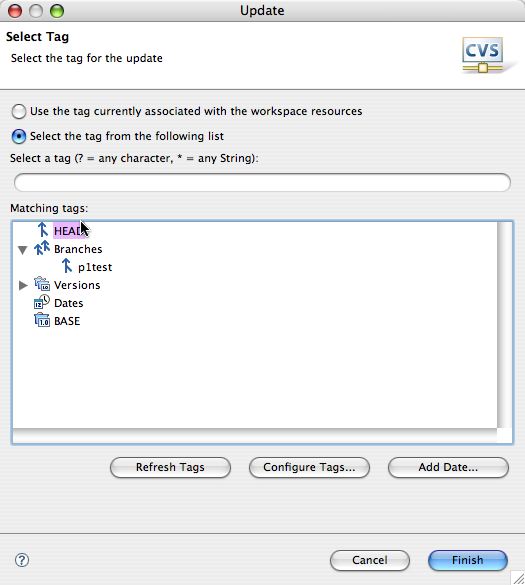
- Select HEAD and click OK.
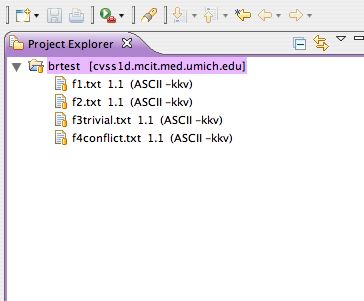
- The branch name should no longer appear to the right of the project name.
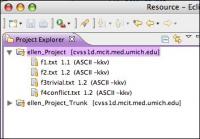
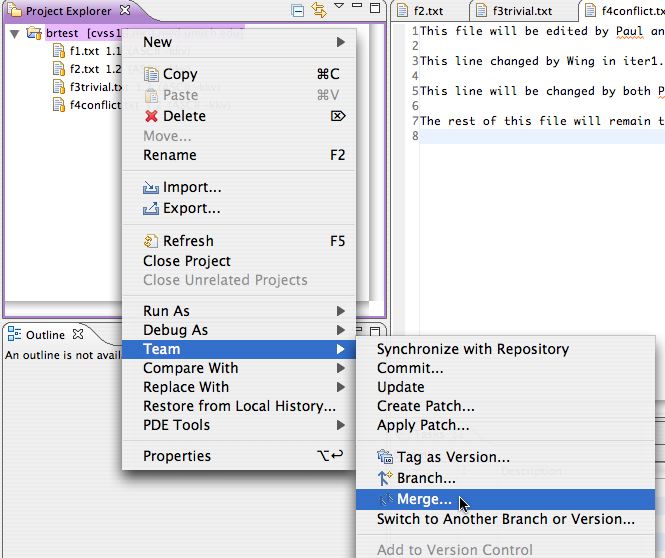
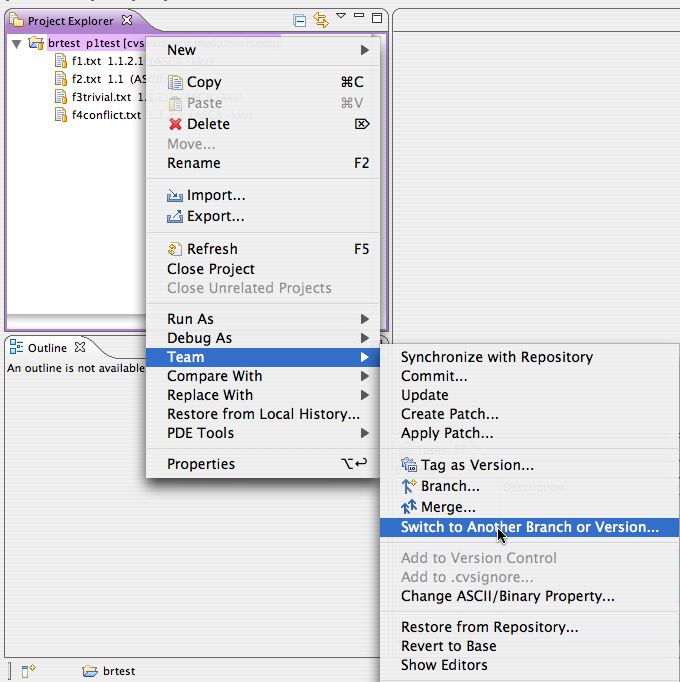
- You are now working in the Trunk. Right-click on the project folder and select Team>Merge....
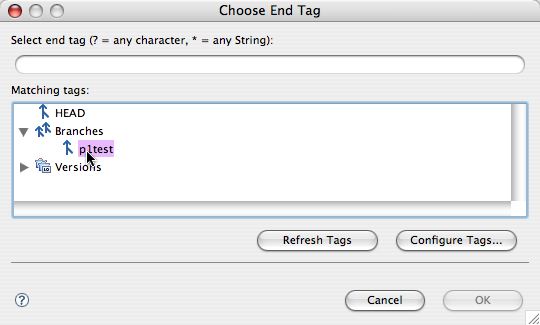
- Click Browse next to Branch or version to be merged. Choose p1test.
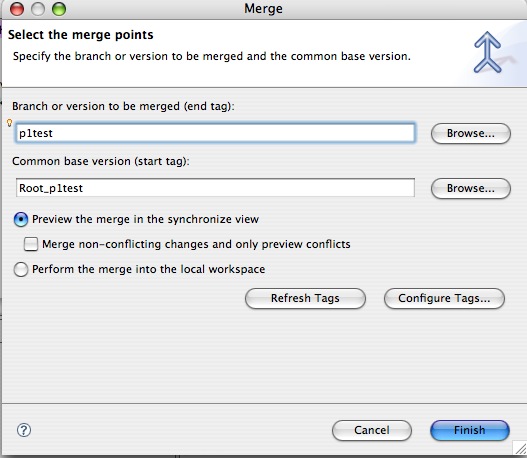
- It will try to guess the common base version for you. In this case it will guess correctly: Root_p1test. It will use the file versions tagged with Root_p1test to determine what has changed since then. So you can see why it is important to tag your files at milestones - it is one way to have control over exactly what gets merged. You can restrict merges to specific intervals, keeping them as small as necessary, and not have to re-merge old changes.
Leave Merge non-conflicting changes and only preview conflicts unchecked. Click Finish.
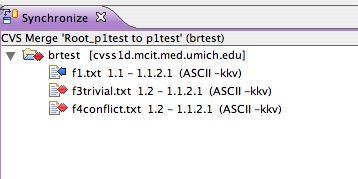
- It will now ask you to Synchronize. Files which have been changed by Paul in the branch since Root_p1test will display different arrow icons depending on whether they conflict or not with the changes Wing has made in the Trunk. Blue arrows mean non-conflicting changes; red arrows indicate conflicts.
Take a look at the buttons available in Synchronize mode. The blue and red arrow buttons are filters. Clicking the blue-arrow button will show incoming changes. Clicking the red arrow will show only the conflicts. For more on the Merge Synchronization view, see this page


If you aren't sure what you are doing, you can mouse over the Synchronize button to see the name of the Merge and the name of the source of the changes.
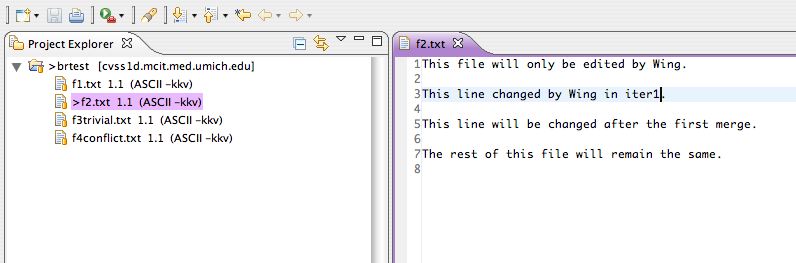
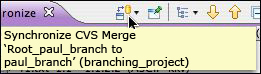 You'll notice that f2.txt is NOT shown, and that's because Paul never edited that file - only Wing did, in the Trunk.
f1.text was ONLY edited by Paul, so that will not conflict with the version in the Trunk.
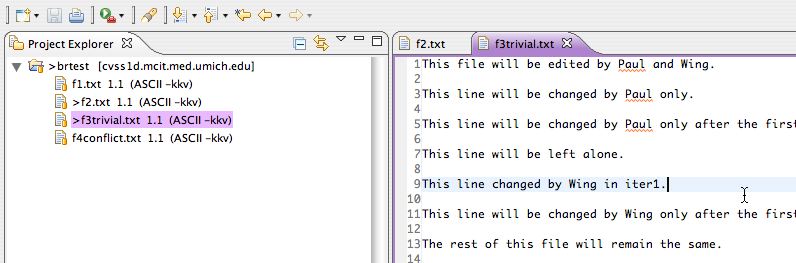
- Now we'll have CVS automatically merge any files it is able to. Right-click on the brtest folder and select Merge. CVS will attempt to resolve simple conflicts on its own, but will ask for help when things get complicated. f3trivial.txt can be fixed automatically, because Paul and Wing edited lines 3 and 9, respectively. Although both made changes to the file, the changes were not to the same lines, so CVS makes the assumption that they do not really conflict. (This may not be correct, so if you want to be VERY careful, you can do all the merges yourself.)
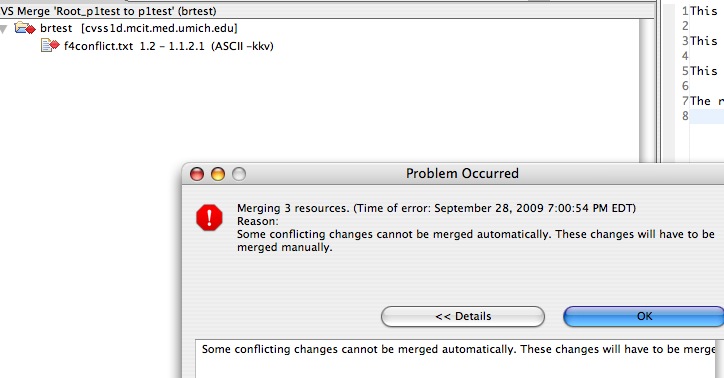
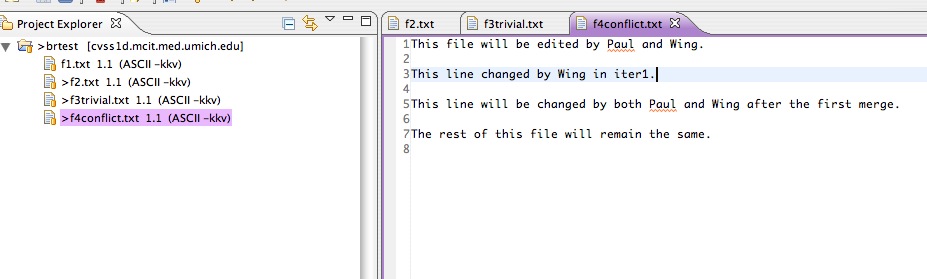
f4conflict.txt DOES have conflicting changes on the same line (3) so you need to step in. You will see this message, since we did not check "Merge non-conflicting changes and only preview conflicts" when we selected merge points. Click OK.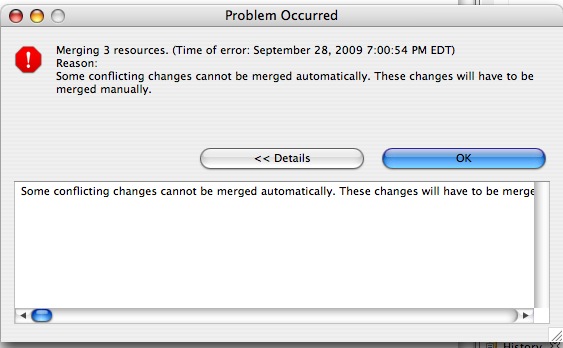
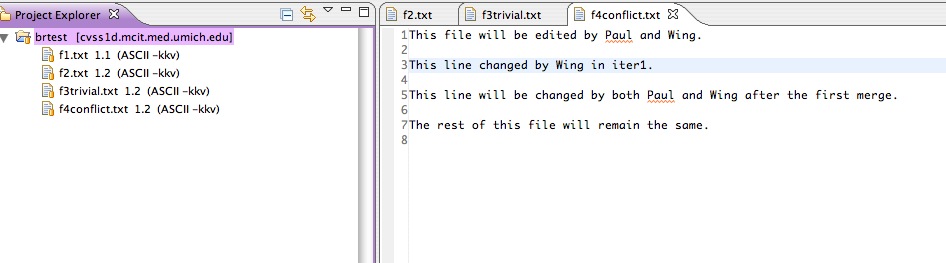
- You'll see the remaining conflicting file in the Synchronize View. To resolve the conflicts, double-click f4conflict.txt to open the Compare editor of the merge tool.
- Line 3 of the local file (on the left) will say "This line changed by Wing in iter1." Line 3 of the remote (repository) file will say "This line changed by Paul in iter 1." Resolve the conflict by changing Line 3 of the Local file to "This line changed by Paul and Wing in iter 1." Right-click in the Local side, and select Save.
Since this was not a trivial merge, the color red was used to display the areas that need work. Blue would be used to denote trival merges. Resolving code conflicts can take some thought - that's why CVS is asking for human help.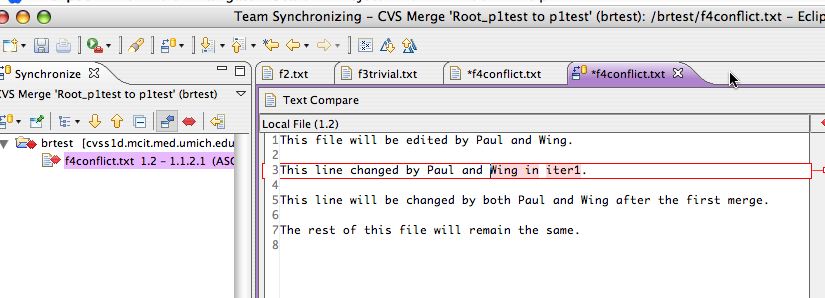
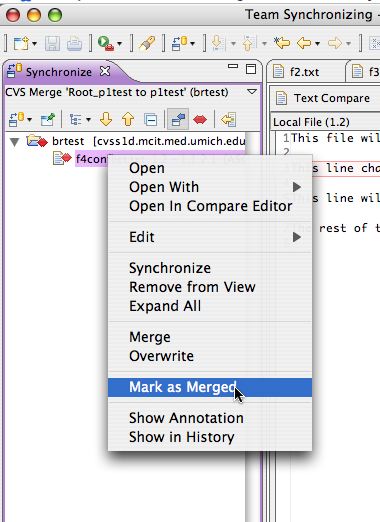
- Even after the save, the entry in the conflict editor and the red arrow icon will remain red. This is because, as far as Eclipse knows, there is still a conflict, albeit with some extra changes. To inform Eclipse that the conflict is resolved, right-click the file in the Synchronize view and select Mark as Merged.
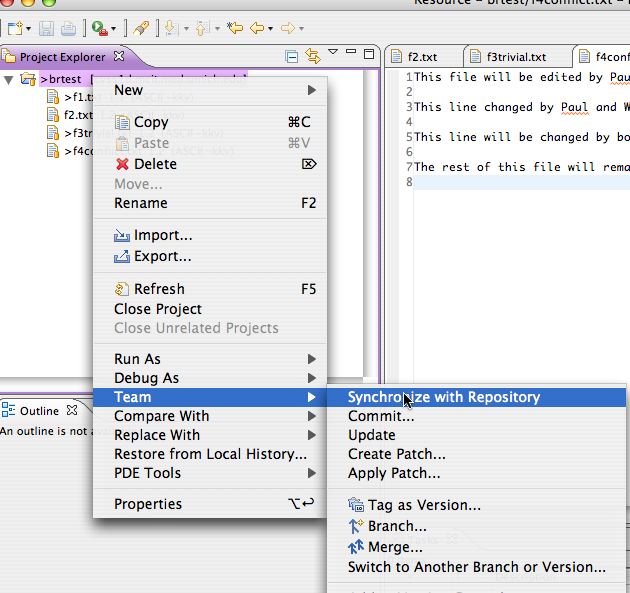
- At this point, the merged version only exists in the local workspace. Commit it to the CVS repository by right-clicking the brtest project folder in the Project Explorer view, and select Team > Synchronize with Repository.
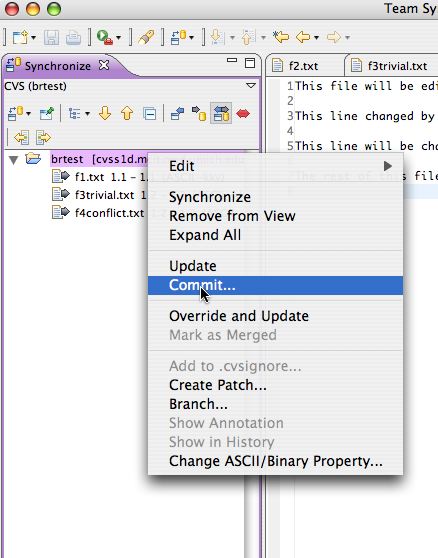
- These changes should not present any conflicts: all the arrows are gray, indicating simple one-way changes. Right-click on the brtest folder again, and select Commit...
- Add a comment as shown.

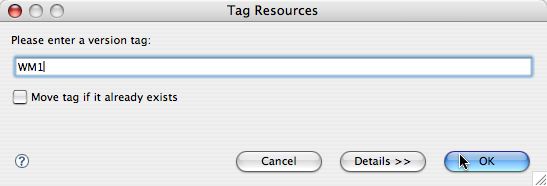
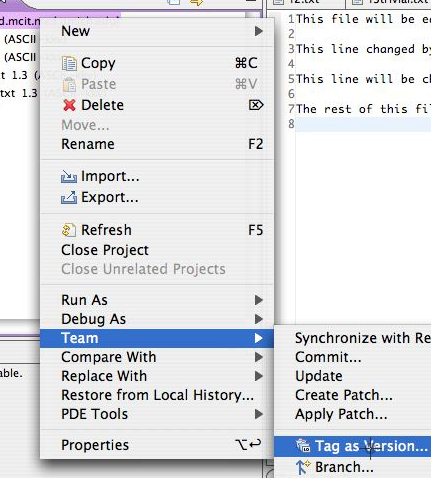
- Tag the result as WM1: Right click the brtest folder, select Team >Tag as Version

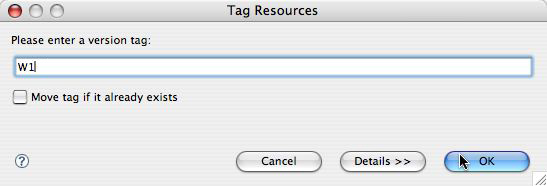
- Enter the tag WM1
- You may view and select from existing tags by clicking Details>>. After the tag you just created, the list should look like this.

- At this point, we are here in the scenario diagram:

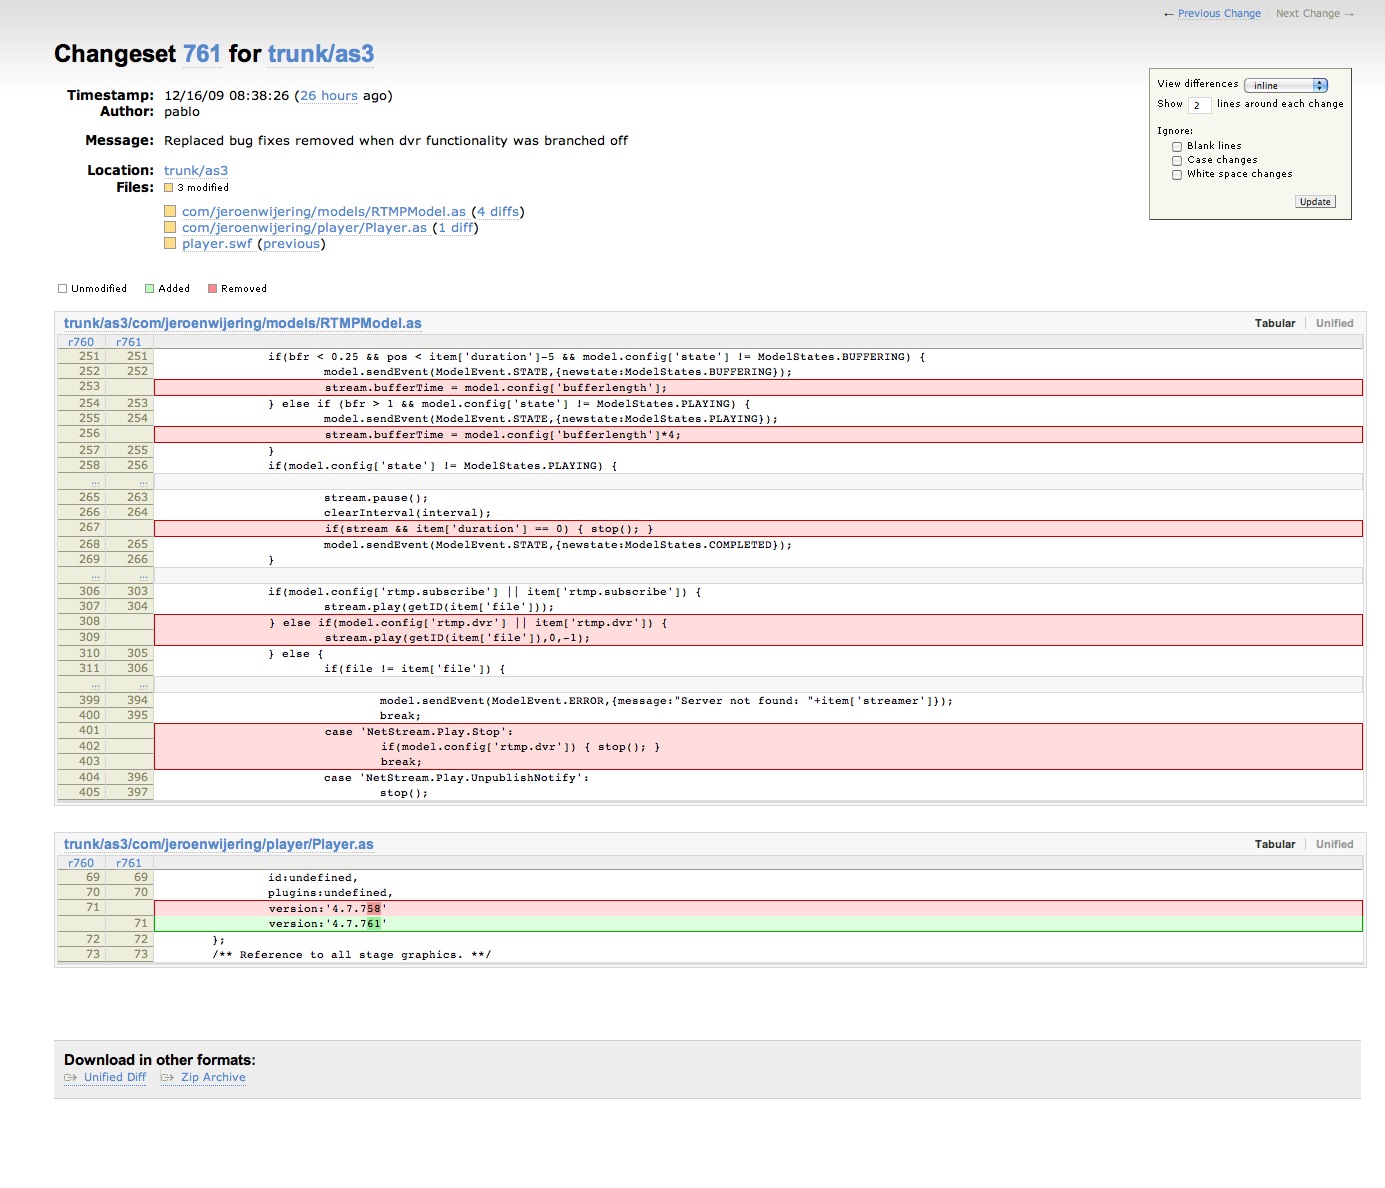
- To review what we've accomplished so far, let's look at the History panel. Right-click f4conflict.txt in the Project Explorer and select Team > Show History.
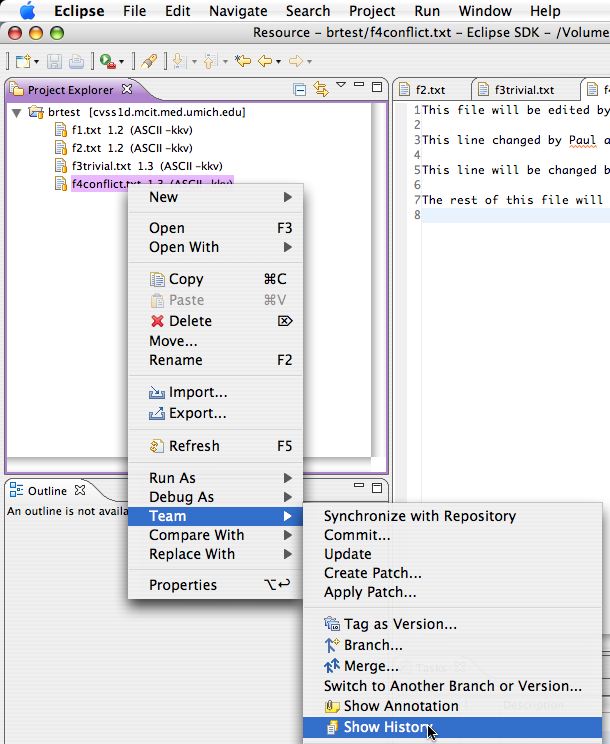
- We can see that the Root_p1test tag is assigned to revision 1.1, the initial version. This means "Branch 1, version 1). Branch 1 is the main branch or Trunk.
Paul's change ("First iteration changes made by Paul") were assigned to revision 1.1.2.1, or Branch 2, version 1 of the main branch, version 1.1. Wing made changes that were committed to the main branch. Finally, the merge resulted in revision 1.3, which was tagged for posterity with the label WM1.

NOTE: This section of the Eclipse CVS tutorial is based on Paul Glezen's article on the Eclipse website: Branching with Eclipse and CVS, and is used with his permission under the terms of the EPL license. The changes I am making to his version are mainly to expand it with more step by step images and explanations, and integrate it with my own beginner tutorials in an attempt to make it more accessible to beginners and designers. Experienced developers will probably prefer to work from Paul's version.
October 11, 2009
Beginning Eclipse CVS - Branching: Work continues in the Trunk
<= Back to previous section "Work in the branch
- Option 1: If a second person is playing Wing, start at this step
- Option 2: If you are playing both Paul AND Wing, start at this step.
Continue reading below break...
- Option 1: A second person is playing Wing. You ("Wing") are starting fresh, so you will need to import the HEAD files into a new, empty workspace. Right-click in the white area in the Project Explorer, and select Import.
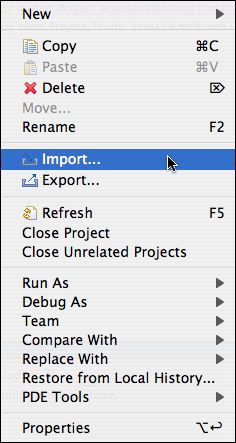
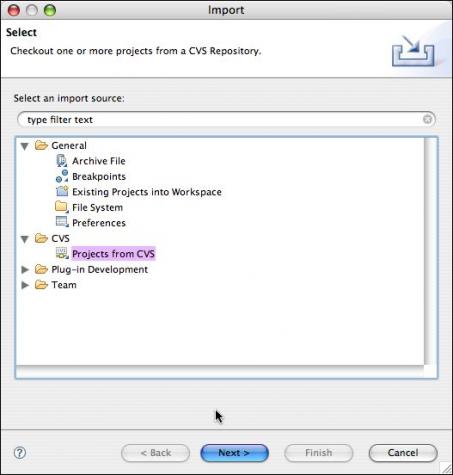
- Select CVS >Projects from CVS and click Next.
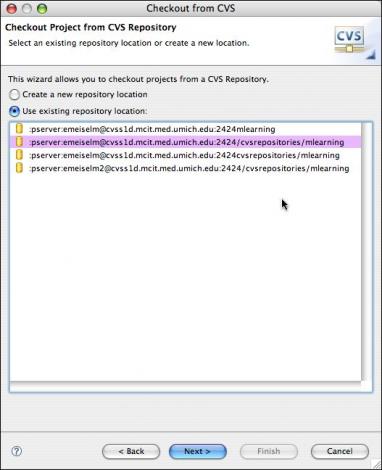
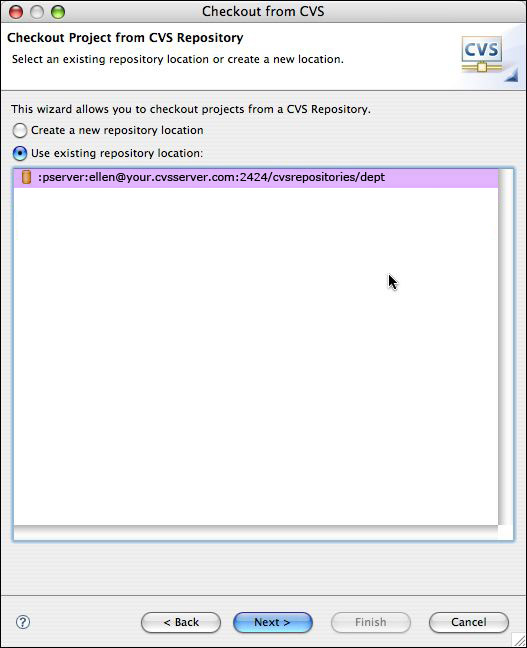
- Select the CVS repository you want to use from the list and click Next.
- It will ask you to choose a workspace. If you do not already have a workspace directory to use, you can create one now.

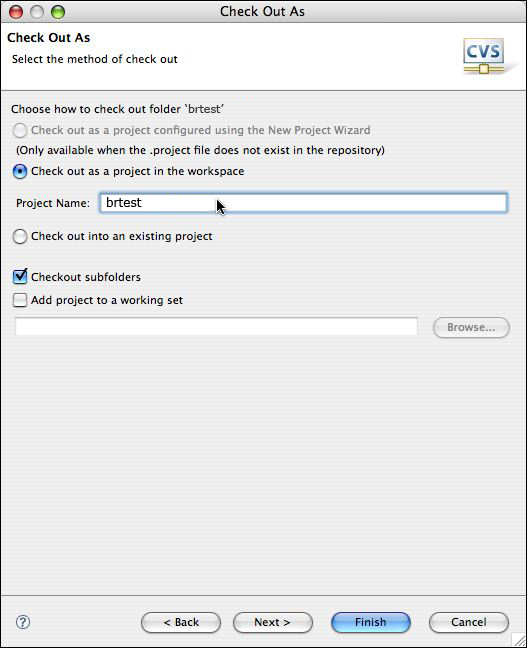
- Check the project out as brtest, selecting Checkout subfolders and click Next.
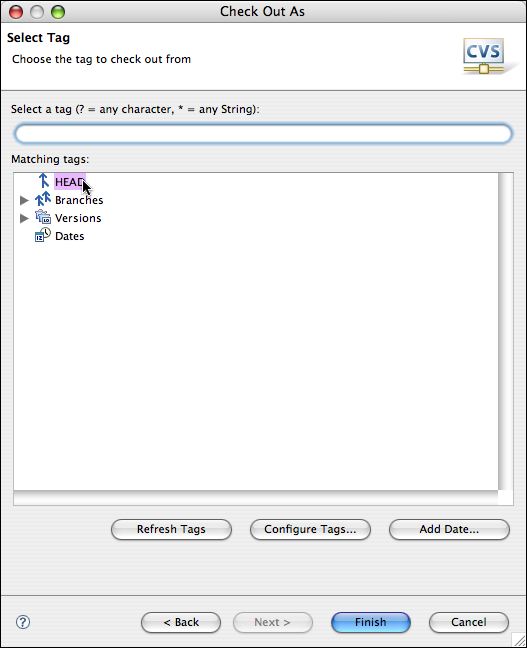
- Select HEAD from the list of tags. Click Finish.
Now go to your next step and continue

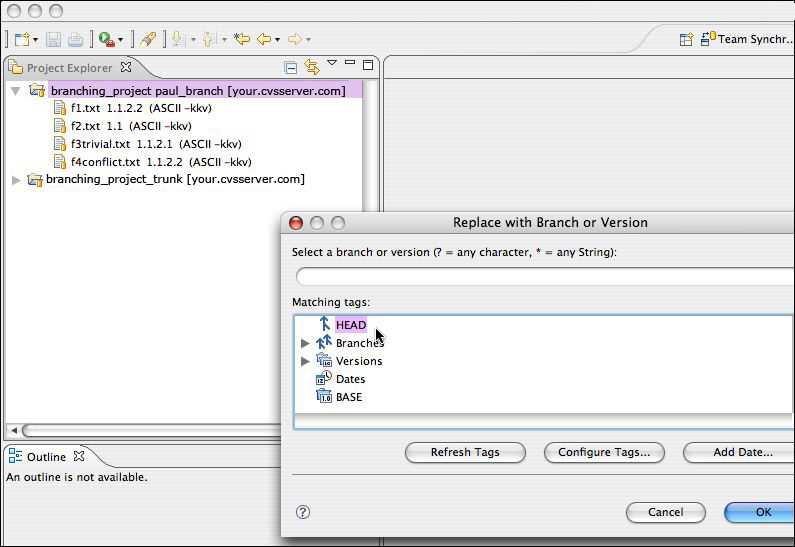
- Option 2 starts here: If you started as "Paul" you already have a workspace with a project in it. Replace the files in your workspace with those of the HEAD by selecting Team > Switch to Another Branch or Version. This replaces the resources in your workspace with those on the tag you specify in the next step.
- Select HEAD from the list of tags. Click Finish.
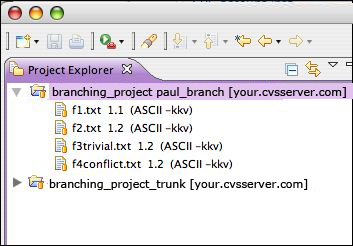
- You should now see a new brtest folder in your Project Explorer. There will be no branch listed to the right of the folder name, indicating that you are NOT working in a branch with respect to this project.
- Now we'll start editing files as "Wing." First we'll edit a file that will only be edited by Wing. Open f2.txt. (The file f1.text is only going to be edited by Paul)
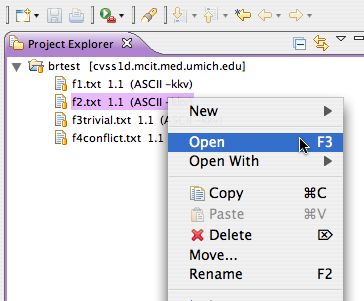
- Change line 3 to read "This line changed by Wing in iter1." Save the change. A ">" will be added beside f2.txt
- Open f3trivial.txt. This file will be edited by both Paul and Wing, but on separate lines, only. Change line 9 to "This line changed by Wing in iter1." Save the change.
- Open f4conflict.txt. This file will be edited by both Paul and Wing on the same line. Change line 3 to "This line changed by Wing in iter1." Save the file.
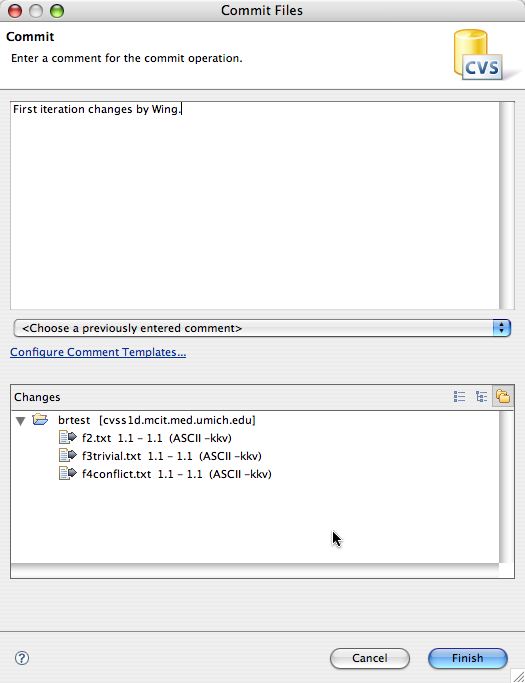
- Commit all these changes. Right-click the project folder and select Team > Commit

- Add a comment: "First iteration changes by Wing."
- The version numbers will remain 2 digit numbers because the changes were made on the trunk.

- Right-click the brtest folder and select Team > Tag as Version...
- Enter the name W1.
We're now here in the flowchart:


October 9, 2009
A better way to make a custom Wordpress-style Flickr badge
I just found this while experimenting with the Flickr badgemaker. It's a much more customizable way to get nice results than the method I posted earlier.Go to: Create your own Flickr badge and make the selections as specified:
- Choose HTML badge
- Select the content you want to show.
- Would you like to include your buddy icon & screen name at the bottom? Choose No
- How many items would you like to show? Choose 10
- Which ones? Choose either most recent or random.
- What size? Square
- Which orientation would you like? None (Because you want to style it yourself)
- Check off No background, No border.
<style type="text/css">
/*
Images are wrapped in divs classed "flickr_badge_image" with ids "flickr_badge_imageX" where "X" is an integer specifying ordinal position. Below are some styles to get you started!
*/
#flickr_badge_uber_wrapper {text-align:center; width:185px;position:relative;}
#flickr_badge_wrapper {padding:0px 0 0px 0;}
.flickr_badge_image {margin:0 0px 0px 0px;border:1px solid black;padding:6px;float:left;}
.flickr_badge_image img {border: 1px solid black !important;}
#flickr_badge_source {text-align:left; margin:0 10px 0 10px;}
#flickr_badge_icon {float:left; margin-right:5px;}
#flickr_www {display:block; padding:0 10px 0 10px !important; font: 11px Arial, Helvetica, Sans serif !important; color:#3993ff !important;}
#flickr_badge_uber_wrapper a:hover,
#flickr_badge_uber_wrapper a:link,
#flickr_badge_uber_wrapper a:active,
#flickr_badge_uber_wrapper a:visited {text-decoration:none !important; background:inherit !important;color:#3993ff;}
#flickr_badge_wrapper {}
#flickr_badge_source {padding:0 !important; font: 11px Arial, Helvetica, Sans serif !important; color:#666666 !important;}
#flickr_badge_image1, #flickr_badge_image2, #flickr_badge_image3, #flickr_badge_image4{}
</style>
<div id="flickr_badge_uber_wrapper"><div id="flickr_badge_wrapper">
<script type="text/javascript" src="http://www.flickr.com/badge_code_v2.gne?show_name=1&count=10&display=random&size=s&layout=x&source=user_set&user=47051377%40N00&set=72157621682851999&context=in%2Fset-72157621682851999%2F"></script>
</div></div>
<!-- End of Flickr Badge -->
And here's what it looks like:October 8, 2009
Flip4Mac WMV player constantly "importing" in background
On upgrading to Snow Leopard, a little window with a progress bar started appearing: "Flip4Mac importing". No reference to what was being imported or why.
This has apparently been fixed in Flip4Mac WMV 2.3.0.11-Beta. It's not available from the main download site on Microsoft.com. You have to get it here:
[LINK]
G5 won't enter Firewire mode
If your Mac refuses to go into Firewire mode, check your keyboard! Chances are, it is plugged into your monitor. Plug it directly into the computer (you'll probably have to dig out your old USB extension cable to do this). Also, unplug all other firewire devices.
For more on Firewire Target Disk mode, see this page [Link]
October 3, 2009
JW FLV player that switches playlists on the fly
The JW FLV player is a versatile, customizable and scriptable flash video player, available from Longtailvideo.com. The player was recently upgraded, and many details in the scripting and playlists had to change to remain compatible. I'm posting examples of some of the players I've created lately, using the latest version of the player and SWFObject.
Versions
This is an example of a current-version player that changes playlists on the fly when you click a link or button.
I can't show you a working demo because I don't have an external Red5 server but here is how it looks. When the page loads, the player loads the first playlist.

When links in the navbar are clicked, the player loads other playlists.

Here's the code. You can download the whole set of files, except for the videos, here: [ DOWNLOAD LINK ]
Example HTML
<!DOCTYPE html PUBLIC "-//W3C//DTD XHTML 1.0 Transitional//EN"
"http://www.w3.org/TR/xhtml1/DTD/xhtml1-transitional.dtd">
<!--http://www.longtailvideo.com/support/forum/Feature-Suggestions/2756/Multiple-playlists-a-Success-#msg109471-->
<html xmlns="http://www.w3.org/1999/xhtml">
<head>
<!--/*v 1.5 12-11-2007*/-->
<title>Player that swaps playlists on clicking link</title>
<meta http-equiv="Content-Type" content="text/html; charset=iso-8859-1"/>
<style>
body { background-color:#000;}
#subnav{ width:150px;}
#subnav h2 {width:150px;height:20px;padding:3px 3px 6px 3px;background-color:#1277D4;font:12px bold Arial, Helvetica, sans-serif;color:#FFF;margin-bottom:2px;}
div#subnav a,#subnav a:link,#subnav a:visited {border-left:6px solid #1277D4;display:block;width:144px;background-color:#96C2ED;font:12px normal Arial, Helvetica, sans-serif;text-decoration:none;color:#000000;padding:3px 3px 6px 3px;margin-bottom:2px;}</style>
<script type="text/javascript" src="js/swfobject/swfobject.js"></script>
<script type="text/javascript">
var player=null;
function gid(name) { return document.getElementById(name); };
var flashvars = {
fullscreen: 'true',
resizing: 'true',
playlistsize: '300',
width: '307',
height: '288',
backcolor: '#111111',
frontcolor: '#999999',
lightcolor: '#66cc00',
//lightcolor: '#FFFFFF',
playlist: 'right',
repeat: 'none',
shuffle: 'false',
icons: 'false',
bufferlength: '1',
autostart: 'false',
stretching: 'fill',
skin: 'includes/mediaplayer4.5/modieus.swf',
oncomplete: 'none',
file: 'http://yourwebserver.com/media/playlist1.xml',
streamer: 'rtmpt://yourred5server.com:80/streams/'
//, debug: 'console'
};
var params ={
allowscriptaccess: 'always',
allowfullscreen: 'true',
bgcolor: '#000000'
};
var attributes ={
id: 'player',
name: 'player'
};
swfobject.embedSWF('includes/mediaplayer4.5/player4-6.swf', 'player', '607', '288', '9.0.124', false, flashvars, params, attributes);
function loadFile(theFile){ player.sendEvent('LOAD',theFile); };
</script>
</head>
<body>
<!--*********************put content below this line!!!!************-->
<table width="100%" border="0" id="contenTable" style="background:#000;">
<tr>
<td valign="top" class="col1" colspan="2" ><h1>Click links to swap playlists</h1></td>
</tr>
<tr>
<td valign="top" class="col1" width="170">
<div id="subnav">
<h2>By task:</h2>
<a href="javascript:loadFile('media/playlist-test.xml')">Playlist Test</a>
<a href="javascript:loadFile('media/playlist2.xml')">Playlist Test 2</a>
<a href="javascript:loadFile('media/playlist1.xml')">How to (some task)</a>
<h2>Patient population:</h2>
<a href="javascript:loadFile('media/playlist2.xml')">Bariatric</a>
<a href="javascript:loadFile('media/playlist1.xml')">Pediatric</a>
<h2>Type of Equipment:</h2>
<a href="javascript:loadFile('media/playlist2.xml')">Brand 1</a>
<a href="javascript:loadFile('media/playlist1.xml')">Brand 2</a>
</div>
</td>
<td valign="top">
<a id="player" name="player" class="player" href="http://www.adobe.com/shockwave/download/download.cgi?P1_Prod_Version=ShockwaveFlash">Get the Adobe Flash Player to see this video.</a>
</td>
</tr></table>
<script type="text/javascript">
function playerReady(obj) { player = gid(obj.id); };
function gid(name) { return document.getElementById(name); };
</script>
</body>
</html>
Example Playlist
<?xml version="1.0" encoding="utf-8" ?>

  <playlist version="1" xmlns="http://xspf.org/ns/0/" >

  <trackList>

  <track>

  <title>Video02 - Playlist 1</title>

  <creator>author or other info here</creator>

  <annotation>Short description goes here  </annotation>

  <location>vid02.flv</location>

  <type>rtmp</type>

  <image>media/vid02.jpg</image>

  <meta rel="start">0</meta>

  <meta rel="duration">205</meta>

  <meta rel="tags">tag1,tag2,tag3</meta>

  </track>

  <track>

  <title>Video03 - Playlist 1</title>

  <creator>author or other info here</creator>

  <annotation>Short description goes here  </annotation>

  <location>vid03.flv</location>

  <type>rtmp</type>

  <image>media/vid03.jpg</image>

  <meta rel="start">0</meta>

  <meta rel="duration">36</meta>

  <meta rel="tags">tag1,tag2,tag3</meta>

  </track>

  <track>

  <title>Video04 - Playlist 1</title>

  <creator>author or other info here</creator>

  <annotation>Short description goes here here's another line </annotation>

  <location>vid04.flv</location>

  <type>rtmp</type>

  <image>media/vid04.jpg</image>

  <meta rel="start">0</meta>

  <meta rel="duration">108</meta>

  <meta rel="tags">tag1,tag2,tag3</meta>

  </track>

  <track>

  <title>Video05 - Playlist 1</title>

  <creator>author or other info here</creator>

  <annotation>Short description goes here  </annotation>

  <location>vid05.flv</location>

  <type>rtmp</type>

  <image>media/vid05.jpg</image>

  <meta rel="start">0</meta>

  <meta rel="duration">140</meta>

  <meta rel="tags">tag1,tag2,tag3</meta>

  </track>

  <track>

  <title>Video06</title>

  <creator>author or other info here</creator>

  <annotation>Should be able to put a multi line description here. 2Should be able to put a multi line description here. 3Should be able to put a multi line description here. 4Should be able to put a multi line description here.  </annotation>

  <location>vid06.flv</location>

  <type>rtmp</type>

  <image>media/vid06.jpg</image>

  <meta rel="start">0</meta>

  <meta rel="duration">130</meta>

  </track>

  <track>

  <title>Video100</title>

  <creator>author or other info here</creator>

  <annotation>Should be able to put a multi line description here. 2Should be able to put a multi line description here. 3Should be able to put a multi line description here. 4Should be able to put a multi line description here.  </annotation>

  <location>vid100.flv</location>

  <type>rtmp</type>

  <image>media/vid100.jpg</image>

  <meta rel="start">0</meta>

  <meta rel="duration">130</meta>

  </track>

  </trackList>

  </playlist>
JW FLV player 4.6: Two or more players on a page
The JW FLV player is a versatile, customizable and scriptable flash video player, available from Longtailvideo.com. The player was recently upgraded, and many details in the scripting and playlists had to change to remain compatible. Since it can be difficult to figure out the details of the necessary changes, I'm posting examples of some of the players I've created lately, using the latest version of the player and SWFObject.
Versions
- Player: JW FLV player 4.6
- SWFObject: 2.1
- Red5 Streaming server using RTMPT or RTMP
This is an example of how to put two or more JW FLV players on a page, side by side. I can't show you a working demo because I don't have an external Red5 server but here is how it looks.

Example HTML
<!DOCTYPE html PUBLIC "-//W3C//DTD XHTML 1.0 Transitional//EN"
"http://www.w3.org/TR/xhtml1/DTD/xhtml1-transitional.dtd">
<html xmlns="http://www.w3.org/1999/xhtml">
<head>
<TITLE>Two video players, side by side.</TITLE>
<script type="text/javascript" src="js/swfobject/swfobject.js"></script>
<script type="text/javascript">
var flashvars =
{
fullscreen: 'true',
resizing: 'true',
playlistsize: '0',
backcolor: '#000000',
frontcolor: '#999999',
playlist: 'right',
repeat: 'none',
shuffle: 'false',
icons: 'false',
bufferlength: '1',
autostart: 'false',
stretching: 'uniform',
streamer: 'rtmpt://yourRed5server.com:80/streams/',
file: 'media/playlist2.xml'
};
var flashvars2 =
{
fullscreen: 'true',
resizing: 'true',
playlistsize: '0',
backcolor: '#000000',
frontcolor: '#999999',
playlist: 'right',
repeat: 'none',
shuffle: 'false',
icons: 'false',
bufferlength: '1',
autostart: 'false',
stretching: 'uniform',
streamer: 'rtmpt://yourRed5server.com:80/streams/',
file: 'media/playlist2b.xml'
};
var params =
{
allowscriptaccess: 'always',
allowfullscreen: 'true',
bgcolor: '#000000'
};
var params2 =
{
allowscriptaccess: 'always',
allowfullscreen: 'true',
bgcolor: '#000000'
};
var attributes =
{
id: 'player',
name: 'player'
};
var attributes2 =
{
id: 'player2',
name: 'player2'
};
swfobject.embedSWF('includes/jw_media_player/player.swf', 'player', '320', '240', '9.0.124', false, flashvars, params, attributes);
swfobject.embedSWF('includes/jw_media_player/player.swf', 'player2', '320', '240', '9.0.124', false, flashvars2, params2, attributes2);
// -->
</SCRIPT>
</head>
<body>
<div id="rightColumn">
<div id="content">
<table width="50%" border="0" id="contenTable">
<tr>
<td colspan="2" valign="top"><h1>Videos</h1> </td>
</tr>
<tr>
<td valign="top">Forklift Safety: Best Operating Practices (13:51) </td>
<td width="50%" valign="top">Forklift Walk Behinds (4:46) </td>
</tr>
<tr>
<td valign="top"><a id="player" name="player" class="player" href="http://www.adobe.com/shockwave/download/download.cgi?P1_Prod_Version=ShockwaveFlash">Get the Adobe Flash Player to see this video.</a></td>
<td width="50%" valign="top">
<a id="player2" name="player2" class="player" href="http://www.adobe.com/shockwave/download/download.cgi?P1_Prod_Version=ShockwaveFlash">Get the Adobe Flash Player to see this video.</a></td>
</tr>
<tr>
<td colspan="2" valign="top"><hr width="100%" noshade="noshade" /></td>
</tr>
<tr>
<td width="50%" valign="top"><h6> </h6></td>
<td width="50%" valign="top"><div align="right">
<h6> </h6>
</div></td>
</tr>
</table>
</div><!--end content-->
</div><!--end rightColumn-->
</div>
</body>
</html>
playlist2.xml
<?xml version="1.0" encoding="utf-8"?>

<playlist version="1" xmlns="http://xspf.org/ns/0/">

<trackList>

<track>

<title>Forklift Best Practices</title>

<creator>author or other info here</creator>

<annotation>Short description goes here  </annotation>

<location>Operating_Practices.flv</location>

<type>rtmpt</type>

<image>media/forkliftBestPractices.jpg</image>

<meta rel="start">0</meta>

<meta rel="duration">724</meta>

<meta rel="tags">tag1,tag2,tag3</meta>

</track>

</trackList>

</playlist>
playlist2b.xml
<?xml version="1.0" encoding="utf-8"?>

  <playlist version="1" xmlns="http://xspf.org/ns/0/">

  <trackList>

  <track>

  <title>Forklift Walk Behinds</title>

  <creator>author or other info here</creator>

  <annotation>Short description goes here  </annotation>

  <location>forkliftWalkBehinds.flv</location>

  <type>rtmpt</type>

  <image>media/forkliftWalkBehinds.jpg</image>

  <meta rel="start">0</meta>

  <meta rel="duration">285</meta>

  <meta rel="tags">tag1,tag2,tag3</meta>

  </track>

  </trackList>

  </playlist>
October 2, 2009
MPEG2 muxed files have no audio in Quicktime
If you have ever opened a VOB file from a DVD in Quicktime, you've probably noticed that there is no sound. When you examine the properties of the file, you'll see that it is an Muxed (Multiplexed) MPEG2, which means that the audio and video are interleaved together into one transport stream. Apparently Quicktime is not yet capable of dealing with Muxed files, although it can playback MPEG2.
I often have to convert DVD's to Flash Video, with specific settings to make it stream correctly on our Red5 server. In the past, I've tried several combinations of DVD ripper software and Flash encoders, but it has always seemed inefficient that I can't just open the VOB files in Quicktime and export directly to Flash Video using Quicktime's conversion functions. However Quicktime cannot access the audio in VOB files.
One video converter from Xilisoft (Video Converter Platinum for Mac or Windows) does open VOB files and exports them directly to Flash Video but lacks controls for the settings for codecs and keyframes that I need.
Today I found the answer - at least until Apple fixes Quicktime. MPEG Streamclip from Squared 5, a free video converter for Mac and Windows. MPEG Streamclip opens and converts the files using the full Flash Encoder conversion interface. The quality seems quite good, too.
Thanks to Rolen27 of the MacRumors Forums for the tip.