phpMyAdmin: How to enable the relation features
One very useful feature of phpMyAdmin is the ability to define simple relations between tables easily, using a GUI interface. The data from a field in one table can populate a field in another table, in a drop-down menu.
phpMyAdmin is a web-based mySQL administration script, available from PHPmyAdmin.net. A lot of hosting services use phpMyAdmin as their mySQL editing and administration interface.
- THE TABLE RELATIONS FEATURE OF phpMyAdmin
- DOWNLOAD AND UNPACK THE ARCHIVE
- CONNECTION INFORMATION
- FILL OUT PMAdb INFORMATION
- SAVE AND UPLOAD
- IMPORT THE TABLES INTO PMAdb
- RELATION VIEW
One very useful feature of phpMyAdmin is the ability to define relations between tables. This means the data from a field in one table can populate a field in another table. For example:
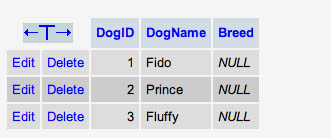
Say you have a table called “Dogs” that lists all your pets:
Dogs
____________________
ID     DogName   Breed
___________________
1      Fido       ?
2      Prince     ?
3      Fluffy     ?
__________________
…and you would like the field “Breed” for each of the dogs listed to be populated with values that come from a table that contains a list of all the breeds. In the words of the phpMyAdmin manual, you are using a field in one table as a foreign key in another table.
The second table “Breeds” that holds the breed values might look like this:
BREEDS
_____________
ID  Breed
_____________
1    Poodle
2    Terrier
3    Labrador Retriever
4    Beagle
5    Bulldog
If the relation features were enabled, when you edited a record in the Dogs table, you would see a dropdown of the items listed in the Breeds table like this:
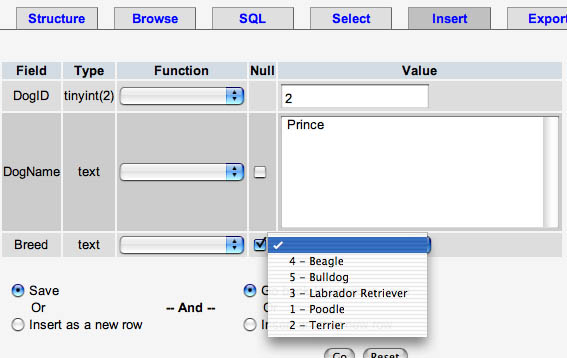
This structure eliminates the redundancy of having to enter the same breed over and over in a long list of Dogs, and more importantly you can relate the list of Breeds to any other object in the database, independent of the list of Dogs.
I’ve found that although hosting services frequently install phpMyAdmin for their users, they rarely enable the table linking features. Users can’t configure the hosting services pre-installed phpMyAdmin script to suit themselves, so if you want to use table linking, you will need to set up your own copy of phpMyAdmin within your website directory.
I found it confusing to set up table linking correctly the first time, so here are my simplified setup instructions for phpMyAdmin and enabling table linking.
(Complete documentation for installing phpMyAdmin is in “documentation.html” in the phpMyAdmin directory or HERE.)
DOWNLOAD AND UNPACK THE ARCHIVE
Download the latest version from this site. Unpack the archive, and find “config.inc.php”. Open it, and display line numbers in whatever html or text editor you are using.
FILL OUT CONFIG.INC.PHP
Look for the “Server Configuration” section starting around line 63. phpMyAdmin can control multiple virtual servers or multiple servers with a single instance of the application, so there are several identical lists of options, one for each server. They are each labled by: “$i++; “.
You will only need to fill out the first list, labeled with a “$i++;” (around line 68).
FILL OUT CONNECTION INFORMATION
The first part of each Server Configuration block mainly deals with the connection information: the mySQL host address (in most cases this will be “localhost,” but sometimes it will be on a separate server. If so, fill in the address of the server), a username that has administrative permissions for your databases, and the password.

Connection information
PMAdb DATABASE INFORMATION
You will need to create a place for phpMyAdmin to store linking data in order to get the linking features working. It can either be a new database, or if you can’t create a new one, use an existing one, and insert the required tables into it. The name of this database goes in line 90. For our purposes we’ll call it “PMAdb.”
The names of the required tables go in the next few lines. Default suggestions for their names are given in every case. If you change the names of the tables, be sure to change them to match in “scripts/create_tables.sql”

PMAdb section of “config.inc.php”
SAVE AND UPLOAD
Save the customized “config.inc.php” and upload all the files in the phpMyAdmin directory on your server.
Browse to http://yourserver.com/phpMyAdmin/, log in (assuming you password protected phpMyAdmin with one of the authentication schemes), and either create the PMAdb database (if you have the privileges to do so), or decide which existing database to use.
IMPORT THE TABLES INTO PMAdb
To create the tables, click “Query Window” in the bottom of the left column.
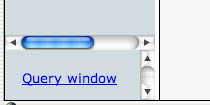
A window will appear. Select the database you are going to use from the “Run SQL query/queries on database” dropdown menu. You can enter the data either of two ways:
1) Open the file “scripts/create_tables.sql”, copy the contents, and paste them in the query window, then click “Go” or
2) you can import the file by clicking the “Import Files” tab, click the Browse button and browse to the file “scripts/create_tables.sql” then click “Go.”
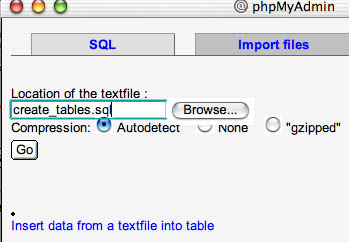
Either method will create the tables and initial data.
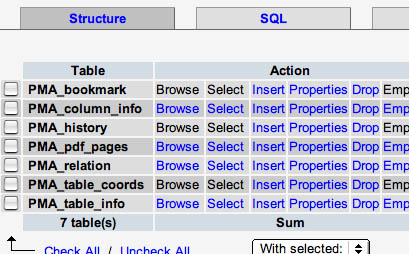
When complete, the structure of the PMAdb database should look like this:
RELATION VIEW
Now try the linking features.
Create a new database named DOGSdb, and import the schema for the dogs tables listed at the top of the article into it . Paste the schema shown below into the query window as described above in the ” PMAdb.
# SCHEMA FOR DOGSdb---------------------------------------------
#
# Table structure for table `Dogs`
#
# Creation: Sep 27, 2003 at 10:06 PM
# Last update: Sep 27, 2003 at 10:07 PM
#

CREATE TABLE `Dogs` (
  `DogID` tinyint(2) NOT NULL auto_increment,
  `DogName` text,
  `Breed` text,
  PRIMARY KEY  (`DogID`)
) TYPE=MyISAM AUTO_INCREMENT=4 ;

#
# Dumping data for table `Dogs`
#

INSERT INTO `Dogs` VALUES (1, Fido, NULL);
INSERT INTO `Dogs` VALUES (2, 'Prince', NULL);
INSERT INTO `Dogs` VALUES (3, 'Fluffy', NULL);

# --------------------------------------------------------

#
# Table structure for table `Breeds`
#
# Creation: Sep 27, 2003 at 10:10 PM
# Last update: Sep 27, 2003 at 10:11 PM
#

CREATE TABLE `Breeds` (
  `BreedID` tinyint(25) NOT NULL auto_increment,
  `Breed` text,
  PRIMARY KEY  (`BreedID`)
) TYPE=MyISAM AUTO_INCREMENT=6 ;

#
# Dumping data for table `Breeds`
#

INSERT INTO `Breeds` VALUES (1, 'Poodle');
INSERT INTO `Breeds` VALUES (2, 'Terrier');
INSERT INTO `Breeds` VALUES (3, 'Labrador Retriever');
INSERT INTO `Breeds` VALUES (4, 'Beagle');
INSERT INTO `Breeds` VALUES (5, 'Bulldog');
View the table “Dogs” by selecting the database name in the left hand column, then when the list of tables shows up, click on the “Dogs” table name in the list. The [b]Structure[/b] tab will be highlighted and you’ll see the structure of the table. Click the [b]Browse[/b] tab. You should see a listing of the three dogs you just imported.
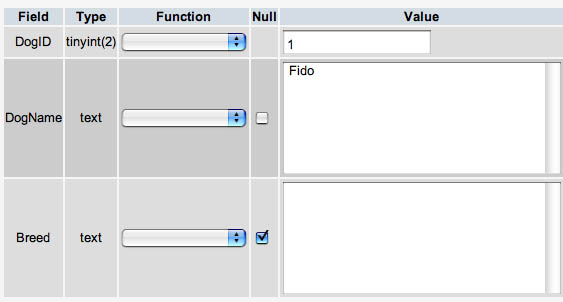
If you click the “EDIT” link next to Fido’s name, you should see the edit screen, but the Breeds field will be empty, like this.
Now let’s check the Breeds table:
In the navigation column on the left, click the “Breeds” link. The structure of the Breeds table should come up: “BreedID” and “Breed “are the two fields that will be listed. If you click the “Browse” tab, you should see a list of all the breeds entered so far.
Click the “Structure” tab again, and then click the words “Relation View” which appear below the horizontal line, and below “Add new field”. See the image below – which shows the link on another table than the ones we are working on.

Click to enlarge.

Breeds Table Relation View
We need to decide which field will appear as a label when values from the “Breeds” table appear in the “Breed” field of the Dogs table. The actual value that will be related will be the BreedID, but for ease of selecting the correct BreedID, it is easier to use a text label that is associated with that ID.
We only have two fields in this table: BreedID and Breed, and one of them is an ID number, which is not very descriptive. So let’s choose the “Breed” field, which has the name of each breed in it.
Do this by selecting Breed from the drop-down menu under “Choose field to display.” Click the Go button below that area.
Now we move back to the Dogs table.
Click the link to the “Dogs” table in the left hand navigation column.
You should be in the “Structure” tab.
Click on “Relation View.”‘
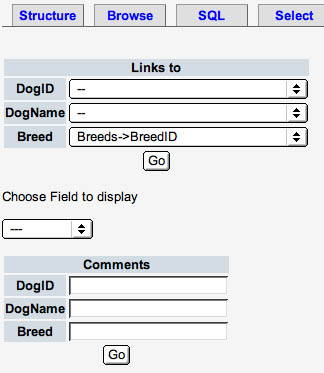
Dogs table relation view
Under “Links to, ” select “Breeds->BreedID” from the dropdown menu next to the Breed Field. Only the fields that are indexes (“Breeds->BreedID”, “Dogs->DogID”) show up here, but our chosen text labels will also display when we edit the Dogs table, since we just set them to do so in the previous screen.
Note that in more recent versions, this task is still under the Structure tab, but instead of clicing the “Choose Field to display”
Click the “Go” button below the “Links to” area. Now go back and Browse the Dogs table, and try editing any one of the records. You will now see a dropdown menu containing all the breeds in the Breed field!
Thank you sooo much for this howto! It really helped me out a lot!! the phpmyadmin notes were really cryptic.
Only note is that your images are not working. I dled your source and renamed the images to correct locations.
Great work!
Thanks for pointing that out: The QuickCode plugin was escaping the quotes around the URL’s. Safari was interpreting them correctly but IE choked on them. Removing the quotes solved the problem.
Thank you ! Merci beaucoup !
Thank you ! Merci beaucoup !
Thanx so much. May God bless you, bro.
Thank you so much for having taken at one moment the time to do this…. Like the first comment…. I was lost in the configuration notes of the phpMyAdmin software and nothing was working out !!! And then I just followed your simple steps !!!!
Thank you !!!!
First time to use phpMyadmin and this page really helps me a lot. Thanx for the great work…
I’ve got a small enquiry…. With my phpMyadmin main window, there is no select option, i’ve got search, can you let me know whether i’ve missed out on something here please..
Hi, the “Select” tab shows up only when you are browsing within a table, not when viewing the list of all the tables.
I’m browsing a table, and I don’t see the “Select” tab anywhere. Did I do something wrong?
Great article/tutorial – thanks so much!
for some reason i’m not getting the “Relation View” link to show up, which defeats my whole attempt at making this work, any ideas why that wouldn’t show up?
thanks again,
Very good tutorial. I agree – most of the phpMyAdmin documentation out there is quite poor. Cheers!
Such a fabulous tutorial, thank you so very much. I too had difficulty following the process, but this got my databases up and working. Thanks again.
Hi Johnny,
Make sure your tables use InnoDB engine and not MyISAM.
Bala.
“Choose Field to display” doesn’t appear to me. Help!
Hi,
I just took a look at a newer version (the version described above is several years old). Under the structure tab of any table you should see “Relation View” at the bottom of the field list. Click that and then you’ll see drop down menus to choose the related fields from. I’ll post some screenshots in a few days to show the new configuration.
Hi
I created the database you called pmad I called phyadmin. I imported the structures – okay
I created the Doggy database.
I had not clue what your are saying in this next step…..
“………, and import the schema for the dogs tables listed at the top of the article into it”
What schema ?#$%
I then tried to take your code and create SQL scripts and imported it and got the following SQL error messages:
Error
SQL query:
# SCHEMA FOR DOGSdb———————————————
#
# Table structure for table `Dogs`
#
# Creation: Sep 27, 2003 at 10:06 PM
# Last update: Sep 27, 2003 at 10:07 PM
#
CREATE TABLE `Dogs` (
`DogID` tinyint( 2 ) NOT NULL AUTO_INCREMENT ,
`DogName` text,
`Breed` text,
PRIMARY KEY ( `DogID` )
) TYPE = MYISAM AUTO_INCREMENT =4;
MySQL said: Documentation
#1064 – You have an error in your SQL syntax; check the manual that corresponds to your MySQL server version for the right syntax to use near ‘<pre>
# SCHEMA FOR DOGSdb———————————————
#
# Ta’ at line 1
Why is it that people who develop tools are so cryptic when offering features ?
Hi, sorry – back when I posted this, I didn’t have a good way to post code, so the “pre” tags ended up inside the code area. They should not be there.
Remove the pre tags and try again – and I’ve now corrected it on the page.
A schema is the structure of a database (as opposed to the data which fills it). the schema shown is the CREATE TABLE… part.
Not sure if this helps, but a detailed tutorial including some SQL statements for setting up users can be found here: http://techblog.willshouse.com/2009/08/16/enabling-linked-tables-in-phpmyadmin/
Hi Ellen, thanks for this great howto 🙂
some quick questions:
my phpMyAdmin somehow is behaving strangely.
is it true, that a Field Type “TEXT” can not have “Length” value ?
and if a Field Length is not defined than it can’t be use as an index key?
and if a Field is not an index key than it can’t be set as a foreign key?
please advise 🙂
Thank you. Been looking 4 this 4 a very long time and could not understand the documentation.
you started off simple, then confused the fcuk out of me.. oh well.. guess Ill have to search somewhere else
thanks.. !!
—–