Create Database-Driven Sites the Easy Way with GoLive 6
PHP/MySQL for the rest of us!
(originally published Spring, 2002)
Intro:
Designers now have a new tool to help them create php/mySQL-based
dynamic sites using without a steep learning curve. It is now
almost as easy to create a simple database-driven site as an html-based
one. Adobe’s GoLive 6 has improved their dynamic link module and
completely integrated it into the application. It now includes
php/mySQL support and plenty of help and templates for creating
your first database-driven website.
site?
started.
to MySQL without a Ph.D.
up the site in GoLive.
Content to your page.
There are two good really reasons to leave the domain of the
static html-based site: Interaction and Maintenance.
A dynamic site allows user interaction. Visitors to your site
can search, select, and customize their information, or contribute
to the site by adding new information, such as messages or articles.
But the really big advantage is in the maintenance. Maintenance
of a rapidly changing site is always a big issue. Clients rarely
take the true cost of keeping a static site updated into account
in their development budgets.
If a site require frequent changes, you should consider making
it database-driven. When new content such as product information,
images, or articles is added to the database, it propagates through
the site without someone having to edit every page it appears
on. As users search for products or select articles, the content
is merged with page templates on the fly using "queries"
which grab the right information from the database to fill each
region of the web page.
The efficiency of a dynamic site is obvious, but until recently, the programming skills required to develop one in PHP/MySQL have been a barrier for many web designers.
However, designers now have two new tools to help them create dynamic sites: Adobe GoLive 6, and soon to come, Macromedia Dreamweaver MX. Both applications do similar tasks, and both will handle PHP/MySQL as well as several other language/database combinations, but since
only GoLive is currently out, we’ll use it to illustrate the steps
in developing a dynamic site. This is not meant to be a complete
tutorial, but will show you how easy it can be.
The first step is to plan out what you want your site to do,
because this will determine the kinds of pages required. This
could be in the form of a flow-chart or site map. If you are new
to designing dynamic sites, it is a good idea to begin by looking
at the example sites provided with GoLive.
These sample sites demonstrate how to set up a photo album, a
product catalog, a shopping cart, a user forum, calendar, and
an E-zine. A set of dynamic pages works together to create what
is called a "web application." Because they issue instructions
to each other and to the database, they are functioning as software,
rather than as a simple set of links. It is important to make
sure that the site you are designing will have all the pieces
necessary so that the application actually returns responses to
the user that make sense, or you will have very frustrated users.
At first, you may wish to simply adapt the sample sites to your
own needs rather than starting from scratch.
There are two parts to any database-driven site: the front end
– the web pages which contain instructions for selecting and displaying
data; and the back end – the database containing all the data.
Once you have planned your site, you may have to design the database,
unless you are using a pre-existing one. A good beginner’s guide
to SQL databases is in an article by Kevin Yank: Build
your own Database Driven Website using PHP & MySQL – Part
2: Getting Started with MySQL
How to talk to MySQL without a phD.
Setting up a MySQL database the first time can be a daunting task.
But if you use a web-based interface such as PHPMyAdmin, it makes
the process much easier. PHPMyAdmin is easy to install, and is
available free from: http://PHPwizard.net/projects/PHPMyAdmin/.
Often it comes pre-installed by your webhost when you ask for
a site with database support.
PHPMyAdmin simplifies tasks like adding a table to your database,
specifying field properties, and entering the data. It may also
help to have an example of a similar database to the one you wish
to create so you can imitate the field types and values. Here
again, GoLive’s sample sites can come to the rescue. Each contains
instructions for designing a database that will work with the
site.
![]()
Figure 1 – the interface for editing a field’s
properties in PHPMyAdmin
Click image to see it full-sized.
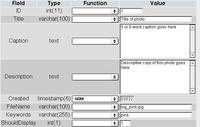
Figure 2 – the interface for editing a record
and its properties via PHPMyAdmin.
Click image to see it full-sized.
Setting up the site in
GoLive.
Once the database is in place on the server, you can start setting
up a new site in GoLive. GoLive will need to be given the right
settings to communicate with it the server and database, and the
location of the files you will edit – usually on a local drive
or server. There is staging-server and webDAV server capability
also.
The program walks you through the process of specifing the path
and user settings necessary to connect. Even so, there is enough
variation in server setups and path configurations that you may
not be successful the first time. A PHP troubleshooting page is
automatically generated by GoLive to help you solve connection
problems that may arise. The kinds of issues that come up typically
fall into the categories of path problems and permissions problems,
although occasionally PHP may not be installed correctly.
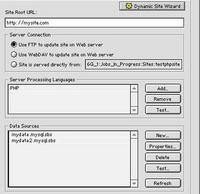
Figure 3 – Specifying a database and server processing
language
Click image to see it full-sized.
Once you have connected to the server, and chosen and connected
to a database, the next step is create a page in the site, make
it dynamic, and specify which subset of the database the dynamic
information on your page will be drawn from.
Adding Dynamic Content to
your page.
In GoLive’s terminology, this subset (defined by a query) is
called a "content source." An example of a content source would be to filter the records in a list of photos by whether or not the field "ShouldDisplay" is set to 1 or 0, or by whether certain keywords are present.
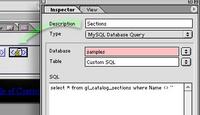
Figure 4 – creating a content source.
Click image to see it full-sized.
Nearly any page element, such as text, tables, form fields, or
images can be bound to content sources. A dynamic table can have
multiple fields poured into it like a spreadsheet.

Figure 5 – the Dynamic Content palette, showing containers, dynamic tables. record navigation objects, and dynamic form objects.
Click image to see it full-sized.
Once a content source is attached to a page, any object can be
bound to specific fields. Here a photo is being linked to a source
called Products, which contains the name of an image from a field
in the database, with an instruction to concatenate it with the
relative path to the small versions of the images (images/smallimages/FileName), so that the correctly sized image will be picked up on this page. When the small version is clicked, another instruction will be executed "Show Details of Current Record." This content will be displayed on the linked page, ie. "detail.PHP." Both a link action containing instructions for selecting data, and a standard html link reference must be specified, as seen in figure 7 below.
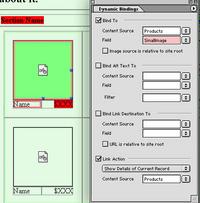
Figure 6 – binding an image to a content source,
and adding a link action.
Click image to see it full-sized.
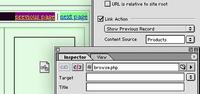
Figure 7 – Specifying the Link Action and the link
reference for a navigation button.
Click image to see it full-sized.
Testing the site must be done on a server that understands PHP
and MySQL. This can be the remote hosting server, or if you have
a Windows or OSX machine, you can install a preconfigured Apache
server that comes with GoLive to do your testing. Hopefully if
you have created your content sources and bindings correctly,
troubleshooting will not be too difficult.
I won’t say "that’s all there is to it," because this
is just the beginning, but hopefully this small taste of what’s
possible will whet your appetite for some of that dynamic site
"power!"
Great Resource
i want to create a dynamic website for my personal informations. could you plz help
—–