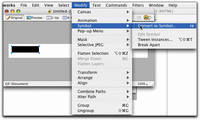
- To designate the rectangle as a button, so that it will react when your mouse rolls over it or clicks on it, it needs to be converted to a button symbol. Fireworks button symbols have some functions built in, making it very easy to create the behaviors you want.
With the rectangle still selected (the blue handles showing), select "Convert to Symbol" from the Modify menu.
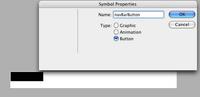
- Name your symbol and select Button as the type. Click OK to finish.
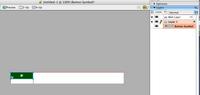
- Your rectangle will now have a greenish tint. The green tint is a transparent layer called a "slice". A slice is used to determine how the graphic you are creating in Fireworks should be cut up. This slice delineates the boundaries of the button and show the active area of the button and determine the size of the table cell or layer that will contain the button.
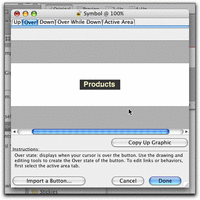
- Now, we need to further edit the properties of the button, to make it blink or flash when a mouse rolls over it. This rollover effect is used to give the viewer some feedback: it makes it obvious that your mouse is over the button, and that if you click the button, something will happen. The mouse rolling over or off of the button is treated as an "event" which can be used as a trigger for changes to the look of the button. Fireworks divides the various states of the button into UP (the default state of the button, the mouse is up off the button.), OVER (mouse rolls over the button), DOWN (mouse clicks on the button) and OVER WHILE DOWN (mainly used in navbars to show rollovers on the current page's button). Generally, the only ones you need to show some feedback to the user are UP and OVER.
Double-click the green rectangle anywhere but on the center registration mark (we'll use that later). The Symbol editing panel comes up.
Use the text tool within the Symbol editor to type a label for the button in the "Up" state, the first tab.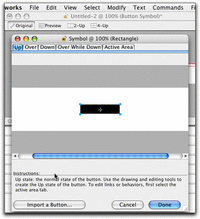
- The rollover effect is created by making a variation in the appearance of the button that will flash on when the mouse rolls over it. For example the type color could become brighter, or the background of the button could be indented.
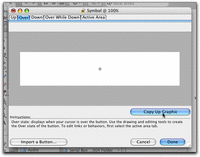
Click the Over tab to begin creating the Over state of the button.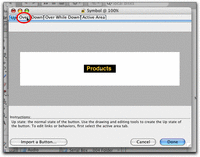
- To make the rollover animation effective, all the elements should be in exactly the same place or they will appear to jump slightly. You can make an exact duplicate of the graphics by clicking Copy Up Graphic. This copies whatever you created in the Up state into the Over state. In this case we will make very minor changes in the button colors - we'll change the text to a lighter yellow, and the background rectangle to gray.
Click Copy Up Graphic...
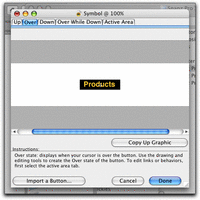
and the graphics from the Up state are copied to the Over state
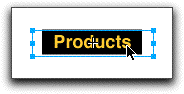
- Select the text. It can be difficult to tell if you have selected the text or the rectangle behind it. The text layer is on top of the rectangle layer, and probably will be the first thing to be selected if you click in the middle of it. There are two ways to tell which is selected: the handles of the text layer will not line up exactly with the corners of the rectangle, but the rectangle's handles will be exactly at the corners. The second way is, if you look at the properties inspector, you will see the word Text in the upper left.
Text is selected: handles don't line up with black rectangle. Instead, the boundaries of the text box turn blue.
Background rectangle is selected: the four corner points of the rectangle turn blue.
-
Press the "Play" button to see the movie showing how to select overlapping objects: observe which handles turn red as you roll the mouse over them.
-
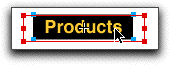
Still in the Over tab, select the text and choose a brighter yellow. Select the black rectangle and choose a gray color. Though only slightly different than the UP colors, these are different enough to show a blinking effect when the mouse rolls over the button.
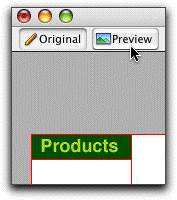
- Click the Done button to close the editing window and return to the main view. To see your rollover effect in action, click the Preview button. In Preview mode, run your mouse over the button and watch the color change.
Ads by Google
Posted by ellen at June 25, 2005 10:50 AM
Ads by Google
