February 25, 2009
Escape double quotes in strings in Visual Basic
I use Javascript much more than visual basic, so I've always been puzzled by how to escape nested quotes in strings in VB. In Javascript, you either nest single quotes (apostrophe's) and double quotes or add a backslash to escape the character (\", \'). But in VB, single quotes create a comment, and backslashes do not escape characters, so I've been using all sorts of tricks to try and avoid the situation.
Thanks to a discussion on this forum thread, I found that it's simple. Just use "" instead of " to escape the nested quote. In other words, just double up the double quote symbol, to have it ignored in calculating the end of the string.
February 24, 2009
Make your own custom code for a Wordpress-style Flickr badge
To create a nicer looking Flickr badge, use Flickr's badge creation tool to get the right user code and content codes for your badge.
Go to:
Create your own Flickr badge and make the selections as specified:
- Choose HTML badge
- Select the content you want to show.
- Would you like to include your buddy icon & screen name at the bottom? Choose No
- How many items would you like to show? Choose 3
- Which ones? Choose a random selection
- What size? Square
- Which orientation would you like? Horizontal
- Check off No background, No border.
The code will look something like the example below.
<!-- Start of Flickr Badge -->

<style type="text/css">

#flickr_badge_source_txt {padding:0; font: 11px Arial, Helvetica, Sans serif; color:#666666;}

#flickr_badge_icon {display:block !important; margin:0 !important; border: 1px solid rgb(0, 0, 0) !important;}

#flickr_icon_td {padding:0 5px 0 0 !important;}

.flickr_badge_image {text-align:center !important;}

.flickr_badge_image img {border: 1px solid black !important;}

#flickr_www {display:block; padding:0 10px 0 10px !important; font: 11px Arial, Helvetica, Sans serif !important; color:#3993ff !important;}

#flickr_badge_uber_wrapper a:hover,

#flickr_badge_uber_wrapper a:link,

#flickr_badge_uber_wrapper a:active,

#flickr_badge_uber_wrapper a:visited {text-decoration:none !important; background:inherit !important;color:#3993ff;}

#flickr_badge_wrapper {}

#flickr_badge_source {padding:0 !important; font: 11px Arial, Helvetica, Sans serif !important; color:#666666 !important;}

</style>


<table id="flickr_badge_uber_wrapper" cellpadding="0" cellspacing="10" border="0"><tr><td><a href="http://www.flickr.com" id="flickr_www">www.<strong style="color:#3993ff">flick<span style="color:#ff1c92">r</span></strong>.com</a><table cellpadding="0" cellspacing="10" border="0" id="flickr_badge_wrapper">

<tr>


<script type="text/javascript" src="http://www.flickr.com/badge_code_v2.gne?count=3&display=random&size=t&layout=h&source=user_tag&user=47051377%40N00&tag=yourtag"></script>


</tr>


</table></span>


</td></tr></table>


<!-- End of Flickr Badge -->
In the red text, change count=3 to count=4 to get 4 images across. Paste only the line of code in red into the table code below, 3 times where indicated:
<style>
  #flickrtbl td { width:76px;height:76px;overflow:hidden;border:1px solid #CCC;padding:3px;}
  #flickrtbl td img{ width:60px;height:60px;}
  </style>
  <table id="flickrtbl"><tr>
  [PASTE CODE HERE]&t=1 </td>
  </tr><tr>
   [PASTE CODE HERE]&t=2 </td>
   </tr><tr>
   [PASTE CODE HERE]&t=3 </td>
  </tr></table>
That's it - just paste that into your HTML page. Your badge will look something like this:

For more control over your badge:
Custom Flickr Badge API Documentation
February 23, 2009
Simple Ajax search form that creates a formatted report as you type keywords
This search form is based on the PHP and AJAX Live Search example from the w3schools.com site. I adapted it to show how it might work with ASP classic.

This form finds all courses in a database that contain whatever has been typed so far in their title, then displays them instantly as the keywords are being typed, grouped by type in two tables. Here you can see that "FIR" has been typed, and mostly courses on fire safety are found.

The letters are sent as soon as they are typed, using the onkeyup event as the trigger. Below the letters INF have been typed and courses containing "Infection", "Inform", "Infant" have been found. The changes to the result lists are very responsive and snappy as you type.

To build this form you will need 4 files:
- mydatabase.asp: a database connection file
- report.htm: the page containing the form and the display of the results
- livesearch.js the javascript functions the open and send the XMLHttpRequest
- functions.asp the file that queries the database and returns the formatted results.
This is the source of mydatabase.asp:
<%

  ' FileName="Connection_odbc_conn_dsn.htm"

  ' Type="ADO"

  ' DesigntimeType="ADO"

  ' HTTP="true"

  ' Catalog=""

  ' Schema=""

  Dim MM_mydsn_STRING

  'MM_lmsp_STRING = "dsn=MYDSN;uid=userid;pwd=mypassword;"

  %>
Replace the items in bold with the appropriate values for your database.
This is the source of report.htm:
<!DOCTYPE html PUBLIC "-//W3C//DTD XHTML 1.0 Transitional//EN" "http://www.w3.org/TR/xhtml1/DTD/xhtml1-transitional.dtd"> <html xmlns="http://www.w3.org/1999/xhtml"> <head> <meta http-equiv="Content-Type" content="text/html; charset=ISO-8859-1" /> <title>Live Search using ASP</title> <script src="livesearch.js" language="javascript"></script> </head>
<body> <p> </p> <p>This page will find all active online activities in the system. </p>
<p>Enter a keyword or phrase in the title of the course:</p> <form> Keyword <input name="keyword" type="text" id="keyword" value="" onkeyup="showResult(this.value)" /> </form> <div id="update"></div>
</body> </html>
This is the source of "livesearch.js".
As you can see it is almost identical to the w3schools example, except I changed a few div and function names. In other words you can use the same code for PHP or ASP or whatever.
var xmlHttp;
function showResult(str)
{
if (str.length==0)
{
document.getElementById("update").
innerHTML="";
document.getElementById("update").
style.border="0px";
return;
}
xmlHttp=GetXmlHttpObject()
if (xmlHttp==null)
{
alert ("Browser does not support HTTP Request");
return;
}
var url="functions.asp";
url=url+"?keyword="+str;
url=url+"&sid="+Math.random();
xmlHttp.onreadystatechange=stateChanged ;
xmlHttp.open("GET",url,true);
xmlHttp.send(null);
}function stateChanged()
{
if (xmlHttp.readyState==4 || xmlHttp.readyState=="complete")
{
document.getElementById("update").;
innerHTML=xmlHttp.responseText;
document.getElementById("update").style.border="1px solid #A5ACB2"
}
}
function GetXmlHttpObject()
{
var xmlHttp=null;
try
{
// Firefox, Opera 8.0+, Safari
xmlHttp=new XMLHttpRequest();
}
catch (e)
{
// Internet Explorer
try
{
xmlHttp=new ActiveXObject("Msxml2.XMLHTTP");
}
catch (e)
{
xmlHttp=new ActiveXObject("Microsoft.XMLHTTP");
}
}
return xmlHttp;
}
When onkeyup event fires, the showResult function is passed the value of whatever has been typed so far. It sends a GET request to functions.asp with the typed letters in the query string ("keyword=[typed letters]").
This is the source of functions.asp
<%@LANGUAGE="VBSCRIPT" CODEPAGE="65001"%>

  <!--#include file="mydatabase.asp" -->


  <%

  Dim Recordset1__keyword

  If (Request.querystring("keyword") <> "") Then

  Recordset1__keyword = Request.querystring("keyword")

  else Recordset1__keyword = ""

  End If

Dim Recordset2__keyword

  If (Request.querystring("keyword") <> "") Then

  Recordset2__keyword = Request.querystring("keyword")

  else Recordset2__keyword = ""

  End If


Dim Recordset1

  Dim Recordset1_cmd

  Dim Recordset1_numRows

Set Recordset1_cmd = Server.CreateObject ("ADODB.Command")

  Recordset1_cmd.ActiveConnection = MM_mydsn_STRING

  Recordset1_cmd.CommandText = "select * from learningactivities where (LEARNINGACTIVITYTYPEID = 300) and STATE = 'A' AND lower(TITLE) like lower('%" &  Recordset1__keyword & "%') order by code"

  Recordset1_cmd.Prepared = true

  Recordset1_cmd.Parameters.Append Recordset1_cmd.CreateParameter("param1", 200, 1, 255, Recordset1__keyword) ' adVarChar

Set Recordset1 = Recordset1_cmd.Execute

Dim Recordset2

  Dim Recordset2_cmd

  Dim Recordset2_numRows

Set Recordset2_cmd = Server.CreateObject ("ADODB.Command")

  Recordset2_cmd.ActiveConnection = MM_mydsn_STRING

  Recordset2_cmd.CommandText = "select * from learningactivities where (LEARNINGACTIVITYTYPEID = 400) and STATE = 'A' AND lower(TITLE) like lower('%" &  Recordset2__keyword & "%') order by code"

  Recordset2_cmd.Prepared = true

  Recordset2_cmd.Parameters.Append Recordset1_cmd.CreateParameter("param1", 200, 1, 255, Recordset2__keyword)

  Set Recordset2 = Recordset2_cmd.Execute


  response.write("<!--Other web based courses table--><table cellpadding=0 cellspacing=""0"" id=""results"" border=""1"" align=""left"" style=""width:49%;""><tr><td colspan=""2"">active Other Web based courses</td></tr><tr><td><b>Code</b></td><td><b>Title</b></td></tr>")


  'if request.querystring("mode")="s" then

  while not recordset1.eof

  response.write ("<tr><td>" & recordset1("code") & "</td>")

  response.write ("<td><a href='"& recordset1("outlinelink") & "' target='_blank'>" & recordset1("title") & "</a></td></tr>")

  recordset1.movenext

  wend

response.write("</table><!--scorm table--><table cellpadding=0 cellspacing=""0"" id=""results2"" border=""1"" align=""left"" style=""margin-left:12px;"" width=""49%""><tr><td colspan=""2"">active SCORM courses</td></tr><tr><td><b>Code</b></td><td><b>Title</b></td></tr>")


  'if request.querystring("mode")="s" then

  while not recordset2.eof

  response.write ("<tr><td>" & recordset2("code") & "</td>")

  response.write ("<td><a href='"& recordset2("outlinelink") & "' target='_blank'>" & recordset2("title") & "</a></td></tr>")

  recordset2.movenext

  wend


response.write("</table>")


  Recordset1.Close()

  Set Recordset1 = Nothing

  Recordset2.Close()

  Set Recordset2 = Nothing


  %>
functions.asp queries the database using the typed letters to filter the results. It then writes the results to the page, formatted into side-by-side tables.
February 18, 2009
Drupal: cannot redeclare date_api_views_data() error after installing Views 2.3
I had a lot of trouble trying to update the Views module. When I would attempt to run update.php, I got the White Screen of Death. I removed several modules and tried to view the modules page - and got this error:
cannot redeclare date_api_views_data()
Apparently back in one of the many updates, I had upgraded the Date module by dragging the new version on top of the old one. This must have left a conflicting file in place that only interfered once Views was updated.
The solution was to delete the Date module from the modules folder and install a clean copy from Drupal.org's modules download site.
February 17, 2009
Should LMS pass more demographic data to the SCO?
Note: This is a repost of my blog posting from Letsi.org
In training healthcare workers, there is a particular emphasis on distinguishing between individuals based on fine-grained demographic and user data: where they work, who they work for, whether they work in a patient care area or not, are they researchers, do they do "procedures", work in an operating room, and on and on. Sometimes only the individual themselves knows what to enter, and must key it in to their own profile.
Learning management systems do a good job of keeping track of this information, and we have gone to a lot of trouble to make sure ours does this well. The user data is drawn from many sources, and sometimes the only source for it is the user. Would it make sense to allow the LMS to send some of that demographic data to the SCO so it could adapt its content to the user at runtime?
There are several possible workarounds, including one that we use now: create multiple courses in the LMS, and distribute them to various audiences, or perhaps create a .NET frameset around the SCO that queries the DB for the necessary data, using the SCORM-passed user id as the key.
Wouldn't it be easier to simply get the data passed with the user id through SCORM? Then the course could adapt as required by the user's qualifications, location or other differences.
This shifts responsibilities previously located in the LMS to the SCO, but perhaps it makes sense in some situations.CO from the LMS
Intranasal insulin for alzheimer's disease
There is growing interest in the use of intranasally administered insulin for treating symptoms of early alzheimers and for improving memory and cognition in general.
An article published in Neurology in 2008 describes the results of a double-blind study of 25 participants with early alzheimers who were given either insulin or a placebo using an electronic atomizer, daily. They found that although blood glucose and insulin were unchanged with the treatment, the insulin-treated group retained more verbal information after a delay compared wth the placebo group. They also showed improved attention and functional status.
Intranasal insulin improves cognition and modulates beta-amyloid in early AD.
February 16, 2009
Execute an asp function within an HTML page using #exec
While looking for more information on how Server Side Includes are implemented on IIS servers, I ran across the #exec directive.
<!-- #exec CommandType=CommandDescription-->
#exec allows an HTML page to run an application (ASP application, CGI script, ISAPI application, etc.) or shell command (this is a security risk, use with caution). The output is then displayed on the HTML page.
The standard filename extension which will process this directive is ".stm" but if you configure your server to process .htm or .html for server side includes, it will run the #exec directive also.
This would be useful only in a situation where you really really can't use an asp page for some reason but need to run some server-side code. And can't use AJAX.. Well, maybe this is pretty useless but it's sort of cool.

Example
The set of pages below will execute a simple ASP command and print it to the HTML page.
HTML page "index.htm"
HTML page "test.asp"<!DOCTYPE html PUBLIC "-//W3C//DTD XHTML 1.0 Transitional//EN" "http://www.w3.org/TR/xhtml1/DTD/xhtml1-transitional.dtd">
<html xmlns="http://www.w3.org/1999/xhtml">
<head>
<meta http-equiv="Content-Type" content="text/html; charset=UTF-8" />
<title>Execute asp code and print result to browser</title>
</head>
<body>
<H3>Inside index.htm</H3>
<!-- #exec CGI="/test/ssi/test.asp?test=this_is_the_request_string" -->
</body>
</html>
<%@LANGUAGE="VBSCRIPT" CODEPAGE="65001"%> <!DOCTYPE html PUBLIC "-//W3C//DTD XHTML 1.0 Transitional//EN" "http://www.w3.org/TR/xhtml1/DTD/xhtml1-transitional.dtd"> <html xmlns="http://www.w3.org/1999/xhtml"> <head> <meta http-equiv="Content-Type" content="text/html; charset=UTF-8" /> <title>This is the ASP page</title> </head><body>
<% Response.Write "<BR>Inside test.asp.<BR>" Response.Write "Test = " & Request.QueryString("Test") & ".<BR>" %>
</body> </html>
Troubleshooting sending mail from the iPhone with AT&T
If you are having problems sending mail from the iPhone, try the following.
Settings > Mail, Contacts, Calendars
Under Accounts, click the account you are having trouble sending mail with.
Scroll down to Outgoing Mail Server and select it. Make smtp.att.yahoo.com the Primary mail server, if it isn't already, and make sure it is set to "On". Check that Use SSL is on, Authentication is On, and Server Port should be 465.
If you still have trouble, try turning off WiFi and try sending again. Sometimes I've found that that works better.
February 14, 2009
Our complete set of customized site files for new dotproject customizers
For all the dotProject newbies out there, this is the kind of thing I wish I'd had when I got started - it would have saved me a lot of time. I'm posting all the files for a dotproject site I manage, since it seems it may help people get started in customizing dotProject.
To find my changes, search across all the files for the phrases "ellen added" or "ellen changed" in various comments.
One note of caution! I am not an expert in php or dotproject so the fact that something has been done doesn't necessarily mean it is done in the best way, nor even that works. But these files should help to get you going. This is presented "as is" and I will not fix things for you or document things beyond what is in the articles I post here (Browse all my dotProject posts)
One-page Project updating
A lot of functions can be done from the projects page, including changing project status, priority, "Team" (something we added, using sys_vals), and creating a new task on a given project. Eventually I'd like to make all project editing happen from this page.

You may want to import our sysvals data into your database to see how we use teams, statuses, colors, etc.
-- phpMyAdmin SQL Dump

  -- version 2.11.9.4

  -- http://www.phpmyadmin.net

  --

  -- Host: localhost

  -- Generation Time: Feb 16, 2009 at 09:52 AM

  -- Server version: 5.1.30

  -- PHP Version: 5.2.4


  SET SQL_MODE="NO_AUTO_VALUE_ON_ZERO";


  --

  -- Database: `complian_dprj4`

  --


  -- --------------------------------------------------------


  --

  -- Table structure for table `sysvals`

  --


  CREATE TABLE IF NOT EXISTS `sysvals` (

  `sysval_id` int(10) unsigned NOT NULL AUTO_INCREMENT,

  `sysval_key_id` int(10) unsigned NOT NULL DEFAULT '0',

  `sysval_title` varchar(48) NOT NULL DEFAULT '',

  `sysval_value` text NOT NULL,

  PRIMARY KEY (`sysval_id`)

  ) ENGINE=MyISAM  DEFAULT CHARSET=latin1 AUTO_INCREMENT=37 ;


  --

  -- Dumping data for table `sysvals`

  --


  INSERT INTO `sysvals` (`sysval_id`, `sysval_key_id`, `sysval_title`, `sysval_value`) VALUES

  (1, 1, 'ProjectStatus', '0|Ready\r\n1|Nd. Resources\r\n2|Nd. Content\r\n3|In Progress\r\n4|In Review\r\n5|Complete\r\n6|Cancelled\r\n7|Templates\r\n8|Ongoing\r\n9|Hold'),

  (2, 1, 'CompanyType', '1|Client'),

  (3, 1, 'TaskDurationType', '1|hours\n24|days'),

  (4, 1, 'EventType', '0|General\n1|Appointment\n2|Meeting\n3|All Day Event\n4|Anniversary\n5|Reminder'),

  (5, 1, 'TaskStatus', '0|Active\n-1|Inactive'),

  (6, 1, 'TaskType', '0|Unknown\n1|Administrative\n2|Operative'),

  (7, 2, 'ProjectType', '0| All\r\n1| App Mgt - Blue\r\n2| ROI - Green\r\n3| Learn Net - White\r\n4| Edu Tech - Lilac\r\n5| Online Edu - Orange\r\n6| Office Mgmnt - Pink\r\n7| Apps Training - Purple\r\n8| Edu Programs - Yellow\r\n9| Strategic Plan - Turq'),

  (8, 3, 'ProjectColors', 'Web|FFE0AE\r\nEngineering|AEFFB2\r\nHelpDesk|FFFCAE\r\nSystem Administration|FFAEAE'),

  (9, 1, 'FileType', '0|Unknown\n1|Document\n2|Application'),

  (10, 1, 'TaskPriority', '-1|low\n0|normal\n1|high'),

  (11, 1, 'ProjectPriority', '-1|3-LOW\r\n0|2-MEDIUM\r\n1|1-HIGH\r\n2|2-UNKNOWN'),

  (12, 1, 'ProjectPriorityColor', '-1|#D4E2F7\r\n0|#009999\r\n1|#EFA9A9'),

  (13, 1, 'TaskLogReference', '0|Not Defined\n1|Email\n2|Helpdesk\n3|Phone Call\n4|Fax'),

  (14, 1, 'TaskLogReferenceImage', '0| 1|./images/obj/email.gif 2|./modules/helpdesk/images/helpdesk.png 3|./images/obj/phone.gif 4|./images/icons/stock_print-16.png'),

  (15, 1, 'BudgetCode', '0|UH 1|MedSchool 2|HMO'),

  (16, 3, 'ProjectStatusColor', '0|#D4E3F7\r\n1|#D8BFD8\r\n2|#F7F7D4\r\n3|#FFFFFF\r\n4|#F7E9D4\r\n5|#E9E9E9\r\n6|#E9E9E9\r\n7|#FFFFFF\r\n8|#D5F7D4'),

  (17, 1, 'ProjectRequiredFields', 'f.project_name.value.length|<3\r\nf.project_color_identifier.value.length|<3\r\nf.project_company.options[f.project_company.selectedIndex].value|<1'),

  (18, 1, 'UserType', '0|Default User\r\n1|Administrator\r\n2|CEO\r\n3|Director\r\n4|Branch Manager\r\n5|Manager\r\n6|Supervisor\r\n7|Employee'),

  (19, 1, 'TicketNotify', '0|admin@localhost\n1|admin@localhost\n2|admin@localhost\r\n3|admin@localhost\r\n4|admin@localhost'),

  (20, 1, 'TicketPriority', '0|Low\n1|Normal\n2|High\n3|Highest\n4|911'),

  (21, 1, 'TicketStatus', '0|Open\n1|Closed\n2|Deleted'),

  (24, 4, 'HelpDeskPriority', '0|Not Specified\n1|Low\n2|Medium\n3|High'),

  (25, 4, 'HelpDeskSeverity', '0|Not Specified\n1|No Impact\n2|Low\n3|Medium\n4|High\n5|Critical'),

  (26, 4, 'HelpDeskCallType', '0|Not Specified\r\n1|Activity still in progress\r\n2|Wrong activity on plan\r\n3|Quiz didn''t score\r\n4|How to unenroll\r\n5|Unable to log in\r\n6|Delete activity from transcript\r\n7|Manager - Staff list\r\n8|Learning module or SCORM\r\n9|Other'),

  (27, 4, 'HelpDeskSource', '0|Not Specified\r\n1|E-Mail\r\n2|Phone\r\n3|In Person\r\n4|Fax'),

  (28, 4, 'HelpDeskOS', '0|End-User\r\n1|Manager\r\n2|Facilitator\r\n3|Other'),

  (29, 4, 'HelpDeskApplic', '0|Not Applicable\r\n1|LMS\r\n2|Learning Module/Quiz'),

  (30, 4, 'HelpDeskStatus', '0|Unassigned\n1|Open\n2|Closed\n3|On Hold\n4|Testing'),

  (31, 4, 'HelpDeskAuditTrail', '0|Created\n1|Title\n2|Requestor Name\n3|Requestor E-mail\n4|Requestor Phone\n5|Assigned To\n6|Notify by e-mail\n7|Company\n8|Project\n9|Call Type\n10|Call Source\n11|Status\n12|Priority\n13|Severity\n14|Operating System\n15|Application\n16|Summary\n17|Deleted'),

  (35, 3, 'ProjectTypeColor', '0|#CCCCCC;\r\n1|#6699cc\r\n2|#66cc99\r\n3|#FFFFFF\r\n4|#ccccff\r\n5|#ff9966\r\n6|#ff99cc\r\n7|#660099\r\n8|#ffffcc\r\n9|#009999'),

  (32, 2, 'Complete?', '0|Yes\r\n1|No'),

  (36, 1, 'TicketSubject', '0| Other\r\n1|activity still in progress\r\n2|wrong activity on plan\r\n3|quiz didn''t score\r\n4|how to unenroll\r\n5|unable to log in\r\n6|delete activity from transcript\r\n7|Unable to open modules or quizzes\r\n8|Facilitator access\r\n9|How to Use\r\n10|Fix Learning Activity or Portal');
Enhanced To-do list for each user
Reorder the tasks on your list: we very rarely share tasks, so each task basically has one assigned user. As a result, I was able to use a field in the main tasks table to keep track of a task-order value, so each person could order their tasks on a big list.
This should really be done with a separate table and some jquery-style drag-n-drop so you can move your tasks around in the list, but that's all for a future upgrade. This quick-and dirty-version works for small teams with minimal task sharing.

Help-call log based on ticket module
I modified the ticket system to create a sort of call log. We don't really need a real ticket system per se, but we do need a way to keep statistics on what kinds of requests for help come in. So I've started to work on making this a one-page module. Everything is entered and filtered on one page. A work in progress.

See my dotproject recipe articles for more details on what I did to the site. Browse all dotProject posts
February 11, 2009
How to capture a scrolled window in Snagit
The scrolled window setting is a feature in Snagit that can be used to capture a page or application whose contents are too long or too wide to fit in one window. There is an "auto-scroll" setting which is supposed to scroll the window vertically or horizontally until all the content is captured.
I've never been able to get that to work and assumed it was broken on Windows XP. Perhaps it works on Vista. After playing with all the options I did finally manage to find a good workaround, although I still can't get the default "auto-scroll" setting to work.
- Have the target window open and ready to go. Here we're using a long page from TechSmith's site, with the window sized very small around it.

- Open Snagit, and under Profiles, select Scrolling window (Web page)*.

- Under Profile Settings, select Advanced > Extended Window.

- The current dimensions of the captured area are shown in the boxes.

- Enter larger numbers in both boxes and click "update Preview". You may have to experiment with the dimensions a few times until the preview shows all the content. Click OK to take the screenshot.

Some less commonly-used CSS selectors
We all know the common CSS selectors that most of us use every day:
Select by Classname:
.classname {color:#000}
Select by Element ID:
#id {color:#000}
Select by tagname:
tagname {color:#000}
And combinations of these:
Select all elements within Element ID "myid" with classname "myclassname":
#myid.myclassname {color:#000}
Select all elements with tag "mysecondtag" that are descendants of any element of type "mycontainertag"
mycontainertag mysecondtag {color:#000}
Here are some selectors that you may not know so well.
Child elements
Select all elements with tag "mysecondtag" that are descendants of any element of type "mycontainertag"
mycontainerTag>mysecondtag {color:#000}
The First-child element
Select the first child element with tag "mysecondtag" of any element of type "mycontainertag"
mycontainertag:first-child {color:#000}
What's the difference between a descendant and a child?
A descendant is any element that is contained within the parent element, no matter how far down the DOM tree. So child elements, grandchildren, great-grandchildren, etc. are all descendants. A child element is on the first level of the DOM tree within the parent. The first-child element is the FIRST element on the first level. So if you have a DIV with multiple P's inside it, the first P would be the first-child. If inside each P is an A element, then the A's are descendants of the DIV.
Note: IE 6 may not comprehend all combinations of child and first-child patterns.
Similarly, most of us know of the dynamic pseudo-classes A:link, A:visited, A: hover, and A:active, but did you know about A:focus? A:focus can be used to highlight the currently selected element on the page. See this page for a description of using the outline property to highlight focused elements
Adjacent elements
Select the element with tag "mytag" that immediately precedes any element with tag "myothertag"
mytag + myothertag
February 8, 2009
Actionscript 3: Examples of accessing XML attributes
Another item I need to keep looking up: how to get the attributes of an XML item.
Here, per the ever-helpful Senocular, is the definitive note on the subject.
E4X (XML used in ActionScript 3) has new operators to access values in XML. One operator is the @ operator which accesses attributes. It can be used in place of the attribute() (Top level XML.attribute()) method for obtaining attribute values. Ex:ActionScript Code:
var myXML:XML =;
trace(myXML.attribute("name")); // senocular
trace(myXML.attribute("id")); // 2867
trace(myXML.@name); // senocular
trace(myXML.@id); // 2867
You can also use an asterisk (*) with the @ operator to get a list of all attributes associated with an XML node in the form of an XMLList object. This is equivalent to the attributes() (Top level XML.attributes()) method. Ex:ActionScript Code:
var myXML:XML =;
var atts:XMLList;atts = myXML.attributes();
trace(atts.toXMLString());
/* Output:
senocular
2867
*/
atts = myXML.@*;
trace(atts.toXMLString());
/* Output:
senocular
2867
*/
February 7, 2009
Restore the default Actionscript 3 classpath
It's very easy to wipe out your default Actionscript classpath from the Publish Settings "Flash" tab, so I've had to look it up several times. Here it is for your convenience:
$(AppConfig)/ActionScript 3.0/Classes
It's a good idea to get into the habit of saving publishing Profiles for various projects. The export/import Profiles button is shown below:

AS3: TypeError: Error #1034: Type Coercion failed: cannot convert flash.display::SimpleButton
If you get an error like this in an actionscript 3 Flash file:
TypeError: Error #1034: Type Coercion failed: cannot convert flash.display::SimpleButton@61422481 to [symbolname].
at flash.display::Sprite/constructChildren()
at flash.display::Sprite()
at flash.display::MovieClip()
at classname()[/path_to/as/classname.as:34]
Check the symbol named in [symbolname] to make sure it is specified as a Movie Clip rather than a button.
Other possible reasons for the error are given in:
February 6, 2009
How to tell which Amazon items interest your visitors
One of the things that I always wondered about Amazon Associates reports was that it the reports display what has been ordered but not the items that were clicked on but not ordered.
Recently I stumbled on that information by accident, so here it is:
Go to your Amazon Associates Orders Report.
Select a date range and scroll down to the report. Items with orders will be shown. But Items with no orders will be hidden, and if there were no orders during the period you select, there will be a very final-looking and misleading message "There was no activity in this period".
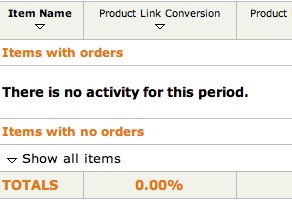 .
.
But click the Show all items arrow, and all the items that were clicked on but not ordered will appear.
Per current web standards, I think Amazon is the Show all items incorrectly in this context, but at least the data is there!
February 4, 2009
Import long narration files into Presenter
Adobe Presenter is an add-on to Powerpoint that produces Articulate-like Flash presentations from your Powerpoint slides. At around $500.00 list price it's out of reach for a lot of content developers, but with an academic discount the price drops considerably, to about $150, and it starts to be a viable option for SME's to purchase for Rapid Elearning development.
But even with the lower price, it may not be convenient for everyone involved in producing a course to have Presenter installed, so it is useful to know how to import and sync narration created outside Presenter. This way, a narrator can take their own laptop and a USB microphone off into a completely quiet room, which often makes more difference in the quality of the audio than almost anything else.
Adobe provides a tutorial on importing and syncing audio, but I find that for long narration files, using the Edit Audio feature is more intuitive and makes it easier to fix problems, so here is my method:
- Add the script for each slide's narration to the slide notes in Powerpoint. This will help when recording the narration and later, will provide a transcript for each slide for those who prefer to read instead of listen.
- Record the narration
First you will need to choose a microphone. See this Adobe Presentation for tips on how to select the right one for your needsUse any audio recording software you have to record the narration (use "mono", not "stereo" settings), and save it as a WAV or MP3. If you don't have any recording software, download and install Audacity, free "donationware" available for Windows, Mac and Linux.
If you are using Powerpoint's built in "Record Narration" feature, please use the instructions HERE to do your recording.
- Import the audio files into Presenter
Open the Powerpoint presentation and select Import Audio from the Presenter menu.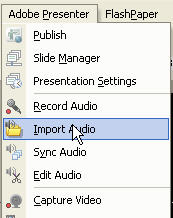
In the Import Audio window, select the first slide, click Browse and find the audio file(s).
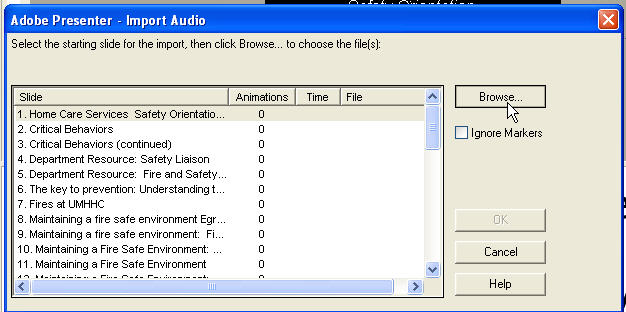
If you used Powerpoint's Record Narration feature, just check "Import from Presentation. Presenter will assign the files to each slide in order, then ask for permission to delete the files from the original Powerpoint to save disk space. At this point you are done!
If you have one long narration file, just select it, then click OK. Wait for Presenter to get done with the import.
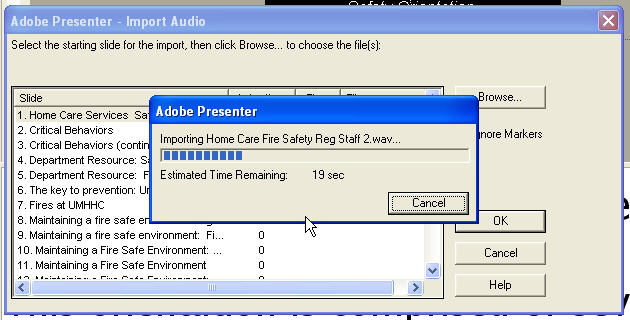
If you imported a single file, the duration of the first slide will be set to the duration of the audio file, until you tell it where the breaks are and "sync" the slides.
Click OK once you are done importing audio.
- Save a copy
Presenter, just like it's sister software Captivate, has some bugs, so I strongly suggest saving your work frequently. At logical stopping points like this, save a copy of the presentation. Create multiple versions by using "Save As...", and add a version number to the end of the file name. You can delete the intermediate versions when the project is completed, but this procedure can save you a lot of time if something goes wrong.

- Add in the slide notes to each slide
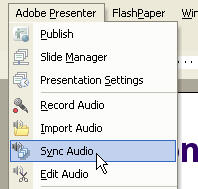
I would also suggest importing the slide notes into all the slides at this stage. I've found that doing this step AFTER syncing the audio can sometimes result in losing the contents of the Media.ppcx file which keeps track of the slide timings. This is one of the biggest bugs I've found in Presenter. Select Sync Audio from the Presenter menu.
Click Import Notes:
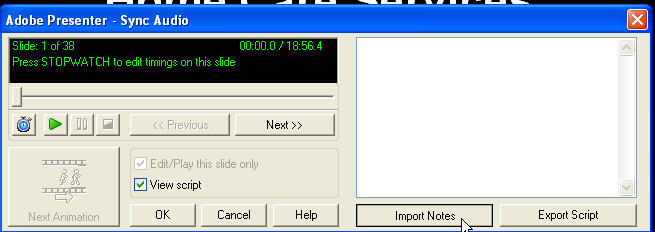
Under Slide range, select All slides.Under Import options select Replace current scripts with imported notes to ensure you have a clean transcript for each slide.
Click OK. You'll be returned to the Sync Audio window. Click OK again to close it.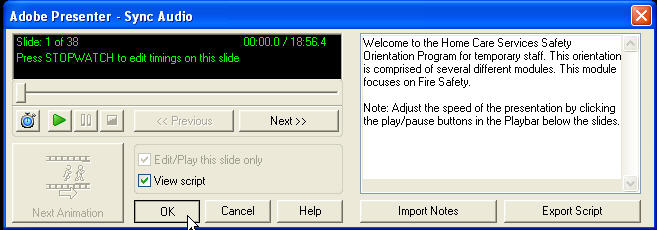
- Sync slides to narration
Change to Slide Sorter view so you can see the slides that are coming up while listening to the narration.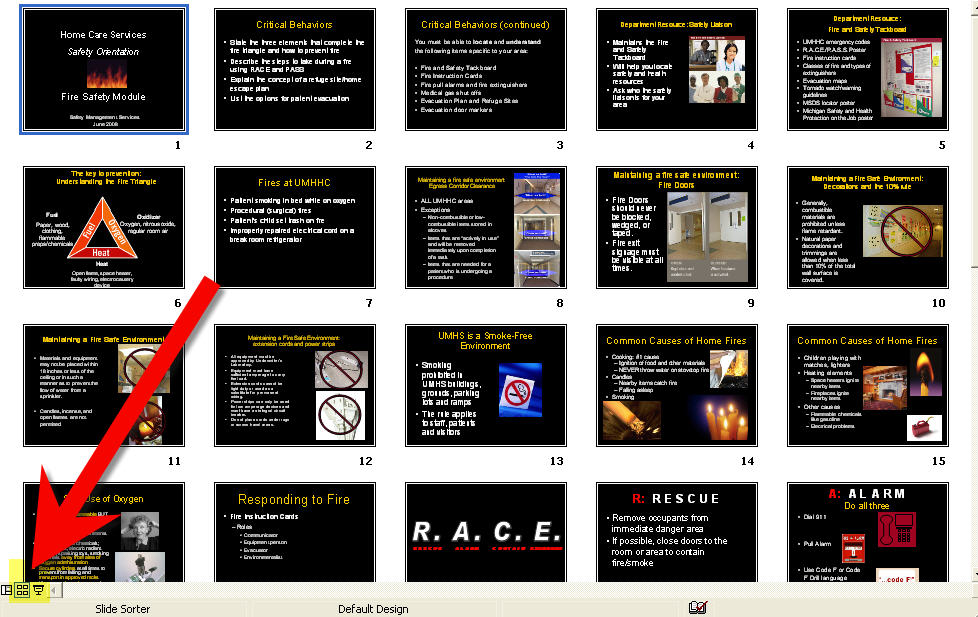
Select Edit Audio from the Presenter menu.

In the Edit Audio window, the waveform for the narration will be displayed. Click the PLAY button to start the narration.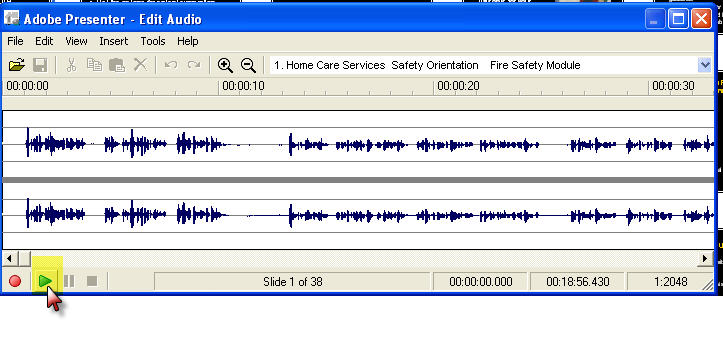
When you get to the position where the next slide should appear, click the PAUSE button (not the square STOP button).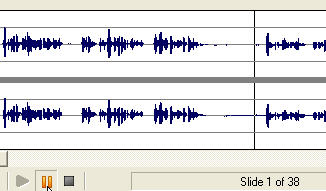
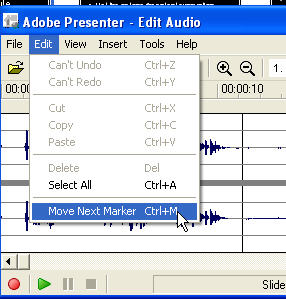
Type Control-M. This moves the marker for the beginning of the next slide to that point in the timeline. Don't worry, if you chose the wrong position you can just drag the marker. The nice thing about using the timeline for syncing is that you can see the breaks in the narration, which often correspond to breaks between slides.
After doing 5 or 6 markers, click the Save icon!

You don't have to do all the syncing at once. You can just save your work, close the Edit window and come back later. It's probably a good idea to stop in the middle of a long presentation and save a new version, then continue.When you have completed the entire presentation, check your work either by playing it in the Sync Audio window (click the play button and watch the slide show), or by doing a test "Publish" to see how it's all fitting together.
Posted by ellen at 5:05 PM


February 1, 2009
Insert a tab within a table cell in Microsoft Word
I just lost 20 minutes trying to line up a list of numbers inside a table cell in Word. The problem was that clicking "tab" only caused the cursor to jump, usually outside the table entirely, but sometimes to the next cell.
The help files were mute on the subject, except to imply that it was the keyboard shortcuts settings in OS X's System Preferences that were at fault. I tried other key combinations but did not hit on the right one.
The correct key combination for inserting a tab into text within a table cell is "Control-tab".
Thanks to Projectwoman for this solution.