May 28, 2010
What is "cetrk.com"?
If you are looking through the code on your site and find a mysterious call to a javascript in the domain "cetrk.com," you may wonder what it is and if it is a malicious script or a hack.
<script type="text/javascript" src="http://cetrk.com/pages/scripts/0001/3919.js"></script>
When I found it at the bottom of my home page, it looked like it might be something to worry about, so I started investigating. It took a while to find the answer, but it turns out that "cetrk" is a domain which used to host Crazy Egg Tracking scripts. Crazy Egg is a site that provides analytics reports. I had tested their tracking service several years ago, then forgotten to remove the script when I stopped using the site.
May 24, 2010
Enhancing Learning through Technology - Part 2
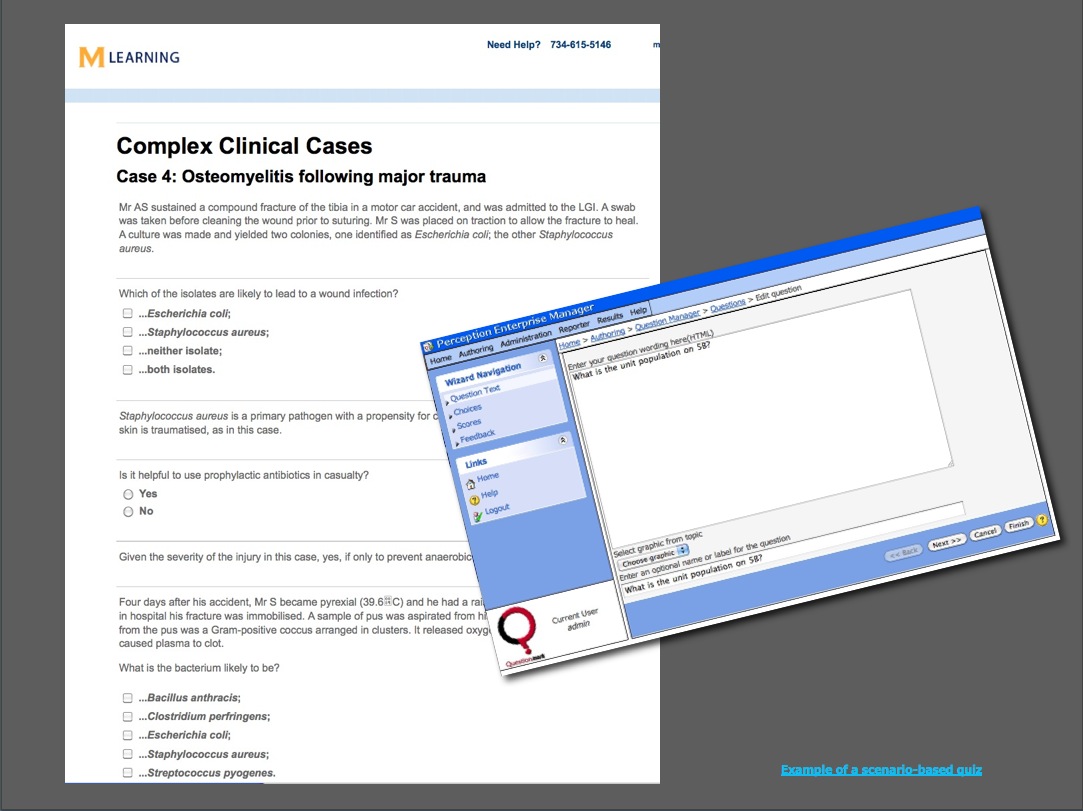
Scenario-based learning can teach decision-making and thinking processes. Here is an example of the "Labyrinth" scenario-based learning system created in a Scottish medical school which features low fidelity simulations created with just text and pictures - but with great effect.
Each page describes what's going on and gives a choice of action.
Here you are a doctor doing rounds and a nurse comes in with news about a patient who is increasingly breathless. Your choice here is "Stick with the rounds" or "Ask to see the patient"
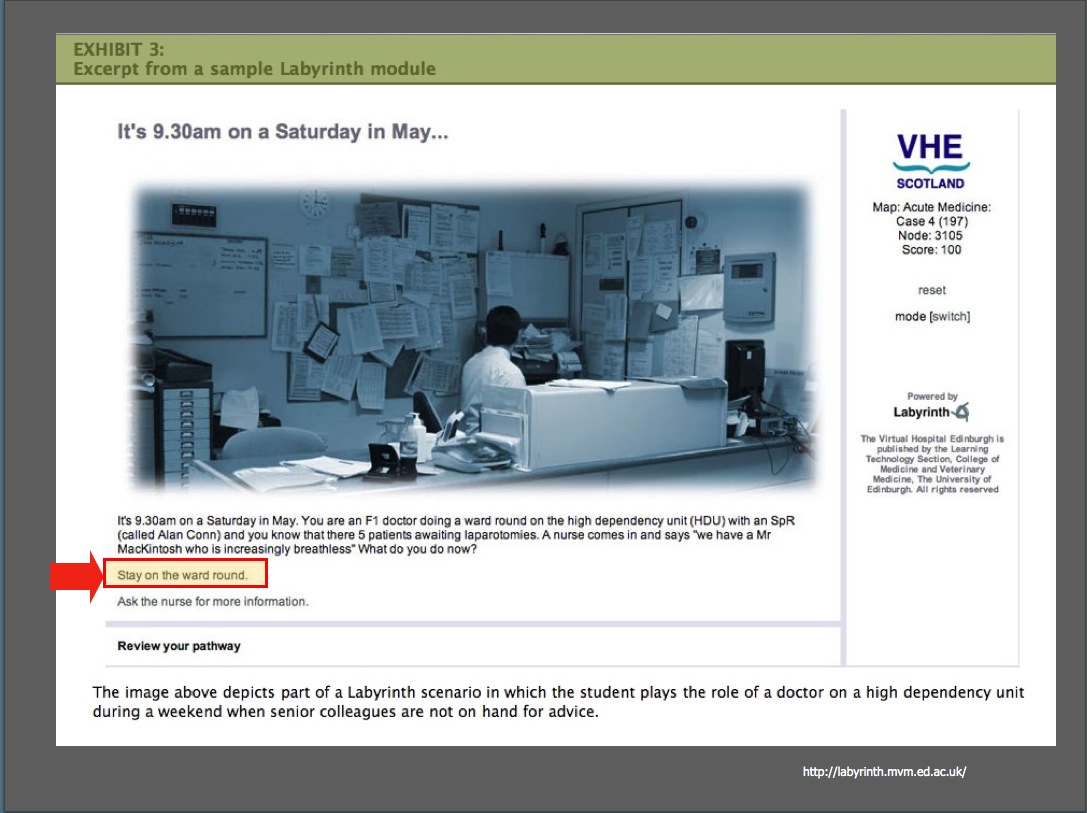
If you stick with the rounds, you start wondering if you are doing the right thing, and are soon brought back to the right track -going to see the patient.
You make decisions and suffer the consequences, which can include getting paged in an emergency, bad outcomes, and even bad morale on the morale meter.

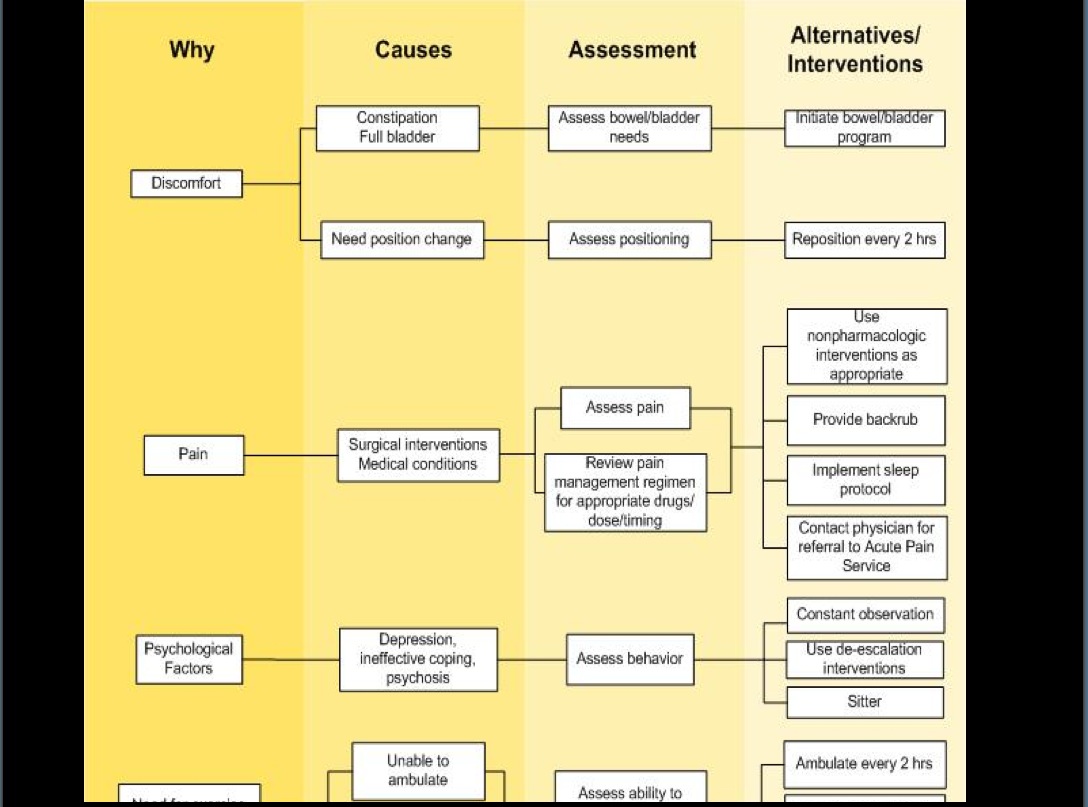
Medical educators tend to be great at the kind of thinking that supports scenario-based training. They often think in terms of logical decision paths. - like in this restraint alternatives decision tree.
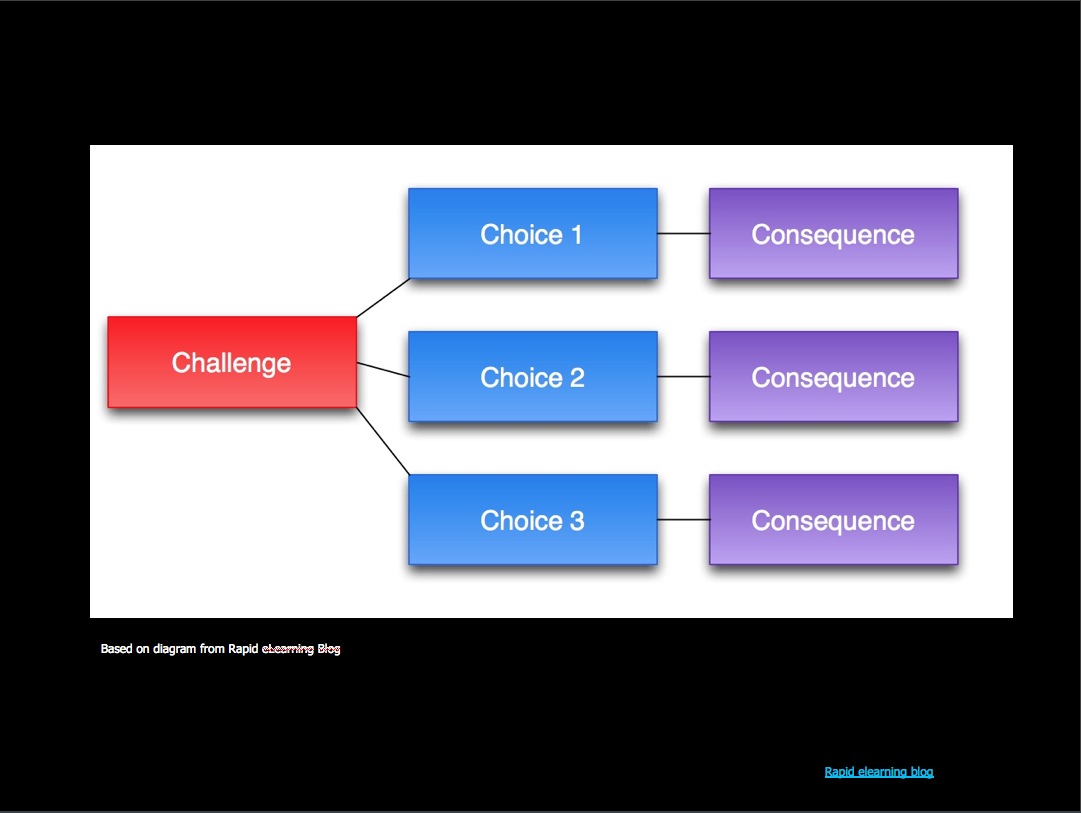
There's an excellent site called "The Rapid Elearning blog" which has instructions on how to plan these types of scenario-based learning activities. The basics are shown here: you have a challenge with multiple choices, and each choice has a consequence.
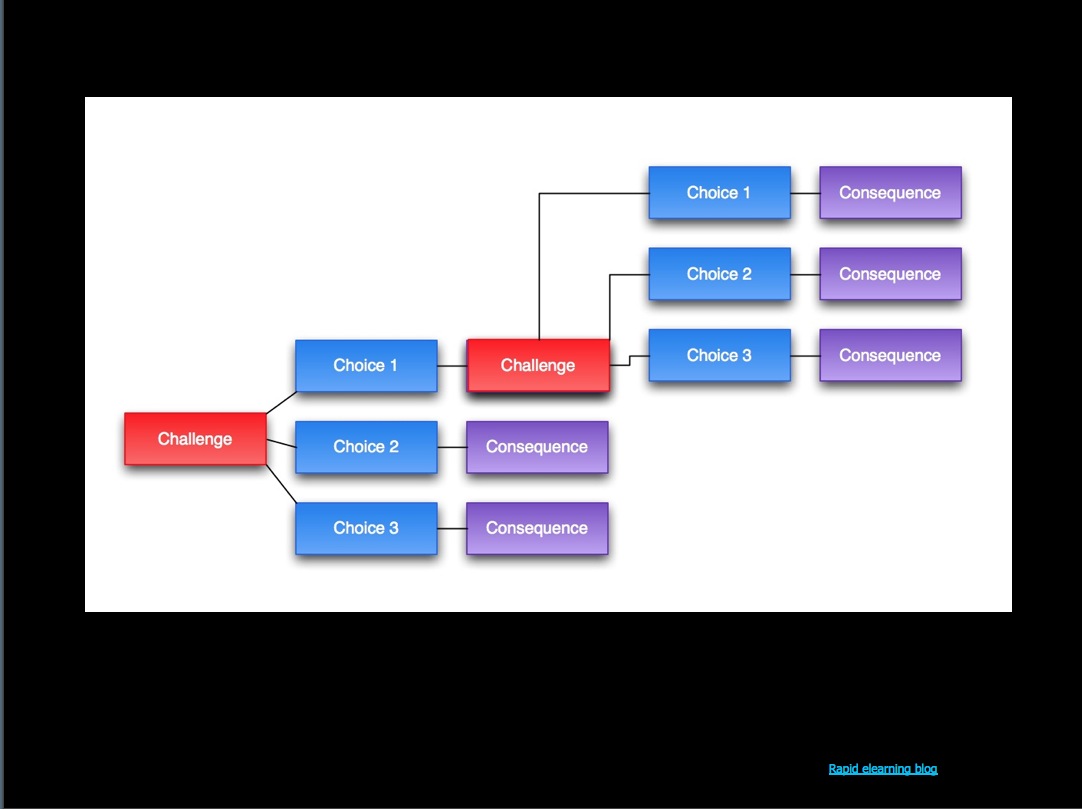
Put a bunch of these together and they form multiple paths through the scenario. You can make these as complex as you can handle. This is very similar to the planning process that goes on in adventure games.
If you're planning one of these scenarios, I'd strongly suggest you draw it all out first, then create the activity using cards or pieces of paper and actually try it first - on paper! This is called Paper Prototyping and is often used to plan complex websites or web-based applications as shown here.
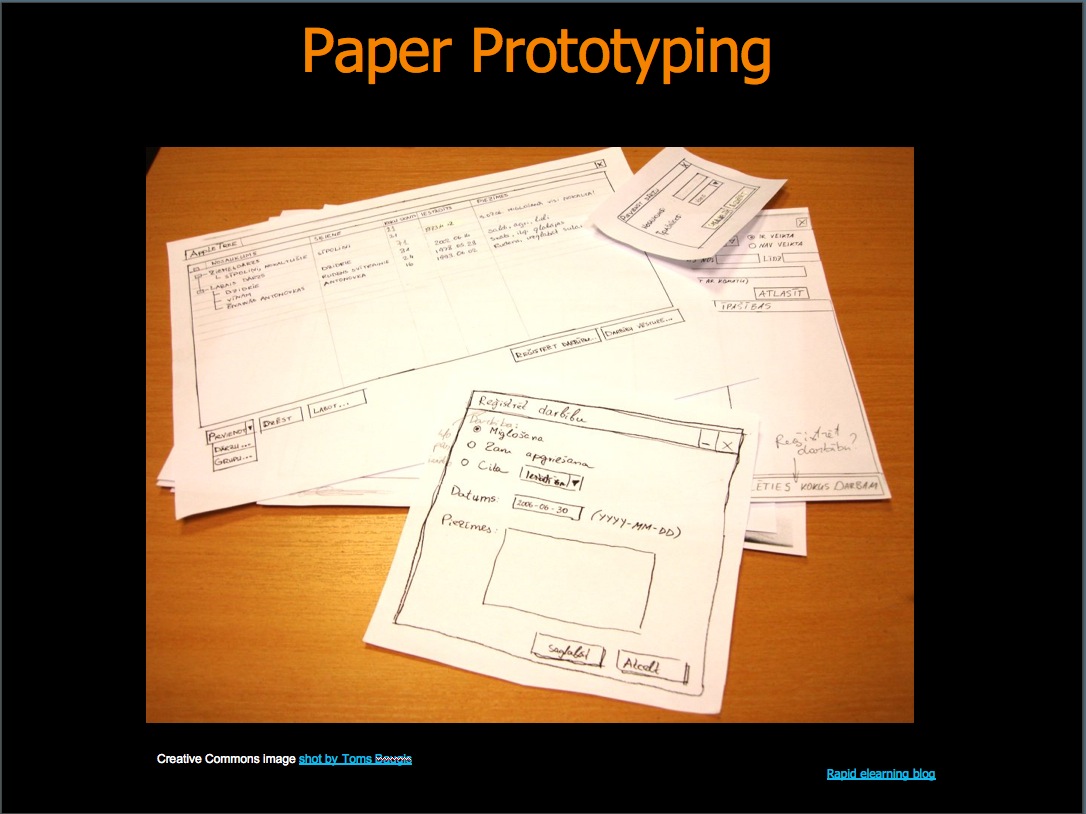
The one shown here is in another language, but is a good example of the process. Testing this way can save you a great deal of time building a complicated scenario.
Once you're done testing, Adobe Captivate is a good tool to build the real learning activity in.
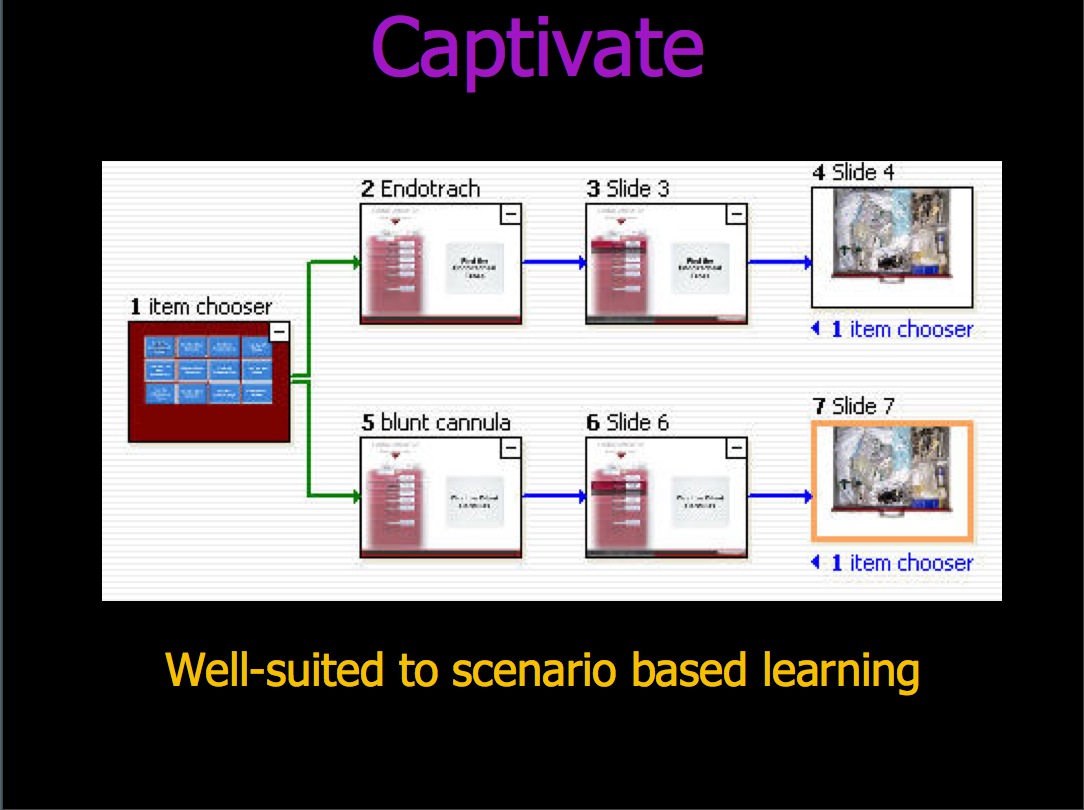
Captivate is well-suited to building scenario-based learning because it has such great interactive features. You can view and check the alternate paths I just showed you - as you are building them, right in Captivate.
This is just a sample I built recently, based on our Cardiac Arrest Cart game which you may have seen at another talk.
The goal is to teach Cardiac Arrest Team members the location of every item in the Crash Cart. You select an item on the first screen, then rummage through the drawers on the cart to try to find it. Here, I was experimenting with seeing what would have to change if the game were ported to Captivate.
Below is an example of a Captivate module recently completed by Betty Rakowski.
I don't yet have finished examples of scenario-based training built in Captivate to show you, but I would encourage you all to think about trying this technique.
And for more intensive development of scenario based training, take a look at the Labyrinth examples when you get a chance. I assure you it will inspire you. Give us a call if you'd like to try the new system once it's installed.
For the situation where your learners need to execute procedures they use only infrequently, I'd suggest Just-In-Time learning, also called Performance Support. I'm including Social Networking and Knowledge Sharing in with these because they often function as just-in-time training.
We built this this Lifts instructional video search engine for Safety Management Services. (launch and show how it works) This video search engine framework can be used for your videos. We can set it up for you to fill up with videos and edit the playlists yourself using a simple text-based list.
Another great tool for Just-in-time learning is a wiki - (You're probably all familiar with Wikipedia) - and here's a wiki resource you can all use inside the hospital: Collective Wisdom - a wiki for the entire UMHS community. It's meant to capture all that hidden knowledge inside all of your heads, that someone else is probably wishing they had right this minute. This is hosted on the Medical School's Confluence site, and I encourage you all to visit it.

An example of a departmental space on the same Confluence site is the ACS Clinical Business Manual. They use it to post detailed procedures and policies - there's one source of truth, it's easy to use, and easy to search.

Adobe Presenter is another tool that could be used to build lectures or tutorials-on-demand for just-in-time learning. Presenter is probably the easiest tool out there at the moment for creating narrated powerpoint lectures.
Presenter leverages the powerpoint skills you already have - it is actually an add-on to Powerpoint, so you aren't learning an entirely new tool, and it's not very expensive.
Here's a short, on-demand lecture built in Presenter - by Jane Pettit of HR.
and another one by Sara Stephens and Carmen Hopkins.
Our last learning situation involves a mixed bag of learners: learners with varying levels of motivation or vastly different skill levels.

Our last learning situation involves a mixed bag of learners: learners with varying levels of motivation or vastly different skill levels.
For learners with different skill levels, you may want to offer additional learning modalities so slower learners can catch up on their own time, without embarrassment. For different motivation levels, you may also want to offer different activities, but as alternatives.
When we do mandatory training, we are often dealing with different motivation levels. Many people will want to just skim through a bullet point list to pass a quiz, while others may want to do a deeper dive. In the Risk Management Core Curriculum, we made it possible to complete the module quickly, by reading a small amount of required content: just enough to pass the quiz. But we also provided case study videos and transcripts in case they were interested. We actually checked the statistics the other day, and the more interesting optional videos have quite a few watchers - so it seems to have been a useful approach.
For the learners with varying skill levels, you may want to give them self-tests and interactive materials that create a safe place to practice and improve their skills until they feel confident.
Or, give them additional ways to look at the same concepts. I'm going to turn it over to Barb, who'll tell you more about using imagery, narrative and comics to bring home a point.
Slides for "Tips on Improving Digital Photography" are located here [LINK]
(Thank you Tafari!)Again, I want to emphasize that these tools are accessible to all of you, and we'll be happy to help you figure out which is best for your project. Take a look at the resources in the handout for more information and links to many of the examples I've showed you.
- MLearning template (opensource version) Download and instructions: [LINK]
- Labyrinth system examples [LINK]
- Rapid Elearning Blog article on branched elearning scenarios [LINK]
- Adobe Captivate information [LINK]
- Performance support, just-in-time learning [LINK]
- Educational Technology directory [LINK]
- Free course authoring tools
- Free or inexpensive Graphics tools
- Comics
- Slide presentation on better digital photography [LINK]
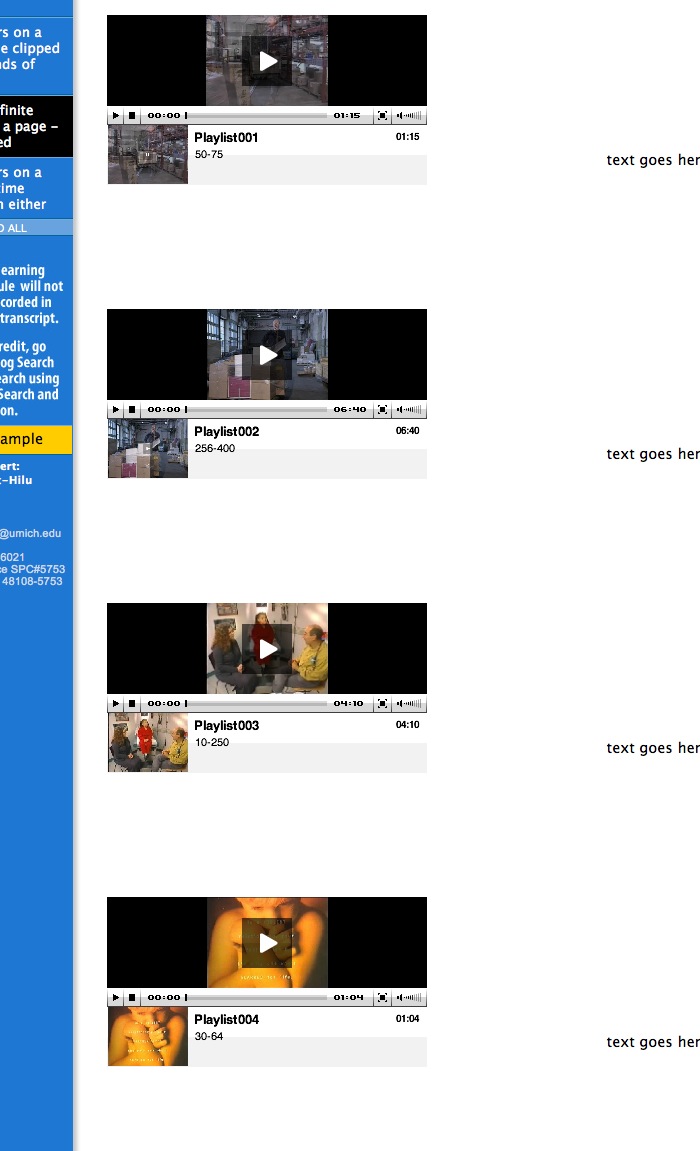
Multiple JW players on a page, revised for JW Player 4.7
The JW Player is a very popular open-source media player which not only supports many video, audio and image formats, but has many scriptable behaviors. Here we'll make use of the JavaScript API to generate as many players as you want on a page. The generated players all have separate event listeners to keep them from interfering with each other. Events or actions executed in one player do not affect others. Article Outline- Removed the buffer-monitoring that used to be in this from this since LongTail video fixed the Red5 buffering problem in version 4.7. The version used here if 4.7.761.
- Playlist now uses the JW player namespace to improve functionality of duration settings. Starting and stopping in the middle of a video now work better.
- Captioning also works better.
Call the swfobject script
In the head of the document, add this line:<script src="http://ajax.googleapis.com/ajax/libs/swfobject/2.2/swfobject.js"></script>
Add placeholders for each player
In the body of the document, add this placeholder code wherever you want players to appear. Name them placeholder001, placeholder002, placeholder003, placeholder004, etc for as many players as you need.<div id="placeholder001"></div>
Important:- Number them in order starting with 001. Do not skip any numbers.
- Every placeholder must have a unique name.
Playlists
Make an xspf playlist for each player called "playlist1_1, playlist1_2, playlist1_3" etc. The number that comes right after the word "playlist" represents the page (in case you are making multiple pages with multiple players on them), and the number that comes after the underscore represents which player out of all the players on that particular page. So player 5 on page 1 would be "playlist1_5".
RTMP/RTMPT player example (we use this for red5 streaming). Not that the provider is listed as "rtmp" but the streamer URL begins with rtmpt. The provider for both RTMP and RTMPT streaming is rtmp. Be careful not to leave out the line marked in red. Without it, the jwplayer tags will not validate.<?xml version="1.0" encoding="utf-8"?> <playlist xmlns="http://xspf.org/ns/0/" xmlns:jwplayer="http://developer.longtailvideo.com/trac/wiki/FlashFormats" version="1"> <trackList> <track> <jwplayer:title>Streaming Flash Video item</jwplayer:title> <jwplayer:description>This item is being streamed with RTMPT from a red5 server through a firewall over port 80</jwplayer:description> <jwplayer:streamer>rtmpt://our.red5.server.com:80/oflaDemo/</jwplayer:streamer> <jwplayer:provider>rtmp</jwplayer:provider> <jwplayer:file>topic directory/myStreamingFlashVideo.flv</jwplayer:file> <jwplayer:start>33</jwplayer:start> <jwplayer:duration>54</jwplayer:duration> <jwplayer:captions.file>media/captions/myStreamingFlashVideoCaptionsFile.xml</jwplayer:captions.file> <jwplayer:image>media/Poster.jpg</jwplayer:image> </track> </trackList> </playlist>Playlist for progressive download videos
<?xml version="1.0" encoding="utf-8"?>
<playlist xmlns="http://xspf.org/ns/0/" xmlns:jwplayer="http://developer.longtailvideo.com/trac/wiki/FlashFormats" version="1">
<trackList>
<track>
<jwplayer:title>Progressive Download Item</jwplayer:title>
<jwplayer:description>Description goes here</jwplayer:description>
<jwplayer:provider>video</jwplayer:provider>
<jwplayer:file>media/progressiveDownload.flv</jwplayer:file>
<jwplayer:start>0</jwplayer:start>
<jwplayer:duration>54</jwplayer:duration>
<jwplayer:captions.file>media/captions/progressiveDownloadCaptions.xml</jwplayer:captions.file>
<jwplayer:image>media/Poster.jpg</jwplayer:image>
</track>
</trackList>
</playlist>
Call the init function
Add a call to the init() function to the body tag:
<body onload="init();">
Add player-control scripts
Add this script just before the closing tag. Change the settings and width and height of the player (see red text)<script type="text/javascript"> var playerscount = 4; //how many players do you want? var page = 14;//give it a unique number to distinguish these players from players on other pages.
/* ********set these settings appropriately for all the players ****** */ var positionarray = new Array("","","","",""); function createPlayer(thePlaceholder,thePlayerId,theStreamer, theFile, theAutostart) { var flashvars = { streamer: "rtmpt://yourstreamingserver.com:80/oflaDemo/topicfolder/", file: theFile, autostart: theAutostart, repeat: 'none', shuffle: 'false', volume: '50', icons: 'false', playlist: 'none', debug: 'console', bufferlength: '1' } var params = { allowfullscreen:"true", allowscriptaccess:"always" } var attributes = { id:thePlayerId, name:thePlayerId } swfobject.embedSWF('includes/jw_media_player/player.swf', thePlaceholder, "350", "282", "9.0.115", false, flashvars, params, attributes); //alert('thePlaceholder'+thePlaceholder+'\n thePlayerId= '+thePlayerId+'\n theStreamer= '+theStreamer+ '\ntheFile= '+ theFile + '\ntheAutostart= '+theAutostart); }//end function createPlayer
/* ********don't touch anything below this line. ****** */ function init2() { for (var i=1; i<=playerscount; i++) { createPlayer("placeholder00"+i, "player"+i, "", "media/playlist"+page+"_"+i+".xml", false ); window["player_player"+i] = window.document.getElementById("player"+i); //dynamic variable names using window[] } }; function playerReady(obj) { for (var i=1; i<=playerscount; i++) { var tm = 'window["timeMonitor"+i]'; var mm = 'window["metaMonitor"+i]'; window["player_"+obj.id].addModelListener('TIME', 'tm'); window["player_"+obj.id].addModelListener('META', 'mm'); } }; function tm(obj) { //alert('in timeMonitor'); //can add custom functions here }; function mm(obj) { //alert('in metaMonitor'); //can add custom functions here } function gid(name) { return document.getElementById(name); }; </script>
Posted by ellen at 5:03 PM
May 21, 2010
Enhancing Learning through Technology - Part I
This is a talk I gave recently to a group of educator/trainers within the U of M Health System. Although it contains many UMHS-specific references, the concepts outlined in it can be applied to other training environments as well. There's nothing particularly original here, just some suggestions for how to select among different technologies commonly available. This was the first part of a two-part presentation. The second part featured tips for creating engagement and improving digital photography.
Best Practice Showcase: Enhancing Learning through Technology
Our team has lots of tools you can use to create online training. There are so many choices, in fact, that it can be difficult to decide which to select when you're starting a new project.
To help you sort through all the options, I'm going to give you some typical instructional situations and suggest tools that might best support them, without breaking the budget in the process. These are all things you can use - they don't require a computer science degree to get a good result!
After I'm done, Barb will come up and tell you about ways to kick it up a notch. No matter what tools you use, your efforts will benefit from her suggestions on creating engagement and how to shoot better photos for online learning.
[Note: Slides for the latter part of the presentation will be up soon.]
So, here are some typical situations you may be dealing with:
- Teaching a brand-new topic to novice learners
- Helping experienced learners become experts
- Training learners in procedures they'll use infrequently
- Training learners with differing levels of skill or motivation
So let's take the first one: Teaching a brand-new topic to novice learners
Teaching entirely new skills or thinking processes may call for a blended learning approach including preparatory online learning, self-guided practice, instructor-led classes, discussion forums, and quizzes.
For this situation, I'd probably use what we call the "MLearning Template" as a sort of Grand Central Station for all the pieces of this type of course so there's only one place to check to find everything. [Note: this template is available for download here]
This module was created for a course taught by Michele Meissner and Kathy Fischer: "Foundations of Teaching and Learning."
It included a self-assessment, readings, reference and also, discussion forums which were an integral part of the course. We'll tell you more about those shortly.
The MLearning template can be used by anyone who can use Dreamweaver - even at a beginning level. We can help you get set up and give you detailed tutorials and assistance for using all its features.
The template is extremely flexible, it can be used to create a fairly complex course structure all in one piece, including quizzes, videos, custom sequencing and scoring behaviors, prerequisites, and automatic navigation.
It is also fully searchable, and the modules can be used as reference outside of the LMS. If you go to the MLearning login page, you'll see we've put a module search engine there, so you don't even need to sign in to find information on specific topics.

Once any module is open, you can search for phrases and keywords within that module as well.
Here's another image from a course built with the template, featuring an embedded interactive case study built in Flash. You can embed just about any type of media into this template framework, and these can be made to score or return data to the LMS.
As I mentioned before, the Foundations of Teaching and Learning course also made extensive use of forums for discussion of concepts learned in class.
Forums are great.They provide a place to reflect on the content of the course and to get help from other participants. Part of the success of the forums in this course was due to Michele being so active in starting discussions and making sure all participants were comfortable with how to use the site. Anyone at UMHS can create a forum like this using Confluence.
Our next lea" target="_blank">
Our next lea" alt="File-7.gif" height="375" width="500" />
Our next learning situation is: "helping experienced learners become experts."

If your learners are self-motivated, you may want to use self-directed practice to let them work through skills in increasingly sophisticated ways.
For practicing certain types of skills, say - medication calculation, or managing complex patient cases, you may want to try writing a scenario-based quiz, or an adaptive quiz that selects the difficulty of questions based on how you are doing so far on a topic. Our Questionmark quizzing application handles both types of quiz well. Both of these take more writing effort up front, but for the right situation it can be worth it.
There are several ways for you to create quiz questions in Questionmark. This web-based form is one example. You can also use simple text files or, if you need to write a lot of quizzes, we can set you up with desktop authoring software and help you get started.
May 14, 2010
Defeat the IE 7 z-index bug
The z-index bug in action
Although Internet Explorer 8 has been widely adopted, IE 7 is still the browser in use at my office, so all new projects must be compatible with it. Even though IE7 was already obsolete when we adopted it, it was a wonderful change from IE 6, because of the reduced need for CSS and javascript hacks, workarounds and compromises in general.
So it was a surprise to realize that an old Internet Explorer 6 stylesheet problem, the "z-index bug" still lingers on. You'll know you've hit this bug when your drop-down menus fall UNDER elements that are lower down on the page. (...I should add: and there are no iframes or frames on the page).
There are several sites that do a fantastic job of telling you exactly why this happens. I'm just going to tell you how to fix it. In fact, if you want to jump to the fix right now, click here
What is the z-index bug?
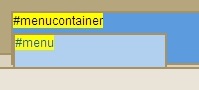
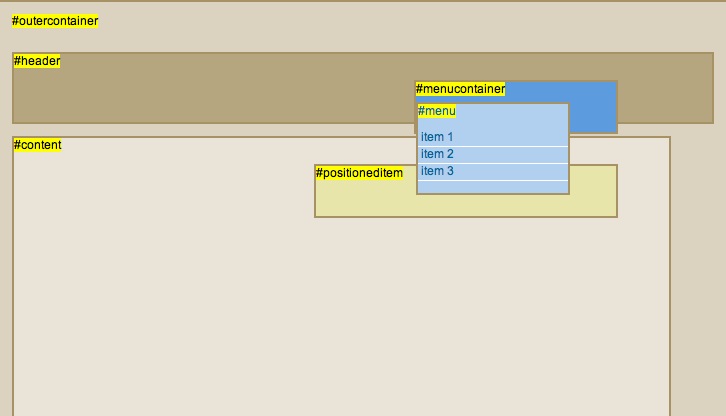
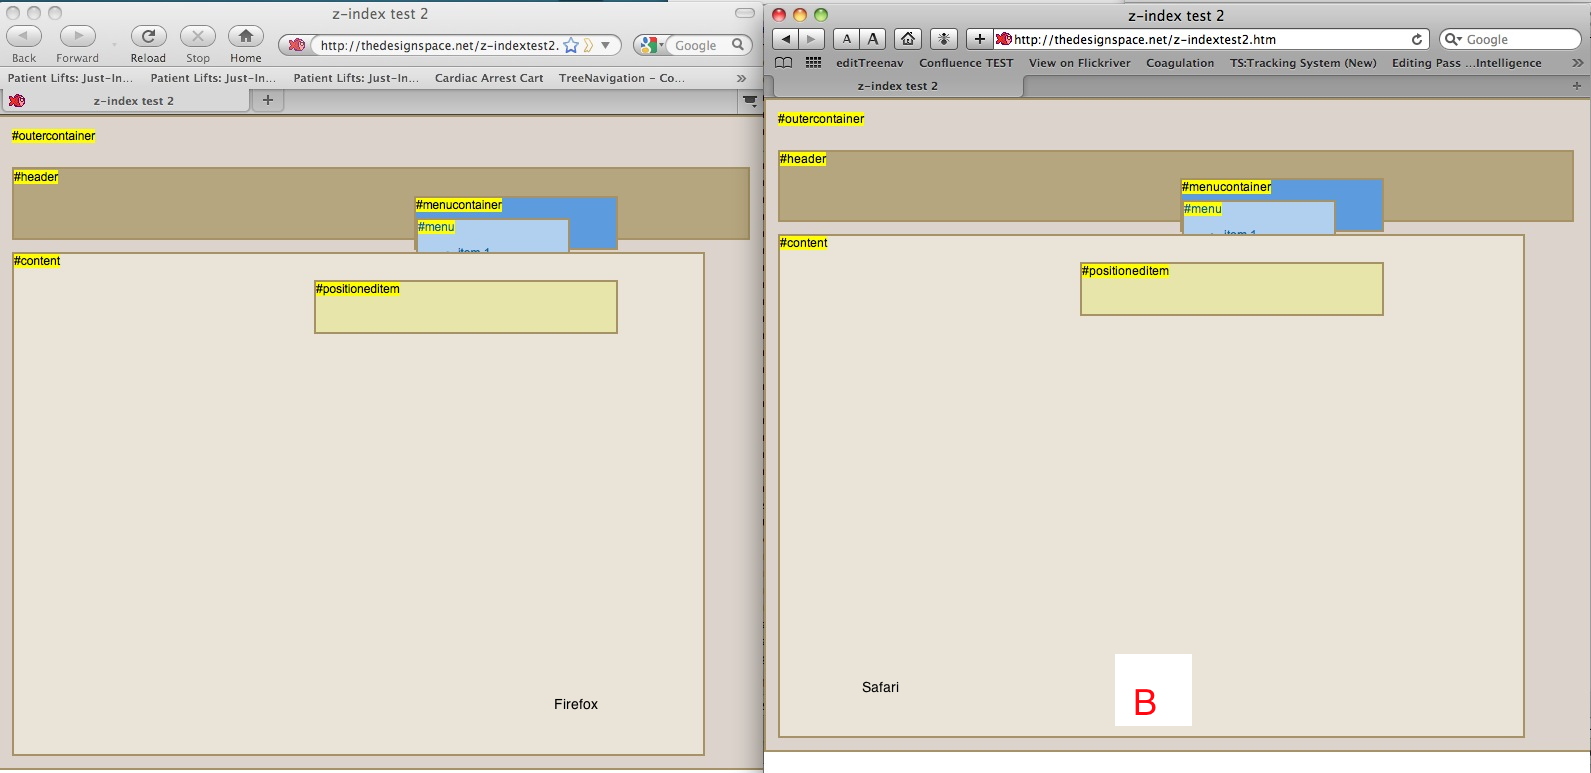
Let's say you have a layout like the one below, with a #header that goes across the top, and a #content area below it. Within #header is an element containing one or more drop-down menus (#menucontainer, below).
This is what you HOPE it would look like:
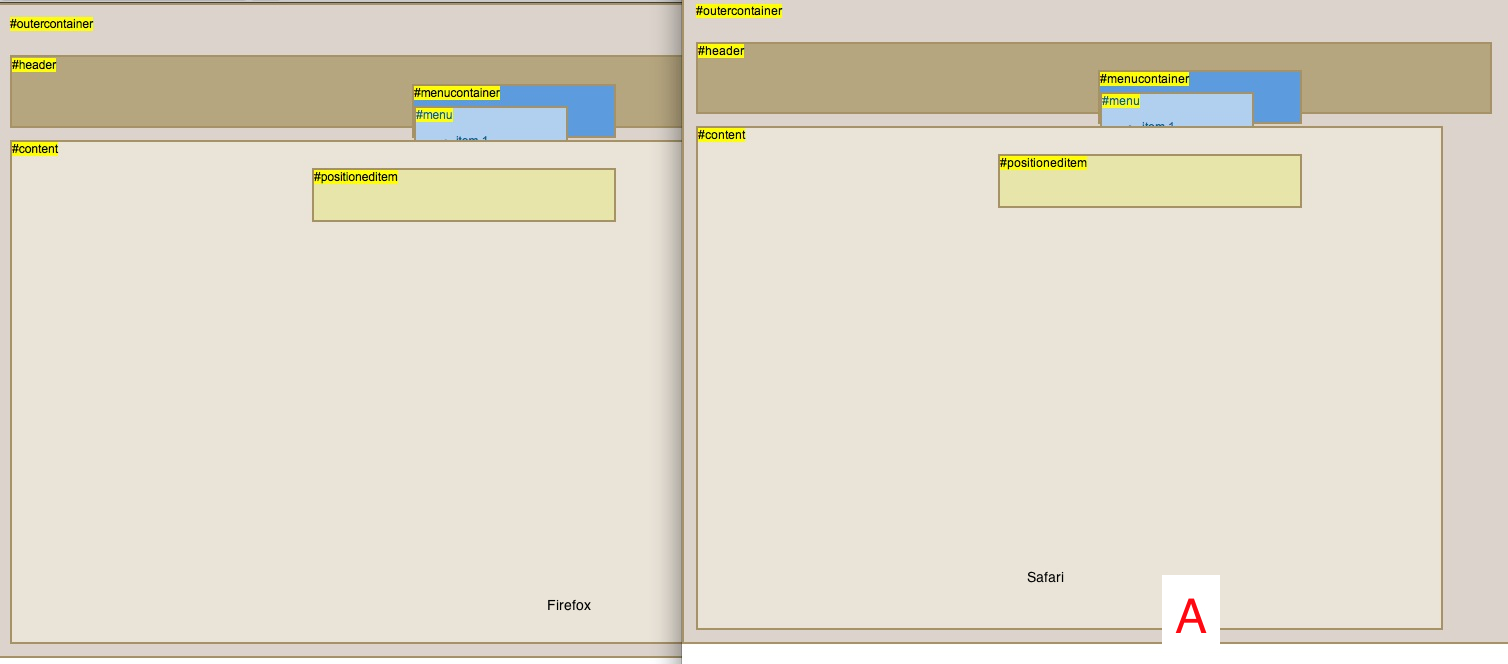
Firefox and Safari show this:
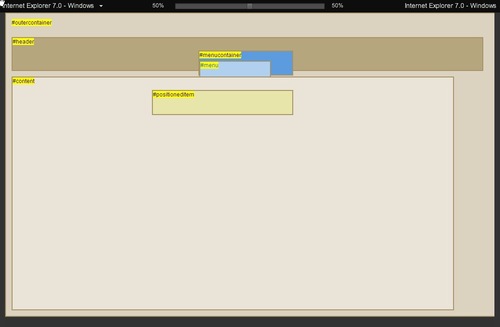
But, when you open Internet Explorer 7, you see this:
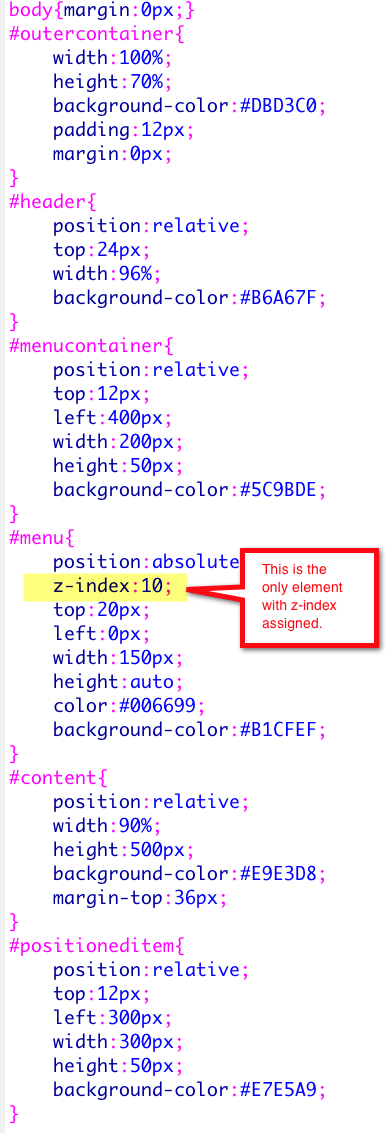
The CSS stylesheet for the example above is shown below.
Note that there are several elements that have positioning assigned to them (#header, #menucontainer, #menu, #content, #positioneditem). Only #menu has z-index assigned, since that's the natural thing you would try to do: try to force it up over the other elements.
The menus underlap items that come after them!
HOW TO FIX IT
- Add z-index to least common ancestor
The simplest fix for this is to add a z-index setting of 1 or more to the "nearest parent" (least common ancestor) of the problem menu and overlapping elements. In the diagram above, the nearest parent to #menu and #content is #outercontainer.
- If that isn't enough add z-index to positioned elements further down the DOM tree toward the menu element, until things straighten out.
If adding z-index to the least-common ancestor did not fix the problem, it probably means some of the items are defaulting to automatic z-index values based on their order in the DOM. To fix this, work your way back down the DOM tree from the least common ancestor toward the menu element to the first positioned element, adding a z-index:1. Continue down to the next one adding z-index as needed until things improve, increasing the z-index by 1 as you go.
Example A.
NO z-index assigned:
No z-index is assigned to any element. Items that need positioning have been positioned with either relative or absolute positioning.
Scroll down to see what effect this has in various browsers.

Firefox and Safari
Internet Explorer 7

In this case, they all show the menu underlapping the content area.
#header and #content are in separate stacking contexts, and since #content comes last in the DOM, its context will always overlap items within #header.
Example B.
z-index added to #outercontainer only
Same as before but z-index:1 has been added to the least common ancestor element: #outercontainer.
Scroll down to see what effect this has in various browsers.

Firefox and Safari
Internet Explorer 7
Well, it looks like we're in about the same place as before - or are we? It may look the same, but there are some invisible changes happening to the way the browsers are perceiving order. Because the outermost ancestor now has a z-index assigned, it is creating a single big stacking context containing all the child elements and their sub-contexts.
Example C.
Just proving what's happening! I've removed the positioning on #content (doesn't really need it anyway!) to show you how the positioning property is what causes the new stacking contexts to be generated.
Scroll down to see what effect this has in various browsers.

Firefox and Safari
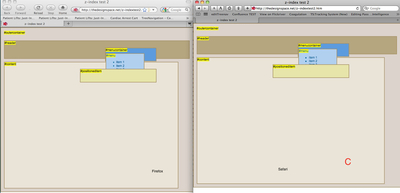
Internet Explorer 7

#content no longer generates its own stacking context, and drops back to z-index:auto ordering within the context created by #outercontainer. #positioneditem DOES create a new context because of its positioning property, and so jumps up over all other elements and contexts because it is the last element in the DOM.
Example D.
z-index added to next positioned element down from #outercontainer.

Firefox and Safari
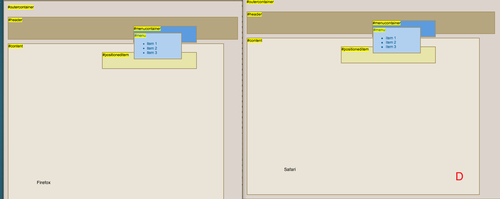
Internet Explorer 7

That seems to have done the trick! The z-index:1 added to #header caused #header to jump up over #content. If you were in a situation where you HAD to assign positioning to the #content element (which would cause IE to generate a new context there), then also give the #content element a z-index value of 0 to bring #content down lower than #header. Basically, do whatever you have to do to make sure that #header's tree structure will all start at a higher level than #content's tree structure.
Here are some articles which will tell you in detail how stacking works:
May 13, 2010
Firefox and Java/SCORM issues
Our LMS uses Java applets to transmit SCORM data back and forth between learning activity and the LMS. Sometimes this causes problems, because Java security on various browsers is increasingly strict. However we can usually keep IE 6, 7, 8, Firefox on PC and Safari on the Mac working.
Mac-Firefox is usually somewhat problematic. In the past, learning modules would not launch at all using Firefox on the Mac, then recently they started launching but with incomplete learner data being transmitted.
Thanks to Peter Miles, on the Moodle tracker site, I think we finally found a solution. I have no idea why it works, but it does work.
There are two applets that talk to each other. One is in thin the window containing the learning activity. To make it work I simply shifted the "codebase" atribute to AFTER the "code" attribute in the APPLET tag.
The original code was:
<APPLET code="org.adl.lms.client.DocentAPIAdapterApplet.class"
archive="${getScormCodebase()}/apiadapter_lms.jar"
codebase="${getScormCodebase()}"  src="${getScormCodebase()}"
height=0 id=API name=API width=0
MAYSCRIPT>
The new, working code reads:
<APPLET codebase="${getScormCodebase()}" src="${getScormCodebase()}"
  code="org.adl.lms.client.DocentAPIAdapterApplet.class"
  archive="${getScormCodebase()}/apiadapter_lms.jar"
  height=0 id=API name=API width=0
MAYSCRIPT>
May 12, 2010
How and why to #quitFacebook
After logging in to Facebook yesterday and seeing yet another notice about how Facebook is going to swap my data with just about any site they feel like, I realized I don't want to have to check their extremely complicated privacy settings every week or two to make sure they haven't changed something I care about.
Besides being an incredible waste of time, it's futile: they have made a practice of making significantly bad changes you can't do anything about. Some of these changes can have real consequences down the road, and I just don't need that. Moreover, it is not clear what real effect the settings have, in practice. So, since I didn't grow up with Facebook and I'm not going to go through social withdrawal, it's out.
It turns out that really deleting my Facebook account is not so easy. It is obvious how to "deactivate" your account, but it can be turned back on at any time, even by accident, if you respond to one of your friends email invitations to an event or other Facebook happening, wiithout being aware that it means reactivation.
However, thanks to several great posts by Dan Yoder I finally found the secret. Log in to Facebook, then click HERE to really, really delete your information. If you have already deactivated your account, RE-activate it (yes, its worth it) and then click the link and delete it for good.
In case you're still on the fence, here's a selection of well-articulated reasons for why others are choosing to leave Facebook.
May 6, 2010
Add comments to Google Docs
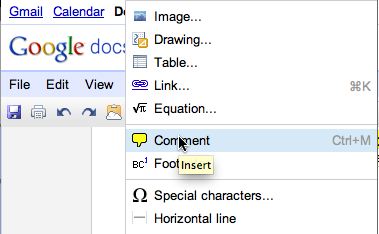

For some reason it took me a while to figure out how to add a comment into a Google doc. I'm not sure why: the comments function is right under the Insert menu where it is in Word. In any case here's how. Just select Insert > Comment, and a comment tagged with your name and the date will will appear.
Using Google Doc's version of "track changes" is not so straightforward, and will be the subject of a later post.May 5, 2010
Set up Mail.app to handle ALL your email accounts, including Groupwise

A lot of people are unaware that it's possible to set up multiple email accounts on Mail.app. You can even add your office GroupWise account! This is true for most mail clients, including Entourage and Outlook, but I'm just going to discuss Mail.app here, since everyone's getting iPads these days, it seems...
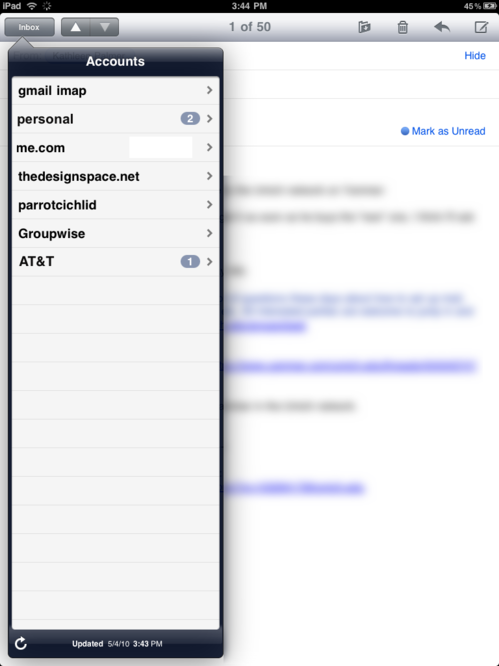
Seven accounts on Mail.app on the iPad, including Groupwise:
If you have a desktop mac, use that to set up the accounts. They will be synced to all your devices, as long as you set up the sync settings for each device correctly. You don't need mobileMe to do this - iTunes will sync the account data.
If you don't have a desktop Mac, you can set up Mail right on the mobile device. The screens displayed by each may be slightly different. I'll show you how to set it up using Desktop Mail.app, and then on iPad's Mail.app, which should be similar to iPhone and iPod touch.
Gather account information for all accounts
You'll need the following information for each account you want to add:
- Type of account (IMAP or POP)
- Incoming and outgoing (SMTP) mail server addresses
- What ports each of them uses
- Whether it requires SSL (security that encrypts your login information during transmission)
- Your username and password, and what authentication scheme or additional encryption they require. (eg: password, Kerberos, MD5 Challenge-Response, NTLM
For Groupwise (and certain other accounts): find an alternate SMTP server
If you are adding a GroupWise account, it is likely that you'll need an alternate SMTP (outgoing mail) server since the GroupWise server may not allow you to send mail through it without using the GroupWise client or without being logged in to the company network. You can try to skip this step, and come back to it if needed. If you have a Gmail account, then you already have a usable alternative.
Note: The fact that you are sending from an alternate SMTP server will not affect your reply-to address.
Good alternate SMTP servers include Gmail (smtp.gmail.com) or if you have an AT&T email account from having an iPhone or 3G iPad, use their server (smtp.att.yahoo.com). Your cable company or DSL provider may also have provided you with one, for example smtp.comcast.net, or smtp.east.cox.net. I've found that some of the cox.net ones don't even require passwords.
A list of possible SMTP servers is available on this page, but I would use only the ones you are familiar with. I have no information about the quality of any of them except the ones I've tried.
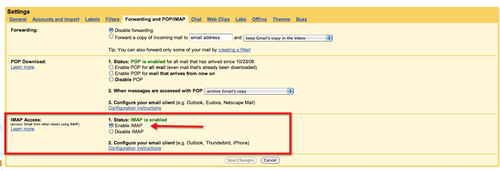
Configure Gmail for IMAP
If you don't have any ready to hand, open a free Gmail account, and configure the settings to enable IMAP Access. Click Settings in the upper right of the Gmail screen and select the Forwarding and POP/IMAP settings as shown below. It may already be set that way by default.
Adding new accounts to Mail.app on a Desktop Mac
Add a Groupwise Account to Mail.app
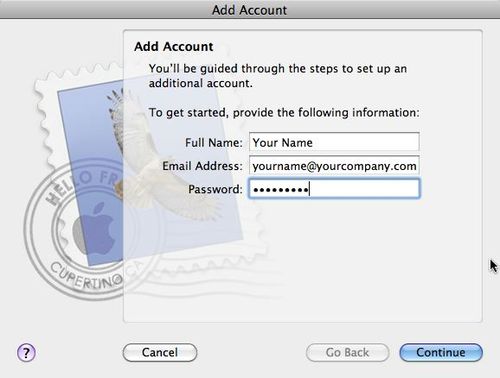
On a desktop Mac, open Mail.app, and select File > Add Account...

Enter your name, GroupWise email address and Groupwise password and click Continue.
Select IMAP from the dropdown list
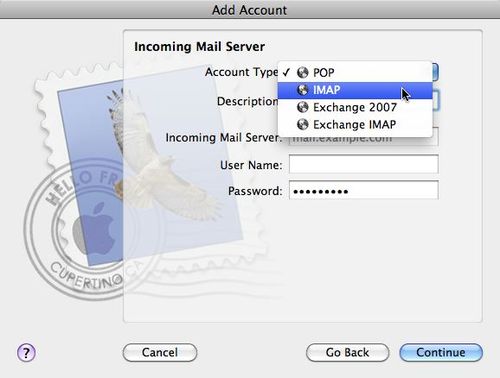
Enter a description so you'll recognize the account in lists, then add your Groupwise incoming (IMAP) mailserver address and your Groupwise username and password.
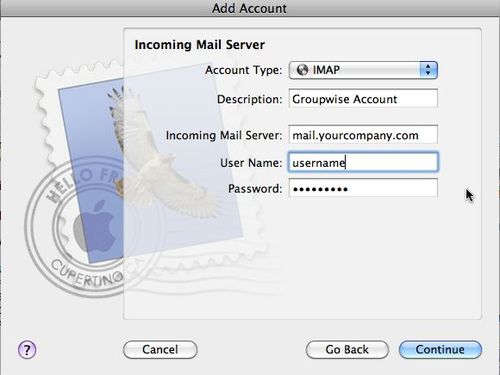
For Outgoing Mail Server, I'd suggest trying Gmail's SMTP server, or other one as described above. Set it up as shown.
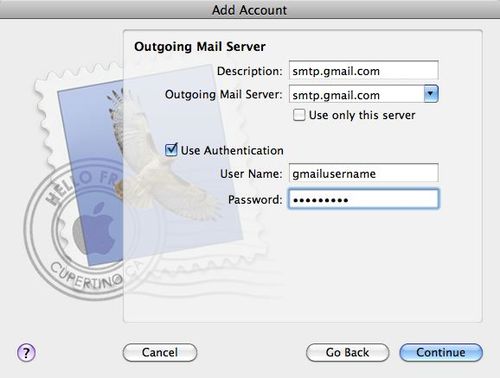
Click Create on the next screen after checking your entries.

Now let's repeat the process with your Gmail account. The settings would be:
Description: Gmail
email address: you@gmail.com
Incoming Mail Server: imap.gmail.com
Username: you@gmail.com
Password: your gmail password
Use Authentication: Checked
Repeat with all your email accounts, and your email inbox will end up look something like this:
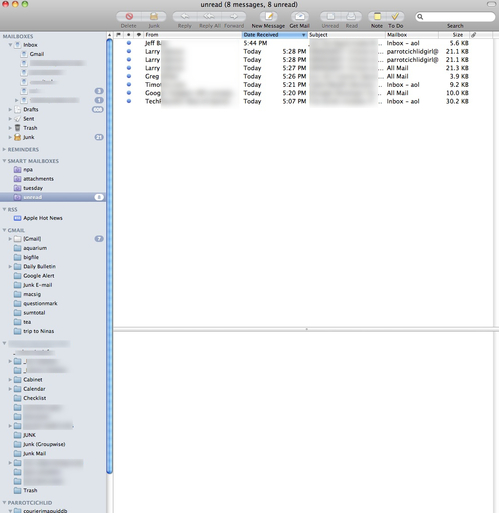
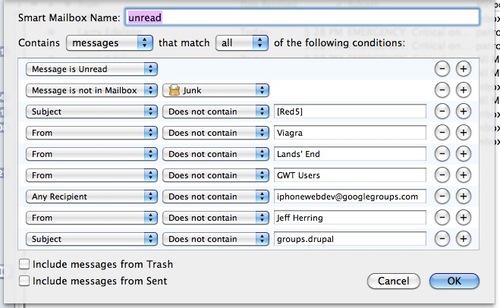
Create a smart Inbox
To manage all this clutter, I've found it useful to create a Smart Mailbox that functions as a single "unread" folder for all the new mail that I am interested in reading right away. It contains rules that gather the new, unread mail from all accounts. It filters out both SPAM and BACON (mail I may want to read later but don't want cluttering up my inbox).
Adding new accounts to Mail.app on an iPad
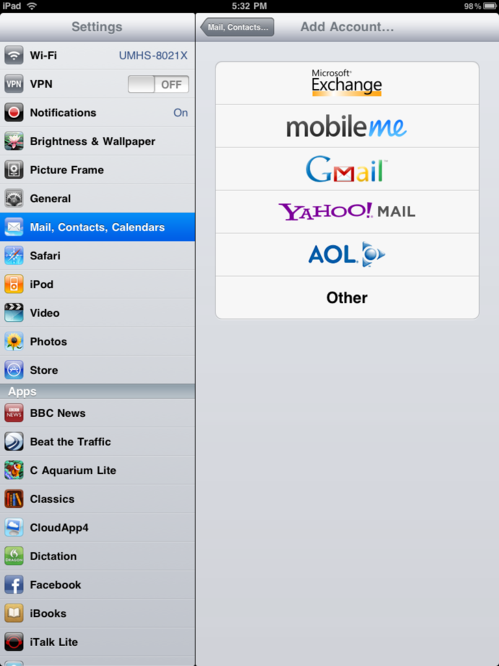
On an iPad, click the Settings icon then select Mail, Contacts, Calendars > Add Account...

On an iPad, you'll then see a range of account-type choices including Microsoft Exchange, mobileMe, Gmail, etc. Choose the appropriate one. In this case it would be Other for a GroupWise account.
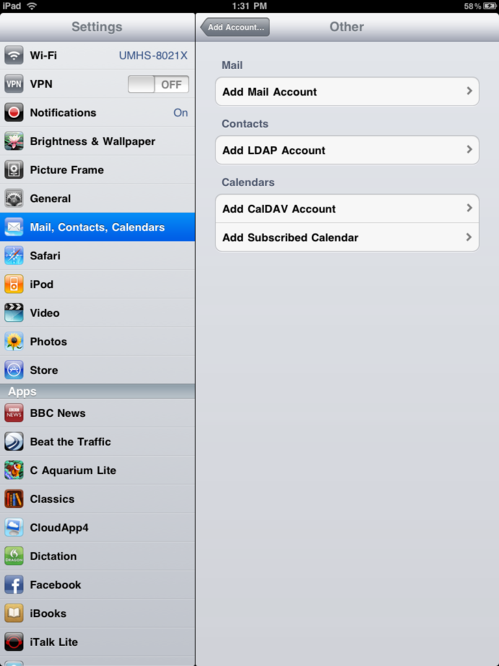
You'll get further choices as shown. Choose Add Mail Account.
In the New Account window, enter your name, GroupWise email address and GroupWise password. Description can be "GroupWise" or "Work" or whatever helps you remember it.

In the Enter your account information window, add Hostname (your groupwise IMAP or Incoming mailserver address). Under Outgoing Mail Server, add the information for the Gmail or other SMTP server you decided to use.
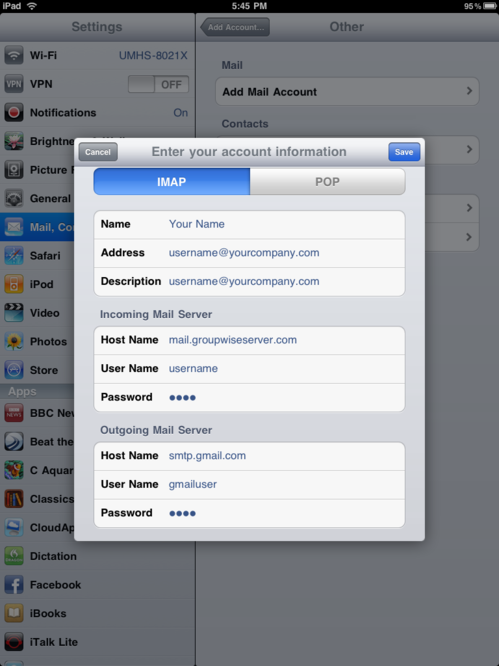
Click Save, and it will probably try to connect to the servers. Hopefully all will be well. If not, check to be sure you typed everything correctly, and try again.
Repeat these steps for all your email accounts.
To switch among your accounts within Mail on the iPad, simply click the button at top left of the left-hand column (It reads "Inbox" in the image below). The button label changes to whatever account name you are in once you drill down, and the button shape changes to an arrow.
May 4, 2010
Best Groupwise calendar app for iPad so far...
Novell's Groupwise version 7 is not compatible with the iCalendar (.ics) format. This makes viewing your Groupwise calendar a challenge on an iPhone or iPad.
In the past, I've used a kludgy method of syncing my Groupwise calendar to iCal by delegating any received appointments to a Google calendar, then subscribing to that calendar with iCal. This was hardly a perfect system: appointments would get missed or doubled sometimes. So it was nice to finally find a better solution: "GW Calendar" from Ghost Pattern Software.
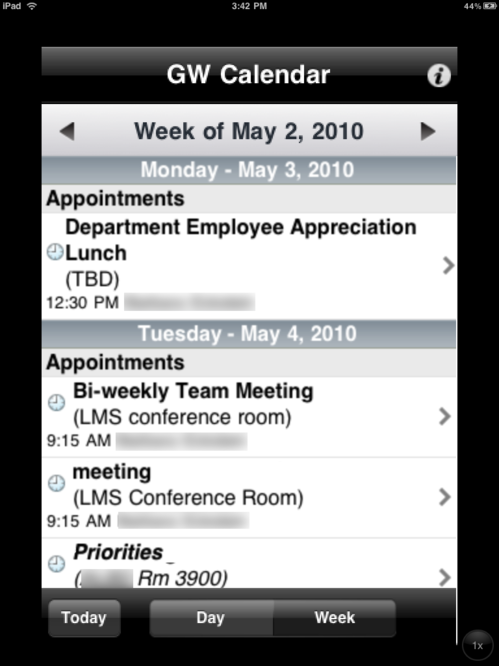
GW Calendar allows you to see your Groupwise calendar in realtime in either one-day or week views. It also allows you to forward, accept and decline meetings, but not create new ones or do busy searches. There is no month view yet. And most importantly, no Push notification of upcoming meetings. However it is quite useful for accurate viewing of your Groupwise calendar over the next few days.
This is the Week view:
Here's the single-day view:
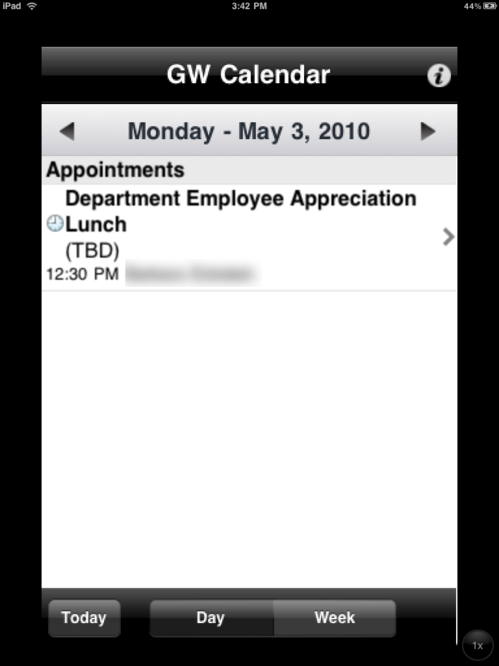
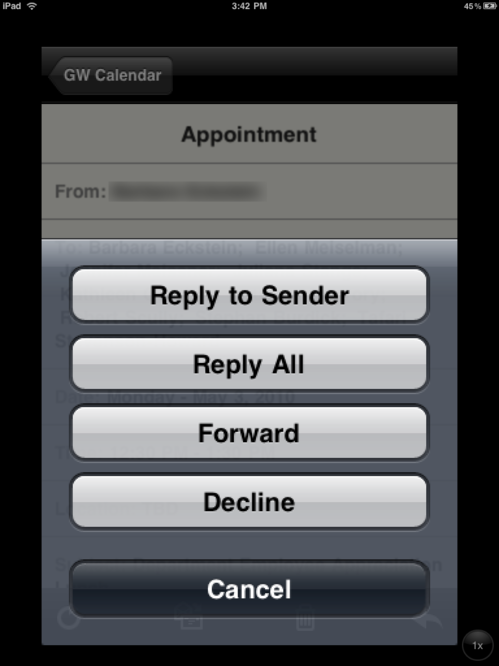
Clicking on one of the appointments gets you the appointment view:

You can reply, forward, accept and decline appointments, but can't issue new ones yet.
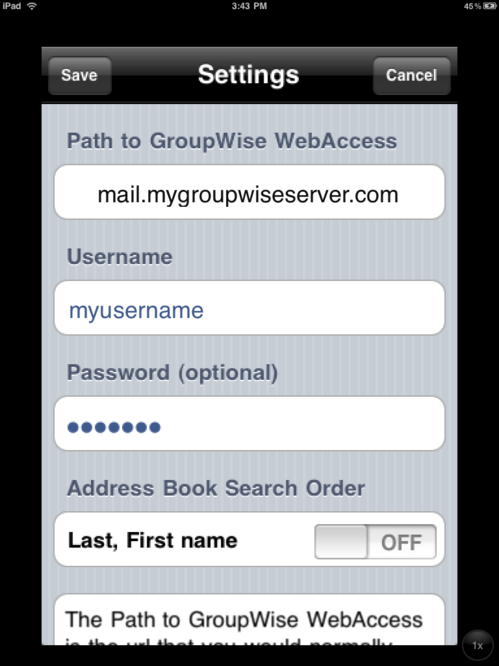
Set up
To get started with GW Calendar, you will need the server address of your Groupwise server. In my case it was the same as the Groupwise webmail URL, so that was easy to remember.
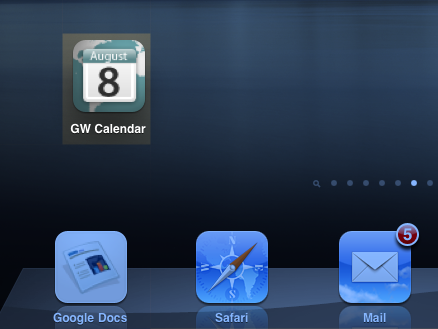
I have it on the home screen, but this may be one of those items you would want right in the dock, if you are a busy person.
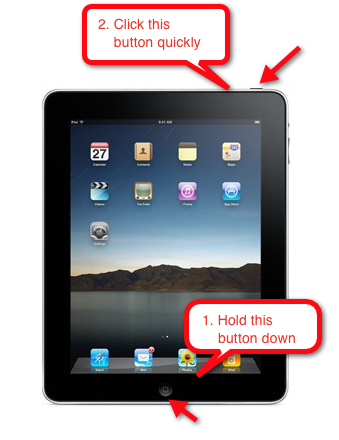
How to shoot a screenshot on the iPad without accidentally shutting it down
I must have a heavy touch: every time I tried to shoot a screenshot on the iPad, following all the directions I've read on other sites, I'd end up turning off the iPad instead.
But after some experimenting, I figured out exactly how to shoot a screenshot without shutting down the iPad:
- Step 1. Hold down the round Home button at the bottom of the screen.
- Step 2. While holding the Home button down, quickly click and release the Power button at the top right of the iPad.