July 31, 2009
Beginning Eclipse CVS - Basics 2: Create a new project from scratch
<= Back to previous section "Getting Started"
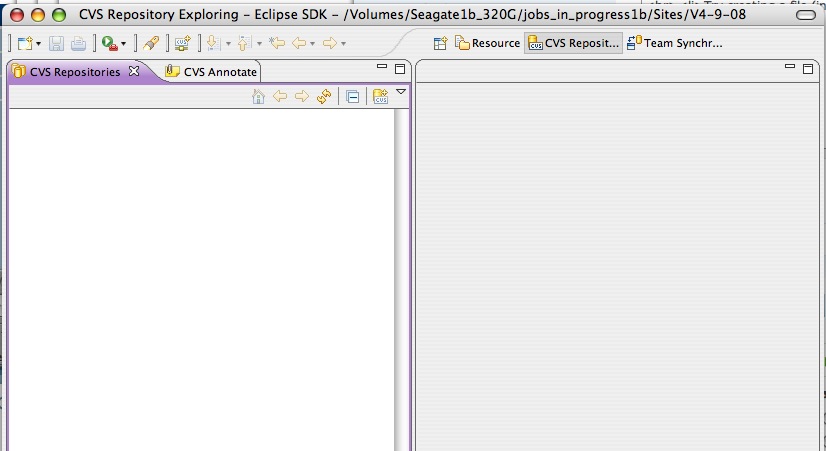
- Open up the CVS perspective in Eclipse by selecting Window > Open perspective > Other > CVS Repository Explorer from the main menu.
The CVS perspective is open on the left in the image below.
- Create a new Repository Location:
Right click on the left window. Select New : Repository Location from the menu that appears.

- Fill out the form with the correct login information

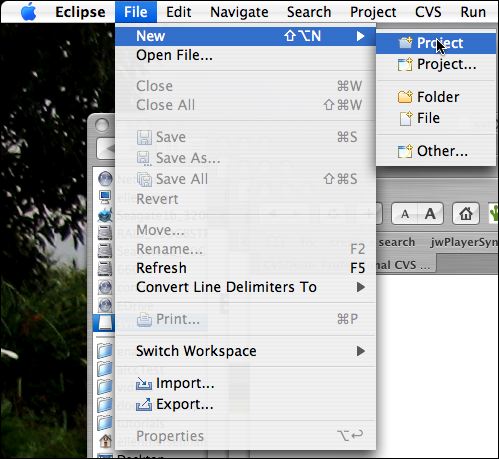
- Create a new project: File : New : Project
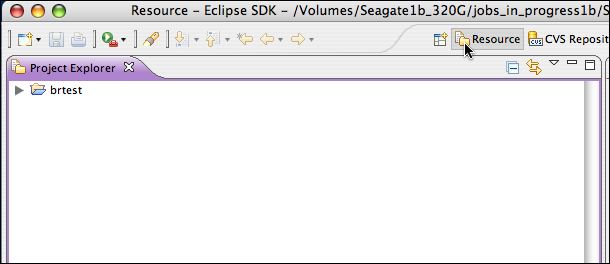
- Click Resource to open your Resource perspective. You should see the project you just created. If you were to look at your workspace using Windows Explorer (PC) or Finder (Mac), you would see a new folder inside it with your project name.
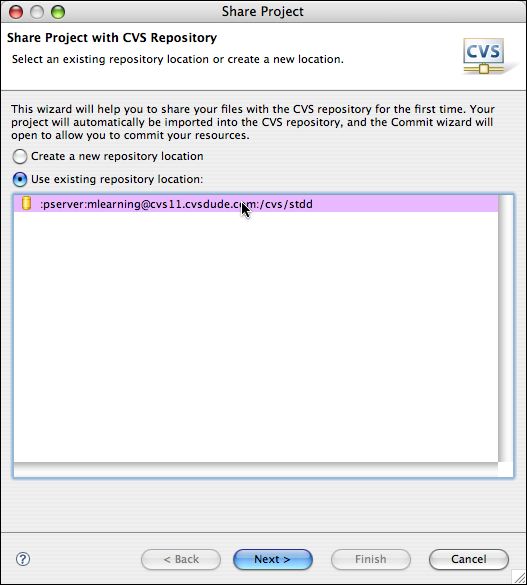
- Now add the project folder structure you just created to the CVS repository. Right click on the new folder and select Team : Share Project

- Select the CVS repository location you just set up.
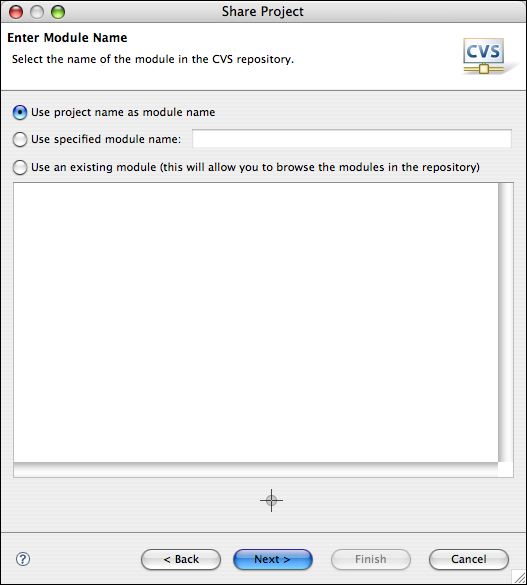
- Follow the steps presented and it will commit your new project to the repository. Choose a module name (often the project name will do).
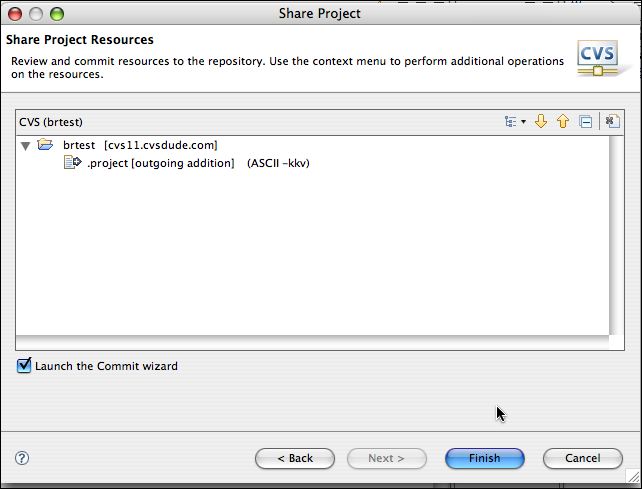
- Review and commit the resources (in this case, just a folder and a project file) to the repository.
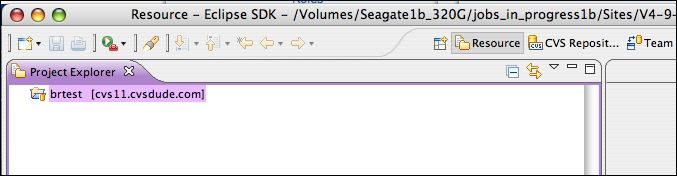
- Click Finish, and you will be returned to the Project Explorer view (Resources Perspective ).
Next we'll add some files to the project. Continue to next section "Import files into the project" =>
Posted by ellen at 4:35 PM
Eclipse Terminology-"Perspective":
The word "Perspective" is used to denote a window panel in Eclipse with a specific purpose. There are Eclipse perspectives for different functions, like the Resources perspective for viewing workspace assets or resources, the Team Synchronization perspective for viewing CVS synchronization information, and the CVS perspective for viewing CVS Repositories, to name a few.
Continue reading below break...
July 30, 2009
Error: "Partition size not a multiple of 4k" on formatting a new drive
New Iomega drives ship with NTFS filesystems, formatted for MSDOS. They must be reformatted to work with Mac OS X.
However when attempting to format these drives you may get this error:
"Partition size not a multiple of 4k"
Here's how to fix it.
- Open Disk Utility and select the drive. Click Partition tab : Options : GUID Partition Table (assuming you have an Intel-based Mac). Click OK.

- Select "2 Partitions" (or higher) from the Volume Scheme dropdown menu. Create two or more partitions of any size. They can be equal or not - according to your preference. Select Mac OS Extended (Journaled) from the Format Menu. Enter names for each partition, then click Apply. You may be able to succeed with 1 partition, but I was not able to, so created one small partition and one large one.

- You should see the "Formatting..." progress bar appear down in the footer area of the window. It does not take very long to complete the process, then the drives will mount.

Thanks to holmahenkel and
chjr7777 from the Apple discussion forums.
July 28, 2009
Beginning Eclipse CVS - Basics 1: Getting Started
Eclipse is an open-source software development platform or IDE that has CVS (version control) functions built-in. Although Eclipse was originally built for Java development, it is very useful for working in other languages as well because of it's open plugin-based architecture. It is often used as the foundation for new applications because it is so easily extended. This series will focus on the basics of using Eclipse for for version control, for web designers or beginning developers.
Continue reading below break...
Why use Eclipse and CVS?
Eclipse is a great development environment for teams. It is extremely flexible and can be customized to work the way each person prefers, with strong team functionality. One of its many useful features is CVS version control. Version control applications like CVS not only help prevent overwriting other team members' work, but it maintains an exact record of every change ever made, and who made each one, allowing comparisons between versions and rollbacks when necessary.
Version control also allows team members to work on different code branches at the same time. Some team members can work on a particular feature or flavor of the project without affecting the others, until the change has been thoroughly tested and is ready to merge back into the main trunk of the code. You'll note the tree metaphor here, and it is commonly used in describing code versioning situations.
Why is this tutorial needed? When I first started out with Eclipse, I had very little experience with IDE's of any kind, and found it quite difficult to understand what was going on because the interface is so flexible and seemed to change at every click. Most tutorials on CVS assume some development experience. This tutorial is for beginning web developers who might be experiencing the same confusion and want to use Eclipse mainly for version control and team coordination.
CVS works by storing information about your files in a repository on a server, along with the files themselves. When you make changes to the file, all those changes are tracked, along with any comments you make about each change, and the file version number is updated. This tutorial assumes you have a repository set up somewhere, but if you don't, try CVSdude.com for CVS hosting.
Install and setup Eclipse
First, check your Eclipse version. Download the latest version of Eclipse from Eclipse downloads page.
Versions before v.3.1 have a problem with checking out items that are not at the root of the CVS repository.(Note: If you get the error: "internal error, resource does not start with root" you know you do not have the latest version, and need to upgrade to the latest version of Eclipse.)

-
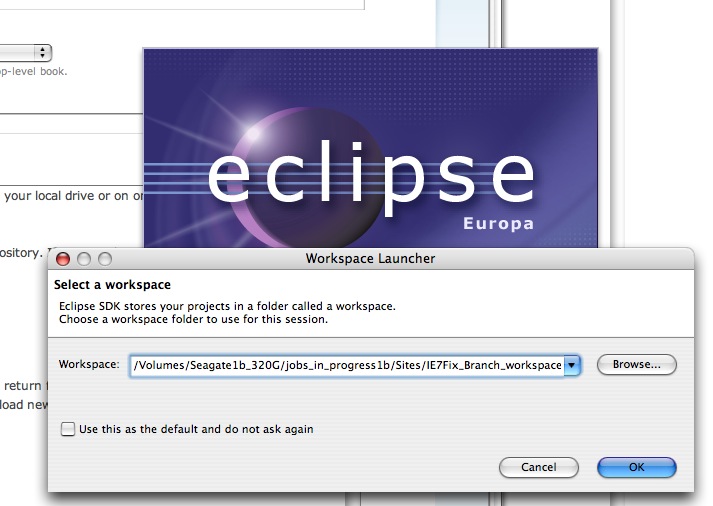
Choose a workspace
Create a new empty folder on your local drive or on the server you are using f. Give it your project name, or call it workspace, or something similar. Then launch Eclipse, and it will open the Select a workspace dialog. Select the new folder you just created and click OK.
Go to the workbench view
If you see this cryptic starting screen, click the curved arrow icon on the far right of the green area to go to the workbench view.
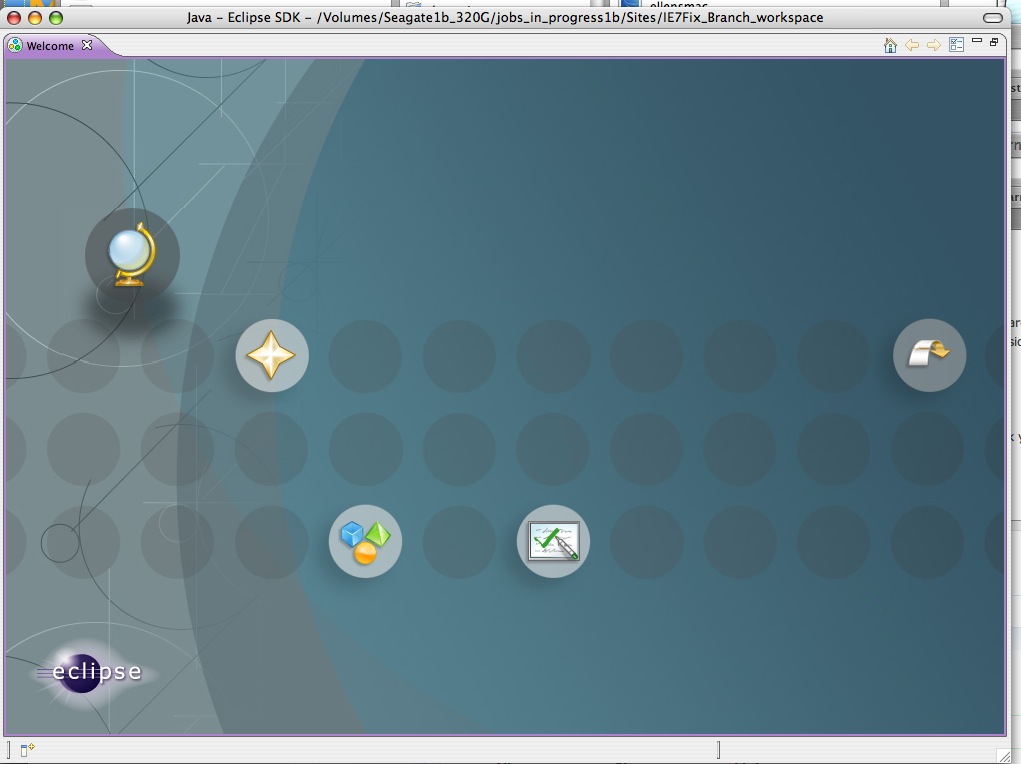
If you had a default workspace selected, Eclipse will not ask you to choose one - it will simply open the workbench view. If that default workspace is open and you want to change to a new workspace for your new branch or project, you will want to switch to a new workspace. (instructions to come soon)
July 26, 2009
Keyboard stops working but only in Finder
A new problem that's been plaguing my Mac these days is that the keyboard sometimes stops working, but only in the Finder. In all the other applications, it remains functional. I use a Wacom tablet, and suspect it may have something to do with that, but more generally I'm guessing there is a key-command somewhere that is conflicting with something else.
My only solution so far is to relaunch the Finder.
Looks like others are having similar problems but so far, no solutions.
Drupal: Use Taxonomy Access Control Lite to protect content areas for each course
Drupal is often used in education these days, and a common requirement for course sites is to create protected areas for each course. You could simply have a separate Drupal site for each course, but sometimes that is not an option, or not efficient, particularly if you want to have some common areas, and other areas which are restricted by course.
There are many approaches you could take to do this using various Drupal modules, but one relatively simple method is to use the Taxonomy Access Control Lite module. This tutorial will help you get started with managing rights in Drupal course sites. In a later tutorial, I'll cover forums, wikis and and blogs.
To create protected, read-only areas accessible only to the students of each course:
- Download and install the Taxonomy Access Control Lite module
- Create a role for each course so that TAC Lite can control their permissions. Besides the default "Authenticated User" which is assigned to all logged-in users you will need to create roles for each course plus the teacher or professor, who will be able to see everything.
For example for a site that will serve students in two music courses this fall, I created three access roles: "Theory 149 student", "Theory 430 student" and Professor. Role permissions work by addition. Every user who is logged in as a member of the site is automatically granted authenticated user permissions. In addition, they are granted any additional permissions their additional roles may have.

- Create a new taxonomy vocabulary called "access" and assign it to all the content types you want to control with this method.

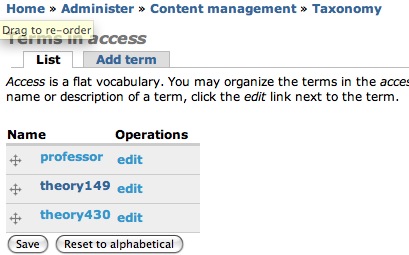
- On saving the new vocabulary, it will return you to the vocabulary list. Click add terms in the access row.

- Add terms to the access vocabulary for each course, and one for the professor or teacher, just like you did for the roles.
- Now you will map specific permissions to those taxonomy terms. Click Administer : User management : Access control by taxonomy. You will see several Scheme tabs.
The permissions you can control are "View, Update, and Delete" which are programmer talk for "Read, Write, Delete." Label Scheme 1 Read. The permission we want the students to have for most types of nodes in Drupal is just "Read" or View, so this Scheme will grant "View." Select view in the Permissions list. Now assign this permission to the taxonomy terms by selecting them in the list boxes under each role as shown. Anonymous users and authenticated users probably should get <none>, Theory 149 students should get view access to the theory149 taxonomy term. Theory 430 students get access to the theory430, and the Professor gets view access to everything.
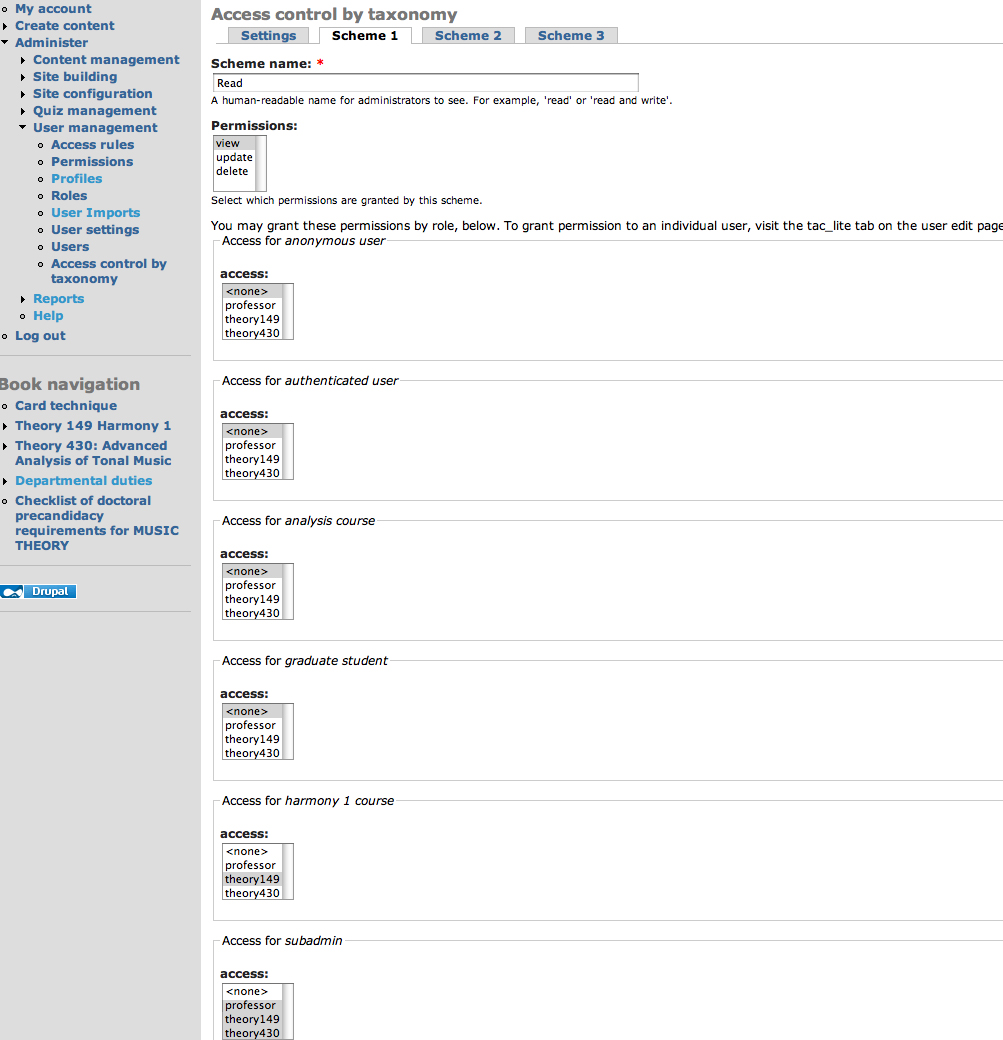
Scheme 2 will be called Write-Delete. Only the professor gets Write-Delete access in this case, because there will be no forums or student blogs.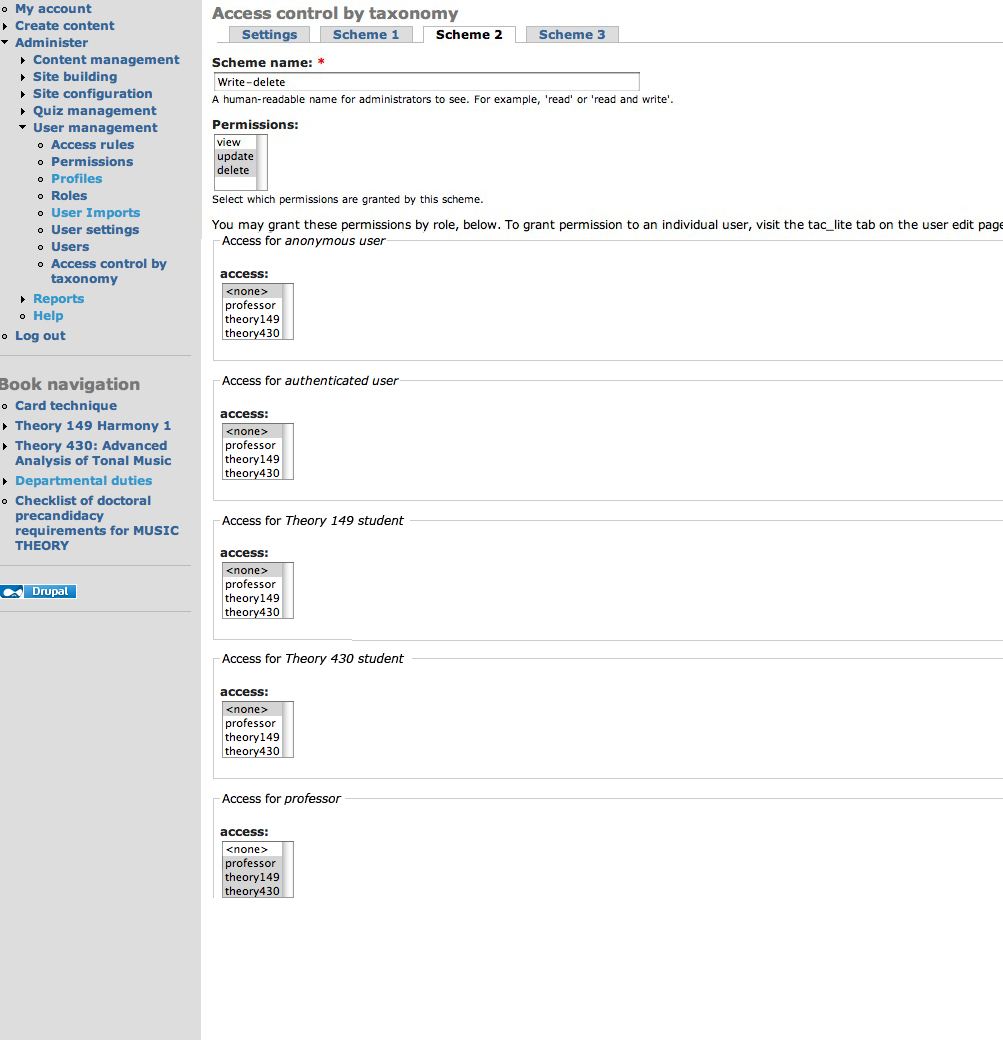
- Now, create a book for each course. (Create Content : Book Page)
Note: Creating a Book page with no "parent" page creates a new Book in Drupal.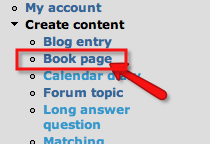
- Assign one of the access vocabulary terms to each book.

- Add a menu item for the new book, so it will show up on the student's front page, if they have rights to see it. In this case, I have set it to show up at the top of the page in the primary links.

- The student will see their book title in the navigation, but not the other books.

I'll cover the management of student write-delete permissions for blogs and wiki-like books in another post, coming soon.
Resources
- Taxonomy Access Control Lite module
Posted by ellen at 12:51 PM


July 16, 2009
Downloaded dmg files and codec overrun errors on Mac
I've been downloading disk image files (.dmg) containing Mac utilities and applications with no problem for years, but all of a sudden, a particular update .dmg always downloads in a corrupted form. I've been trying to update Mathematica 7, but the disk image containing the updater consistently gives "codec overrun" errors when it is being verified prior to mounting.
The disk image can be mounted by clicking "skip" during the verification process, but the files are corrupted. They look OK, but the installer errors out a few seconds after launching.
Apparently this .dmg corruption issue has to do with using SPI (Stateful Packet Inspection) in our Netgear router's firewall. I haven't yet had the opportunity to test it without the SPI setting, but according to many people, this will resolve the problem in most cases.
To fix, open your Netgear router's administration page (http://www.routerlogin.net), log in and go to WAN settings. Uncheck SPI.
July 15, 2009
ASP contact form for use on GoDaddy sites
Make the following changes.
- You will no longer need "formproc.asp". GoDaddy will not release the code for their working form but you can use theirs.
- In contact.htm, replace everything within the FORM tags with the following HTML code. This sends the user's data to GoDaddy's ASP form processor, _gdForm/webformmailer.asp
<form action="_gdForm/webformmailer.asp" method="post" id="form"> <input type="hidden" name="subject" value="Submission" /> <input type="hidden" name="redirect" value="thankyou.htm" /> <table cellpadding="0" cellspacing="0" summary="Contact form"> <tr> <th><label for="name">* Full Name: </label></th> <td><input type="text" name="name" id="name" size="25" maxlength="255" /></td> </tr> <tr> <th><label for="email">* Email Address: </label></th> <td><input type="text" name="email" id="email" size="25" maxlength="255" /></td> </tr> <tr> <th><label for="subject">Subject: </label></th> <td><input type="text" name="subject" id="subject" size="38" maxlength="75" /></td> </tr> <tr> <th><label for="message">Message: </label></th> <td><textarea cols="30" rows="6" name="message" id="message"></textarea></td> </tr> <tr> <td colspan="2" id="button"><input type="submit" value="Send Email" /></td> </tr> </table> </form>
- Next, create a "thankyou.htm" page, which can contain any message you want. This is going to be the page they get redirected to after the form has been processed.
GoDaddy made some changes to their smtp email server settings such that old ASP mail forms no longer work.
This is apparently an attempt to prevent spam from people using the server as a relay server, since the error that occurs is:
Final-Recipient: rfc822;yourname@yourdomain.com
Action: failed
Status: 5.5.0
Diagnostic-Code: smtp;553 sorry, your mail was administratively denied. (#5.7.1)
For some reason they have not updated their help site, and are unwilling to give examples of the corrected code.
Here is an example of a contact form that does work. You need two files, the contact form (contact.htm) and the ASP form processor page (formproc.asp)
contact.htm
<!DOCTYPE html PUBLIC "-//W3C//DTD XHTML 1.0 Strict//EN" "http://www.w3.org/TR/xhtml1/DTD/xhtml1-strict.dtd">
<html xmlns="http://www.w3.org/1999/xhtml" xml:lang="en" lang="en">
<head>
<title>page title</title>
<meta http-equiv="Content-Type" content="text/html; charset=utf-8" />
</head>
<body>


<b> Contact</b>

<p>* Indicates required fields</p>
<form action="form_ac.asp" method="post" id="form">
<table cellpadding="0" cellspacing="0" summary="Contact form">
<tr>
<th><label for="name">*  Full Name: </label></th>
<td><input type="text" name="name" id="name" size="25" maxlength="255" /></td>
</tr>
<tr>
<th><label for="email">*  Email Address: </label></th>
<td><input type="text" name="email" id="email" size="25" maxlength="255" /></td>
</tr>
<tr>
<th><label for="subject">Subject: </label></th>
<td><input type="text" name="subject" id="subject" size="38" maxlength="75" /></td>
</tr>
<tr>
<th><label for="message">Message: </label></th>
<td><textarea cols="30" rows="6" name="message" id="message"></textarea></td>
</tr>
<tr>
<td colspan="2" id="button"><input type="submit" value="Send Email" /></td>
</tr>
</table>
</form>

</body>
</html>
formproc.asp
Thanks to John Peterson for the code that made this possible.<%@ Language="VBscript" %> <% Option Explicit %>
<html> <head> <title>Page title goes here</title> <% Const cdoSendUsingMethod = _ "http://schemas.microsoft.com/cdo/configuration/sendusing" Const cdoSendUsingPort = 2 Const cdoSMTPServer = _ "http://schemas.microsoft.com/cdo/configuration/smtpserver" Const cdoSMTPServerPort = _ "http://schemas.microsoft.com/cdo/configuration/smtpserverport" Const cdoSMTPConnectionTimeout = _ "http://schemas.microsoft.com/cdo/configuration/smtpconnectiontimeout" 'Const cdoSMTPAuthenticate = _ (not needed for godaddy) '"http://schemas.microsoft.com/cdo/configuration/smtpauthenticate" 'Const cdoBasic = 1 'Const cdoSendUserName = _ (not needed for godaddy) '"http://schemas.microsoft.com/cdo/configuration/sendusername" 'Const cdoSendPassword = _ (not needed for godaddy) '"http://schemas.microsoft.com/cdo/configuration/sendpassword"
Dim objConfig ' As CDO.Configuration Dim objMessage ' As CDO.Message Dim Fields ' As ADODB.Fields Dim name, email, subject, message name=request.form("name") email=request.form("email") subject=request.form("subject") message=request.form("message")
Set objConfig = Server.CreateObject("CDO.Configuration") Set Fields = objConfig.Fields
With Fields .Item(cdoSendUsingMethod) = cdoSendUsingPort .Item(cdoSMTPServer) = "relay-hosting.secureserver.net" .Item(cdoSMTPServerPort) = 25 .Item(cdoSMTPConnectionTimeout) = 10 '.Item(cdoSMTPAuthenticate) = cdoBasic (not needed for godaddy) '.Item(cdoSendUserName) = "username" (not needed for godaddy) '.Item(cdoSendPassword) = "password" (not needed for godaddy)
.Update End With
Set objMessage = Server.CreateObject("CDO.Message") Set objMessage.Configuration = objConfig
With objMessage '.MailFormat = 0 .To = "Your name <youremailaddress@anydomain.com>" .From = email .Subject = "A standardized subject line can go here :: " & subject .HTMLBody = "Name entered: " & name & _ "<br>Email address entered: " & email & _ "<br>Message entered: " & message .Send End With Set Fields = Nothing Set objMessage = Nothing Set objConfig = Nothing %>
</head>
<body>
<h3 class="header">Thank you!</h3> <p id="sent">your request has been sent</p> </body> </html>
July 5, 2009
iPhone won't sync to iTunes: disconnects during sync.
A few days ago, my iTunes started giving me messages like "iTunes could not sync contacts to the iPhone "My iPhone" because the iPhone disconnected." It wasn't syncing anything to the iPhone anymore.
After reading this forum thread I tried resetting the sync history in the iSync application preferences. This did not help and instead caused iSync reminder messages to come up every few minutes.
I also tried syncing the iPhone with all the "info" selections unchecked, and then finally replacing all info on the iPhone by checking "Replace with information from this computer" in the Info tab in iTunes. This last change seemed to work, but I realized later that something else had probably helped fix it:
I'd had a USB hard drive plugged into the same USB hub as my iPhone for the last few days, and when nothing else was working, I finally shut it down and unplugged it. So there was more power for the iPhone coming from the hub. It is a power issue.
A couple of other troubleshooting guides to help you if you are having similar problems:
- Troubleshooting iPhone and iPod touch calendar syncing via USB on Windows:[LINK]
- Reset Sync History
- Disable third-party Outlook add-ins
- Attempt to sync content in a new Windows user
- Reinstall the iTunes software
- iPhone: Troubleshooting USB connections [LINK]
Symptoms:
When attempting to sync, update, or restore the iPhone, you may receive one or more of the following symptoms:
- An alert message indicates an unknown error occurred
- The iPhone unexpectedly disconnects during a sync or restore
- Photos downloaded from the iPhone appear garbled or not all photos transfer
- An alert message indicates the USB device cannot operate because it needs more power than is available
- An alert message indicates "this device can perform faster" if you plug the device into a higher speed USB port"