May 17, 2007
Updated tutorial on captioning Windows Media
Subtitle Workshop, by Urusoft is free captioning software (donation-ware) which allows you to easily transcribe and edit captions and output the resulting file to many different formats. I'll be focusing on Windows Media format here, but you will find this a useful tool for captioning DVD's, Quicktime, and Flash as well.
Note: A much more complete exposition of the concepts summarized in this tutorial is available to members of the Elearning Guild in the article A Guide to Captioning Windows Media and QuickTime Using Subtitle Workshop
You can download Subtitle Workshop here. Once it is installed, launch the application, and follow the steps to create a caption file that can be used in the stand-alone or HTML-embedded Windows Media Player.
Before you begin, your video must be completely edited to its final duration and saved in a format that can be opened by Subtitle workshop, such as Windows Media. It does not have to be at full size, however. For example if your final video is 640x480, you could do the captioning on a 320x240 file, which could save time, space, and enable you to use a lesser computer for this stage of your video workflow.
Creating synced captions
- Begin by creating a new subtitle file. Selecting File>New Subtitle. This will add your first caption row.
- Set Input Frames per Second and Frames per Second to equal the frame rate of your video.
- Select File>Save. Since this is your first save, Subtitle Workshop will ask you what format you want to use. For use with Windows Media, choose SAMI captioning. Next you will be asked for a location and filename. I usually choose a filename similar to the video filename, so I can keep track of what captions go with what video.
- Select Movie>Open, and find the video file you want to caption. The video will start playing, so if you aren't ready to start captioning yet, type control-spacebar to pause the video. Control-spacebar toggles between play/pause.
- Select the first caption row (it may already be selected). Hit control-spacebar to start the video. Listen to a single phrase, then pause the video by hitting control-spacebar again. Immediately type Alt-V to set the duration of the first caption.
- Click in the large text field under the caption row. This is where you will type what you hear. As you type, the caption will appear in the "Text" column in the selected caption row.
- When you have finished the first line, hit the Insert key to create a new caption row.
- Type control-spacebar to start the video again. Try to memorize the key sequence: control-space to play, control-space to pause , Alt-V to set the duration. It will make the captioning process go much more smoothly.
- When you reach the end of the video, select File>Save.
Open your saved SAMI file in a text editor. At the top of the file is a style sheet that controls the size and color of your captions, and also sets some Windows Media-specific parameters. You can change the size, color, margins, etc. here. Upload the SAMI file to your web server. Upload your video file to a streaming server or a web server.
Add a captioned Windows Media player to your web page
1. Create the object and embed tags, and add appropriate parameters.
2. Create 2 asx files, one for the PC, which references the SAMI file, and one for the Mac which doesn't.
- Note regarding Mac browsers: playing the captions in the embedded player requires control of parts of the player object that Mac browsers cannot access. To give your Mac users the option of viewing captions in Windows media, provide a link to the asx file with instructions to open it in Windows Media Player 9 and turn on captions. Unfortunately Flip4Mac will not play the captions. This is not a great solution, since usually some proportion of your users will have no idea how to do this.
- If the video is housed on a streaming server, the protocol prefix of the URL used in the REF tag will be "mms://" If it is on a web server, it will be "http://"
- The path to the SAMI file must be an absolute path. Relative paths will not work.
<ASX version="3.0">
   <ENTRY>
   <REF HREF="mms://your.streamingserver.com/videofile.wmv?sami=http://path.to.sami/videoName.smi"/>
   </ENTRY>
 </ASX>
An easy way to get a head start on creating the HTML for an embedded windows media player is to use this generator provided by UCSF's Center for Instructional Technology. This will create the basic object tag, embed tag and associated parameters. Once you have these basics, you will have to add the captioning-related items shown in red below.
This is an example HTML page showing the embedded player.
<!DOCTYPE HTML PUBLIC "-//W3C//DTD HTML 4.01 Transitional//EN" "http://www.w3.org/TR/html4/loose.dtd"> <HTML> <HEAD> <TITLE>Closed Captioning Example</TITLE> <!-- the following style sheet controls the look of the div containing the captions.--> <style>
<--
#CapText1 { font-family: Arial, Helvetica, sans-serif; font-size: 12px; text-align:center; background-color:#000000; width:300px; height:80px; color: #FFFFFF; }
--> </style></HEAD>
<BODY>
<!-- the OBJECT tag contains the settings to create the Windows Media Player ActiveX control in the Web page in IE for PC. The Embed tag is contained within the OBJECT tag to support non-IE browsers which use a plugin to create the Media Player-->
<OBJECT classid = clsid:6BF52A52-394A-11d3-B153-00C04F79FAA6 height = 300 id = "Player1" width = 300>
<param name = "AutoStart" value = "1">
<param name = "CaptioningID" value = "CapText1">
<param name = "ShowCaptioning" value="True">
<param name = "URL" value = "videoName.asx">
<!--The Embed tag displays the Netscape Plugin Windows Media Player, which understands a somewhat different set of parameter names-->
<embed TYPE = "application/x-mplayer2"
width="300"
height="360"
ID="Player1"
src="videoName.asx"
autostart="1"
autosize="0"
samifilename="videoName.smi"
showcaptioning="1" >
</embed>
</OBJECT>
<!-- this DIV creates a partition for a closed caption text display in IE for PC -->
<DIV name ="CapText1" id = "CapText1"></DIV></BODY>
</HTML>
ActiveX issues
In February, 2006, Microsoft made changes to Internet Explorer to get around the EOLAS patent, after being sued for infringing on it. The changes made it necessary for IE users to click to activate any element within an "OBJECT" tag: this includes Flash, Shockwave, video, java applets and other plugin technologies. Besides some inconvenience, this negatively impacts the usability of HTML pages, because users sometimes don't notice that they need to click, despite the alerts and messages IE attempts to display. Web developers have come up with several workarounds. Since javascripted embedding does not infringe on the patent, a typical approach is to convert the content of the OBJECT tag to a javascript "write" statement. This must be in an external script to be eliminate the "click to activate".
If you use Dreamweaver, it will automatically apply a fix to your page, if you have the preferences set up correctly.
There are several other methods of getting around the problem. One dynamically replaces a "noscript" tag with the required object tag and its contents. I haven't tested this, but you can try it here: http://www.ediy.co.nz/click-to-activate-and-use-this-control-fix-for-internet-explorer-xidc20771.html
Putting all the pieces together
You now have 4 files:
- The windows media video ("myvideo.wmv")
- The SAMI file created with Subtitle Workshop ("myvideo.smi")
- The ASX file ("myvideo.asx")
- The HTML file ("videoplayer.html")
The video file goes on the streaming server, or if it is set up for progressive download, put it on your web server. The other three files go on your web server.
Additional Reference
- Urusoft (makers of Subtitle Workshop)
- Wikipedia article on the EOLAS patent and litigation, along with a list of ActiveX fix resources
- For a complete list of all commands understood by the Windows Media Player (the ActiveX Player) see the list of PARAM tags for Windows Media Player 10 on MSDN:
“Using the Windows Media Player Control in a Web Page”
(http://msdn.microsoft.com/library/default.asp?url=/library/en-us/wmplay10/mmp_sdk/usingtheplayercontrolinawebpage.asp )
- A list of the set of parameters understood by the Windows Media Player Plugin for Mac OS X is here:
Windows Media Player for Mac Guide for Internet Content Providers: Embedding the Player in a Web Page: Object Model
(http://www.microsoft.com/windows/windowsmedia/howto/ articles/macicp.aspx#object_model__phih ) - The best exposition of the differences between the ActiveX Player and the Plugin that I have been able to find is given in parts III and IV of "A Streaming Media JukeBox." This article is a tutorial on creating a streaming media jukebox that works on all browsers, and contains a list of the methods that can be used with the Windows Media control, and the A-E section of a chart comparing all the properties of the ActiveX control with those of the Plugin.
A Streaming Media JukeBox, Part III: Browser Independent
(http://www.webreference.com/js/column53/index.html )
- The continuation of the previous article's comparison of player properties, containing the rest of the alphabetical chart, F-W.
A Streaming Media JukeBox, Part IV: F-W Properties
(http://www.webreference.com/js/column54/index.html - A much more complete exposition of the concepts summarized in this tutorial is available to members of the Elearning Guild in the article A Guide to Captioning Windows Media and QuickTime Using Subtitle Workshop
May 12, 2007
A SCORM-ready template: Part 6 - Branching behaviors
Branching behaviors
Several branching functions are included in js/branchingToolkit.js and are available to be used in your modules. Note: These haven't been thoroughly tested!
InsertList: This function inserts a new pages into the page list right after the current page To use, you must add a second PageArray to the pageArray.js file, called PageArray2, containing the pages to be inserted.
function insertList(){
	 for(var i=0; i< PageArray2.length; i++) {
	parent.data.PageArray.splice((window.parent.data.znThisPage-1),0,PageArray2[i]);
	parent.data.determineParents();
	}
	wipePageNo();
	wipeNavBar();
	printNavBar();
     }
	  function writeArray(){
	  for(var i=0; i< parent.data.PageArray.length; i++) {
	  document.getElementById('writeItHere').innerHTML +=(parent.data.PageArray[i].url +" " + parent.data.PageArray[i].title +'
');
	   }	}
addOnePagetoEnd: The following function pushes just one new page at a time into the page list. To use, add title, url, chapter and level information to the "mystring" line, similar to what you did when filling out each line in the page array.
function addOnePagetoEnd() {

	mystring=({title:'I am new',url:'page303.htm',chapter:0,level:1});

	parent.data.PageArray.push(mystring);

	document.getElementById('NavBar').innerHTML = ('');

	parent.data.determineParents();//haven't testedd yet but you have to run determineParents after modifying the array

	wipePageNo();

	wipeNavBar();

	printNavBar();}
replaceAllPages: This function replaces the entire page list with a new list.
To use, you must add a second PageArray to the pageArray.js file, called PageArray2.
function replaceAllPages() {
	parent.data.PageArray=parent.data.PageArray2;
	parent.data.determineParents();
	wipePageNo();
	wipeNavBar();
    printNavBar();
    NextPage(); }
 //**end branching toolkit**//
A SCORM-ready template: Part 5 - Modifying the CSS styles
Modifying the CSS styles
The css styles are defined in several sheets. Any of the styles can be overridden by adding a new definition for the selector to /css-local/userStyles.js or to individual pages or even individual elements on a page. YOU WILL NOT BE ABLE TO change any of the files inside the css/ folder but you can add your own overrides to userStyles.css.
If you need special text styles or need to control the positioning of content-specific elements, add those to the userStyles file.
css/allBrowsers.css contains most of the styles used. These include the pseudo-class selectors, and the styles that define the structure of the page, including most of the navBar.
A few Internet Explorer-specific styles are included in includes/headContent.htm, using a conditional comment to hide them from all other browsers. These were unavoidable, since IE still has some unique differences. These override their counterparts in allBrowsers.css.
css/print.css removes the Navbar when printing to make the document fit the page better.
css/header.css contains styles for header and footer.
css/stylesMac.css is not being used at this time.
css/styles800x600 is experimental for use with smaller screens or low resolution monitors, but is not really working well yet.
How to override a style
Let's say you wanted to change the style of all h4 elements to dark blue. In userStyles.css, add the following:
h4 {
color: #003366
}
That's all there is to it! Of course you can also create your own styles as well. userStyles.css is already included in the includes/headContent.htm file so it will automatically be picked up if there is anything in it.
A SCORM-ready template: Part 4 - Building Pages
Start building your pages
Now you are ready to start building pages.
Important: You will find that Dreamweaver 8 does a much better job of displaying this module, complete with all the Server Side Includes, than earlier versions. It is possible to use earlier versions, but you will only see the central content area of the page, and not the Header/Footer areas or Navbar area.
Note: Typical Dreamweaver-generated javascripts used for rollover images and creating popup windows are already included in the template. You do not need to add them again.
The content area
Start adding your own content to the module
- Open page01.htm and look at the source code.
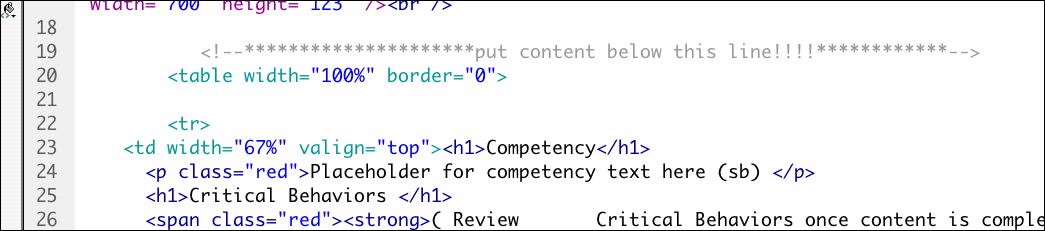
Click to enlarge imageFind the lines that say:
"*****Put content below this line!!!****"
and
"*********Put content above this line!!!******"
Add your content between these lines! The area between these two comments is the only area in this file you should need to modify, except if you wish to hide chapter and page titles as described below. - If you do not want the automatic Chapter and Page titles to show, simply add the following to your css-local/userStyles:
#pageTitle {

display:none;

visibility:hidden;

}
The Standard Layout Grid
A grid has been devised to facilitate a standard look for all the modules. The grid consists of two columns, with a width ratio of 67% to 33%. The order and width of the columns can vary as needed, but try to keep the overall ratio the same wherever possible.Click the image below to see the two columns highlighted in red.
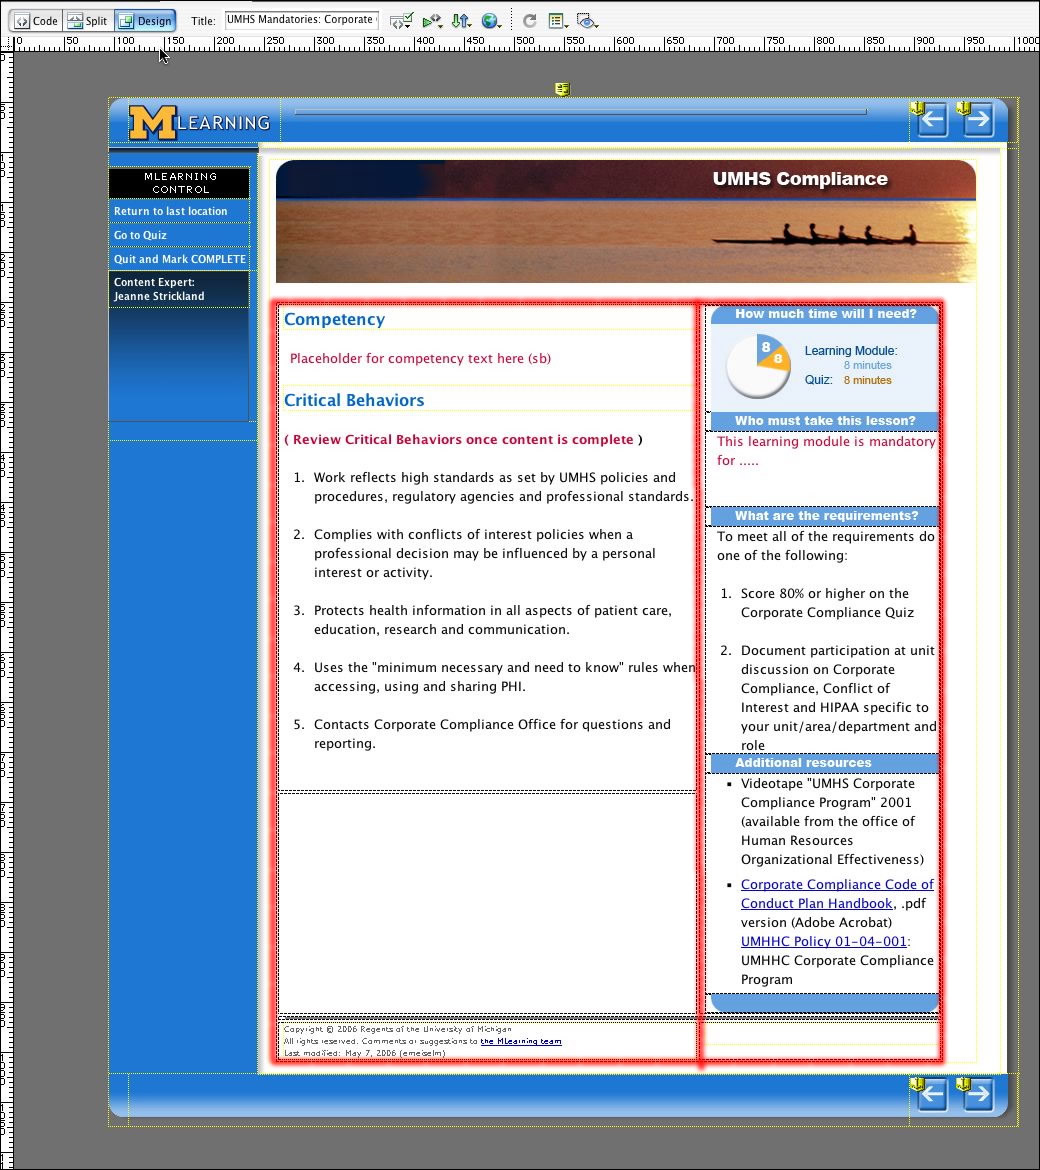
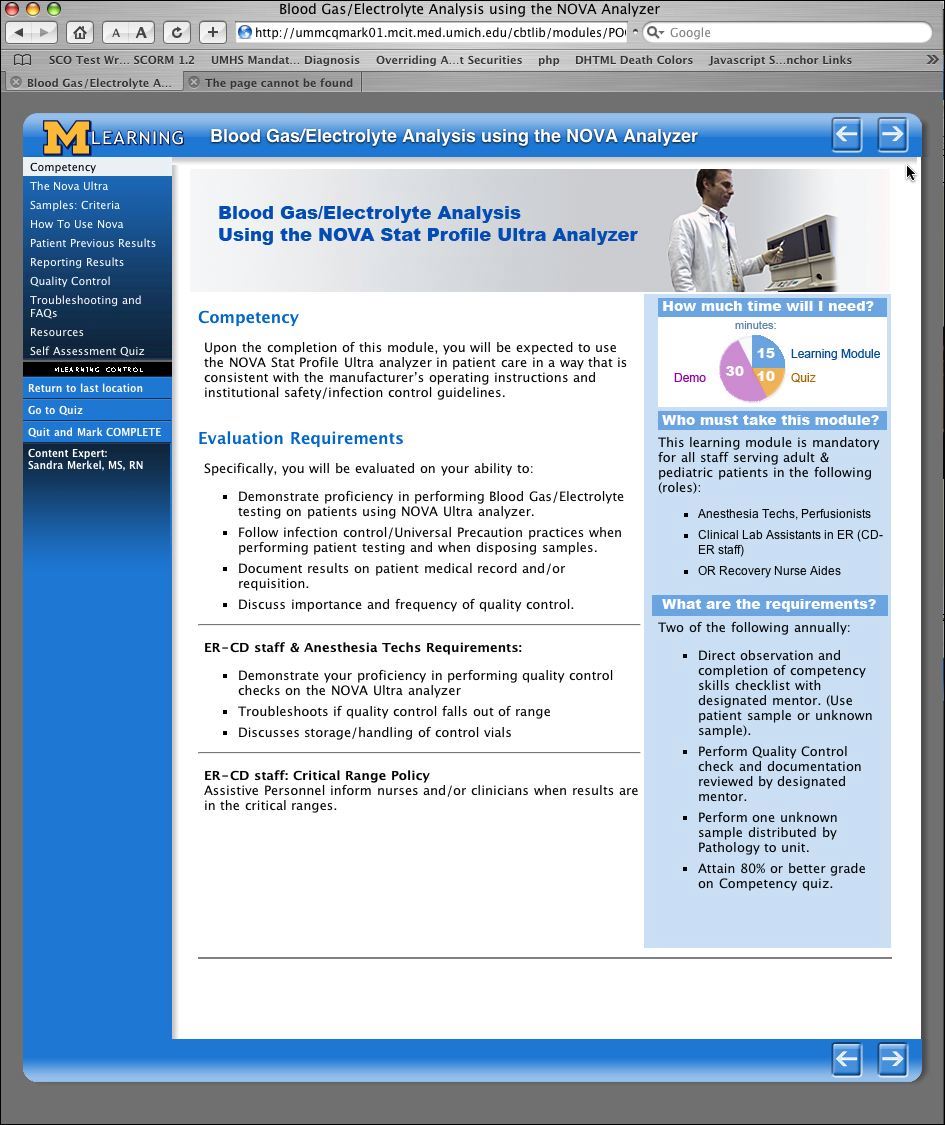
Layout Examples
Some examples of the use of the grid are shown below for inspiration. Click each image to see enlarged view.
 |  |  |
 |  |
A SCORM-ready template: Part 3 - Settings
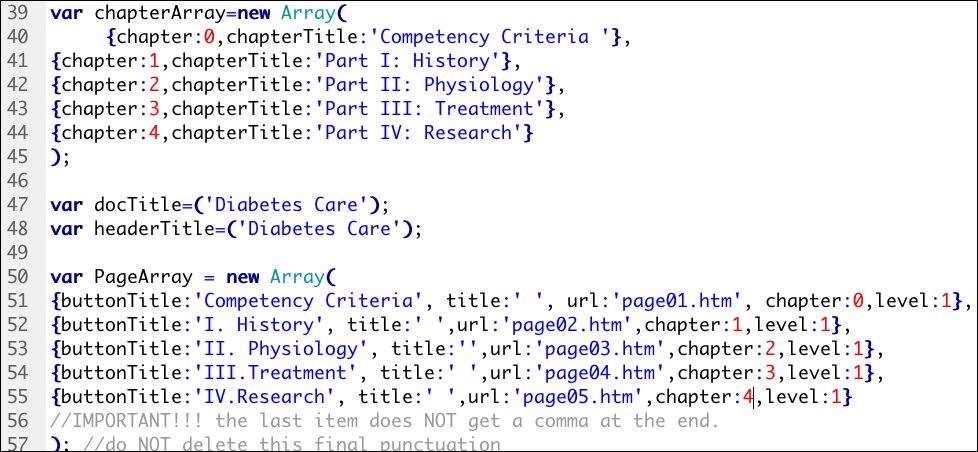
Other configuration variables: chapterArray, docTitle and headerTitle
In the same file as the pageArray, you will find several other variables: chapterArray, docTitle, and headerTitle.
The chapterArray can be filled out with chapter titles if desired. This is optional - the chapter and page titles can both be hidden if not needed.
The docTitle and headerTitle are required. The docTitle is the title that shows up at the top of every window -in other words the <title> tag on each page. The headerTitle is the title which shows up in the blue header at the top of each page.
Chapter and Page Titles
If you want, you may have Chapter titles and Page titles show up automatically on every page, or on only the pages you choose.
- You must fill in the Chapter titles in /js-local/pageArray.js
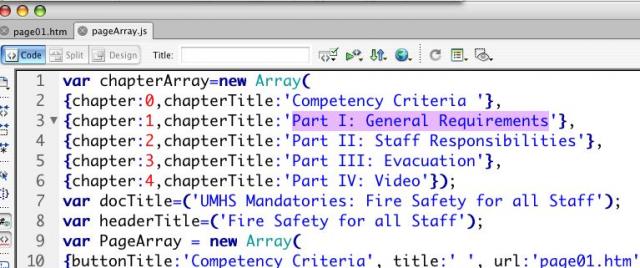
Look for:
var chapterArray
and add the chapter titles.Add chapters as necessary, observing the usual caution about the punctuation at the end of the array.
Click to enlarge image - How it works
Once the titles are filled in, when the page is loaded, the module looks for a div with the id "subTitleBar". If it finds this on the page, it populates it with the chapter and page titles you entered into the arrays, and styles them per the CSS style sheets. - To remove this functionality from any page, delete the line highlighted in yellow, shown below. Be very careful not to remove the lines above or below it.
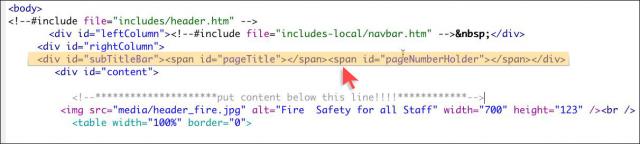
Click to enlarge image
A SCORM-ready template: Part 2 -Create the Navigation
Create the Navigation
The Page Array controls all navigation within the module
The engine that drives most of the module is the Page Array. The Page Array, a variable located in js-local/pageArray.js, is simply a list of all the pages in your module. It contains information about each page: the button title, page title, what chapter, and what outline level it is on. The navbar, "Previous" and "Next" buttons are based on the Page Array.
What does all this stuff mean?
Find the file js-local/pageArray.js and duplicate it to make a backup copy. Then open the original file js-local/pageArray.js
Don't be intimidated by all the code on this page. You will simply be adding titles to the list of pages.
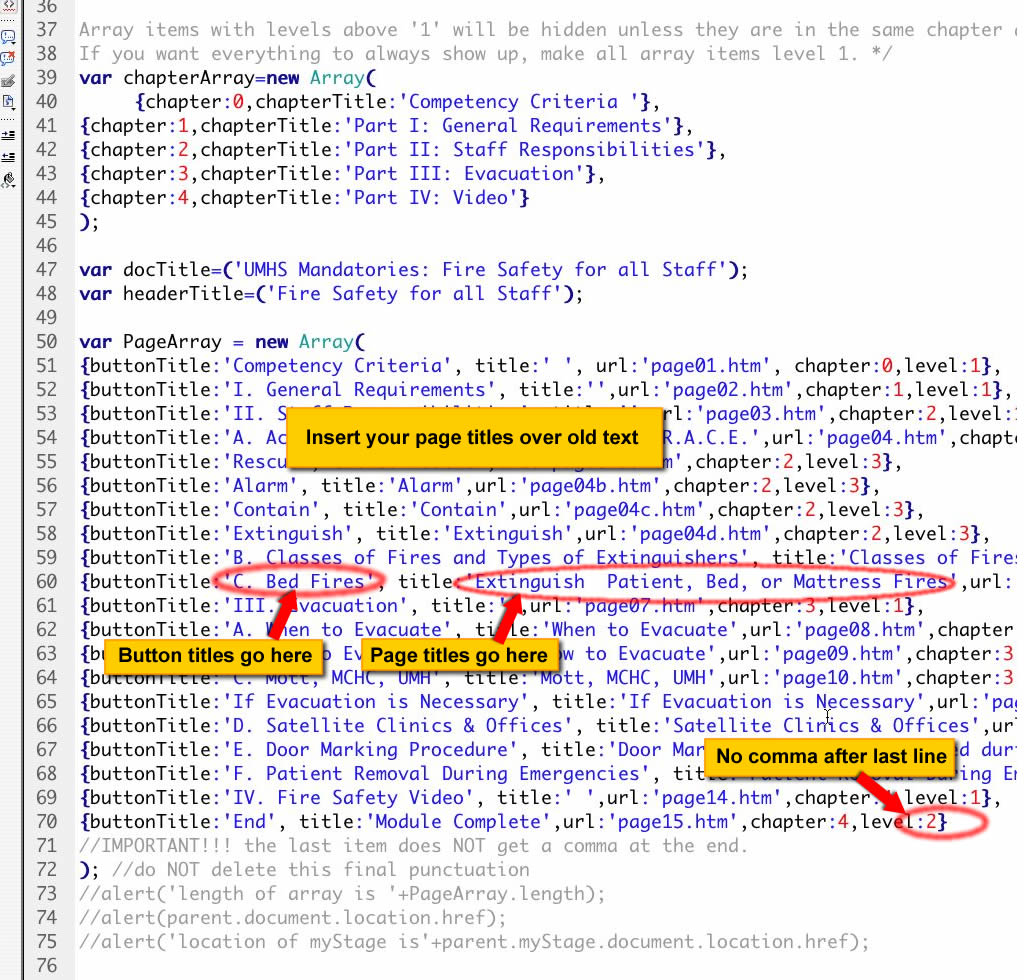
Look for the line: "var PageArray" as shown here (approx line 50.)
(Click to enlarge image)
You can see that there is a line for each page in the module. Each line in the Array contains the following:
- buttonTitle: this is the title that you want to appear on the associated button in the navbar
- pageTitle: this is the full title that you want to appear on the page itself (you can turn this off if desired)
- url: this is the relative path to the page from the root folder of the module.
- chapter: (0 and up) the chapter number, starting with 0.
- level: (1 and up) In the navbar, buttons for pages at level 1 will always show up. Buttons for pages with level numbers greater than 1 will only be displayed when you click on a button for a page in that chapter. The effect is that when you click on the opening page of any chapter, the menu expands to show what is in that chapter. All of this behavior is easily customized to your needs using CSS styles and level numbers.
Add the data to create your module structure
 (Click to enlarge)
Carefully replace the button and page titles with the titles from your outline. Add the relative URL's for each page. You may use any filename for your pages, not just page01, page02, etc. However if you choose to change the name of the first page, "page01.htm", please be sure to change it in the "index.htm" page as well or the frameset will open with a "not-found" error.
It is very important that you DO NOT DELETE ANY PUNCTUATION, so be careful when you are pasting in titles. If you do, and cannot find what you deleted, use the backup file you just created, and try again. Every line in the array gets a comma after it, except for the last one.
Note: make sure the number of chapters in the Chapter Array matches the number in the Page Array.
Examples of completed pageArrays
For the simple outline shown here

the page array would look like this:
Click to enlarge
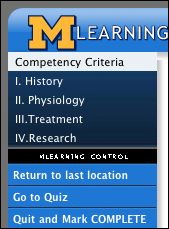
and would result in this navbar:
For the more complex hierarchical outline shown here:
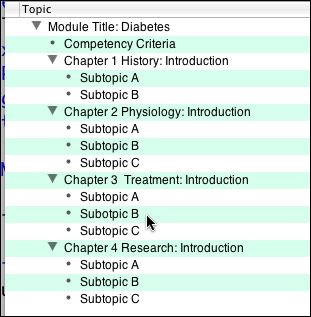
the page array would look like this:
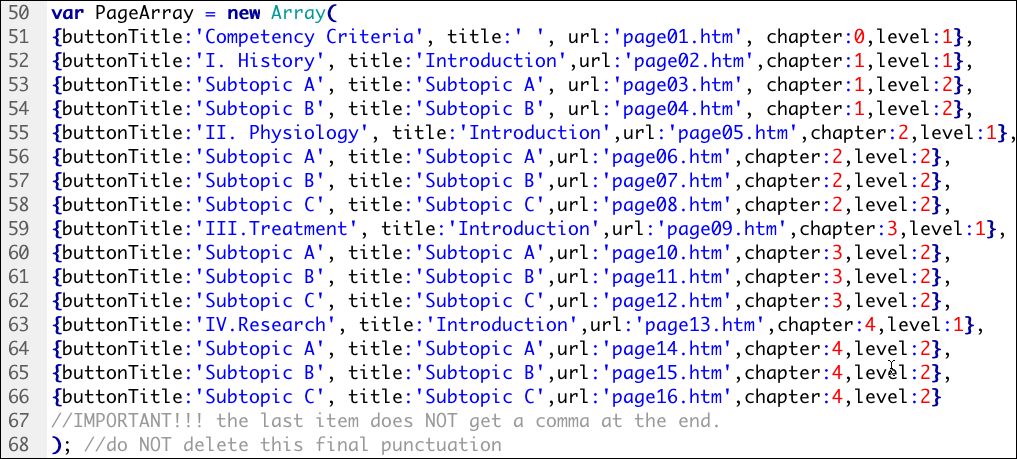
(click to enlarge)
and would result in this navbar, with Chapter III shown open.

A SCORM-ready template: Part 1 - Features
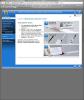
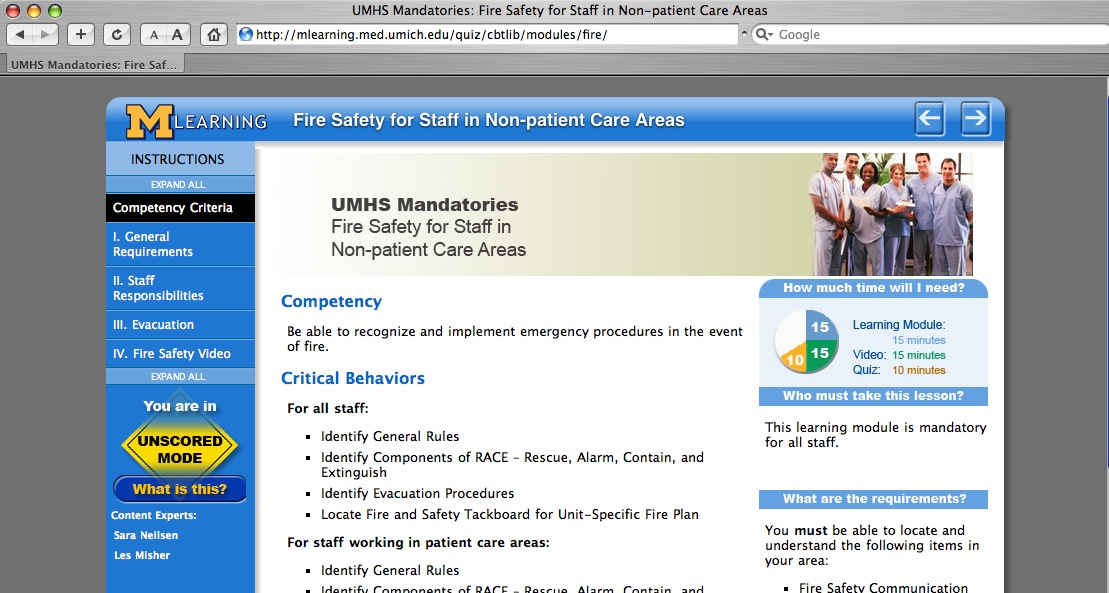
 Here's a screenshot of the template, showing part of the left-hand navigation expanded. Note the previous/next navigation buttons at upper right, which are automatically created based on your list of pages, as is the progress bar and page numbering at upper right. |
 Example of a finished module based on the template. Note: the look of the navigation column has changed slightly since this article was first written.
>> View a live demo of the template here
>> Download the template files here
 |
| Another example of a module based on the template. The navigation bar shown here is the latest version. |
>> View a live demo of the template here
>> Download the template files here
Features
This HTML template is designed to simplify the creation of SCORM-compatible learning modules. Some of the features include:
- SCORM compatibility: The required elearning SCORM communication functions are built in so the module can communicate its status to a Learning Management System (LMS).
- Can be used with no LMS as well -scorm-function buttons are hidden when module is viewed outside an LMS
- Requires no server-side languages or processing other than Server Side Includes (SSI's). Javascript/DHTML-based. NOTE: Your server must be set up to process the extension ".htm" for SSI's. This can usually be done even if you are on a hosted server, using the control panel. Instructions for making this change on an IIS server are here.
- Bookmarking: last page browsed is automatically stored in the LMS.
- Dynamic navigation: The navigation, page titles, and pages left to view are all automatically generated.
- Built-in styles: The look and feel has been set up so all you need to do is add text and use styles like H1, H2, and a few classes. The styles adapt to different browsers and screen sizes.
- Pretty printing: Navbar disappears when printing, creating a cleaner, more efficient printout.
- Branching capability:
- replace entire page list with a single click to create another version of the module.
- Insert pages with a single click.
- Add pages to end of current page list.
- Deep linking. Although the module is structured as a frameset by necessity, linking directly to specific pages is possible, now both when under scorm control and when used outside the LMS.< /li>
- Versions: easily make multiple versions from the same set of pages.
- Embedded Questionmark Perception Quizzes (requires Questionmark server and an LMS)
- Soon to come: Embedded Captivate Quizzes
Getting Started
Module-specific folders
You will notice that several of the directories have two versions - a "global" version and a "local" version ("css-local," "includes-local," and "js-local"). There is also a "media" folder which is where you will put your module-specific images. This is because on our production server, we use a version control process where the global folders are replaced with symlinks, so that changes to the template will immediately update all templates on the server. Changes made in the local folders will affect that module only.
The files in the "local" directories and files can be modified as needed, and can be used to override many global settings. For example, the CSS styles can be changed by adding styles to the file "css-local/userStyles.css."

Outline your module's structure
Start by outlining your entire learning module. List all the pages you want to include. You can change the list after you get started, so don't worry if there are items you aren't sure about.The module structure can be very simple as shown in Example 1, or more structured with chapters and sections as shown in Example 2. This template can accommodate up to four levels if needed.
Example 1The outline below shows a flat structure, with all pages on the same hierarchical level. In this example, all items would be on level 1. |
This is the navbar that results from this outline. Links to all items are visible at all times. |
|
|
 |
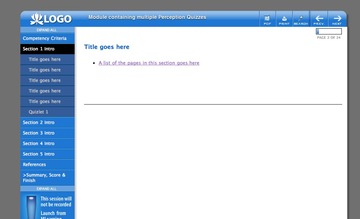
Example 2This outline shows a more complex hierarchical structure with chapters and sub-sections. In this example, the Competency Criteria page and the Chapter Introductions would be on level 1 and the Subtopics would all be on level 2. |
This is the navbar that results from this outline. Only the top level (level1) items are visible at all times. Other levels are visible when browsing any page in the respective chapter. NOTE: each page on level 1 should have a different chapter number. |
|
|
 |

May 5, 2007
Create Inter-sco navigation for SumTotal 6.5
SCORM courses in the SumTotal 6.5 Learning Management System are launched from a page that lists each SCO (lesson) in a list of links representing the course structure.
On clicking the "Enter the Lesson" button next to any SCO, a new frameset window opens. The screenshot below shows the "Enter the Lesson" page, with the course window open in front of it.
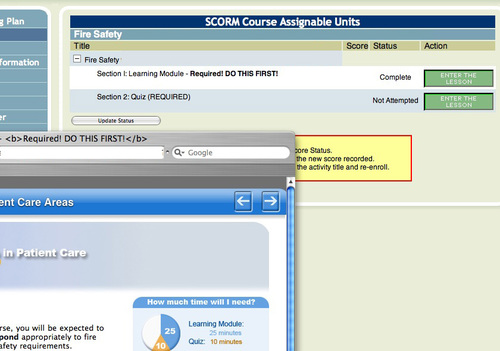
(Click to enlarge)
Once the course window opens, there is no corresponding list of links within it to allow the user to jump back and forth between SCOs. In some courses, it would be useful to allow inter-SCO navigation without having to close the course window.
SumTotal 6.5 does have a "sequencing" feature, which means that if the LMSFinish command is sent by the SCO, the next SCO, if there is one, will open in the same frame. But there is no way to jump around between SCOs at will, or perhaps more importantly, to try the same SCO again without closing the window.
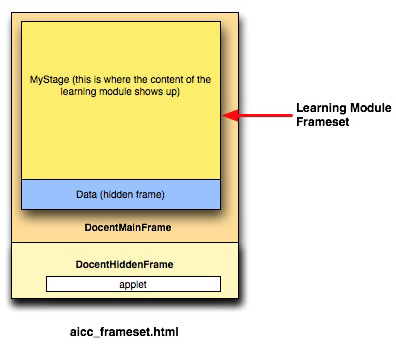
The frameset structure of the course window is as shown below:
SumTotal provides API extensions which allow such functions as "nextSCO", "previousSCO" etc., all of which consult the course structure to generate the actual links.
The easiest way to determine the correct DOM paths to these functions from wherever you currently are in the window is probably to use the DOM inspector tool in Firefox. The image below illustrates.
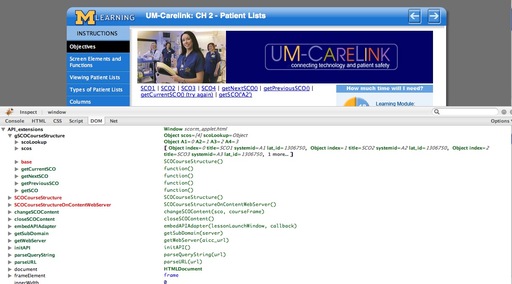
The code for various types of jumps is shown below. These links work from within the course itself. I'll post the code for generating a complete navbar in a future entry.
Go to the first SCO:
<a href="javascript:top.API.LMSFinish('');top.API_extensions.changeSCOContent(top.API_extensions.gSCOCourseStructure.scos[0],parent.frames[0]);">SCO1</a>

Go to the second SCO:

<a href="javascript:top.API.LMSFinish('');top.API_extensions.changeSCOContent(top.API_extensions.gSCOCourseStructure.scos[1],parent.frames[0]);">SCO2</a>

Go to the third SCO:

<a href="javascript:top.API.LMSFinish('');top.API_extensions.changeSCOContent(top.API_extensions.gSCOCourseStructure.scos[2],parent.frames[0]);">SCO3</a>

Go to the fourth SCO:

<a href="javascript:top.API.LMSFinish('');top.API_extensions.changeSCOContent(top.API_extensions.gSCOCourseStructure.scos[3],parent.frames[0]);">SCO4</a>

Go to the next SCO:

<a href="javascript:top.API.LMSFinish('');top.API_extensions.changeSCOContent(top.API_extensions.gSCOCourseStructure.getNextSCO(),parent.frames[0]);">getNextSCO()</a>

Go to the previous SCO:

<a href="javascript:top.API.LMSFinish('');top.API_extensions.changeSCOContent(top.API_extensions.gSCOCourseStructure.getPreviousSCO(),parent.frames[0]);">getPreviousSCO()</a>

Try this SCO again:

<a href="javascript:top.API_extensions.changeSCOContent(top.API_extensions.gSCOCourseStructure.getCurrentSCO(),parent.frames[0]);">getCurrentSCO() (Try again!)</a>

Get a SCO by specific ID:

<a href="javascript:top.API.LMSFinish('');top.API_extensions.changeSCOContent(top.API_extensions.gSCOCourseStructure.getSCO('A2'),parent.frames[0]);">getSCO('A2')</a>