August 27, 2010
The Processing Instruction Target Matching "[xX][mM][lL]" is Not Allowed
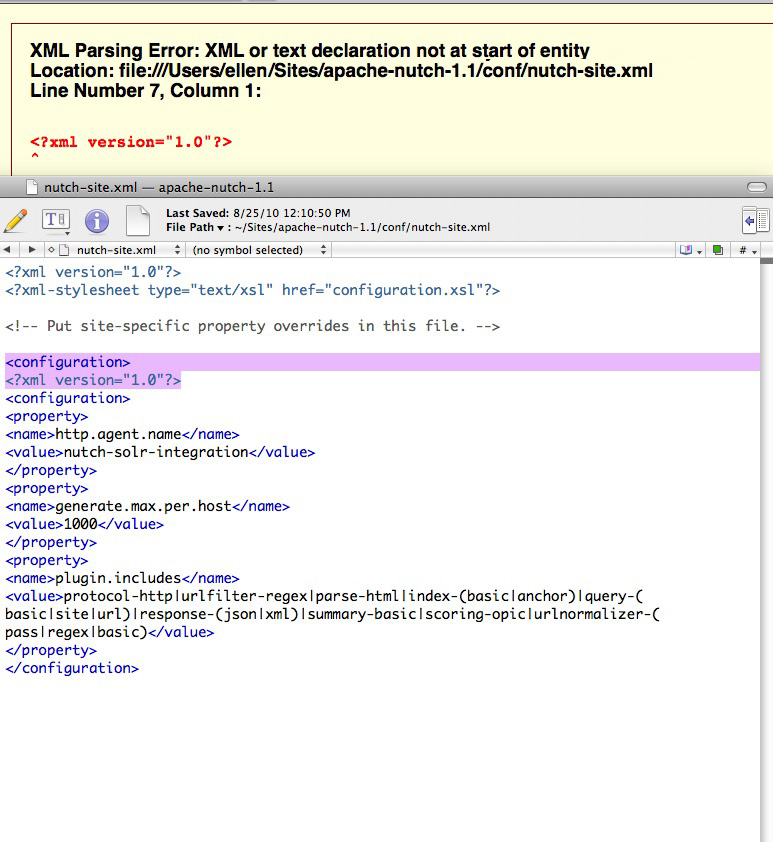
When running Java or other types of applications which use an XML file as part of the input, you may see this error: The Processing Instruction Target Matching "[xX][mM][lL]" is Not Allowed. Often the cause is a malformed XML file, with a common problem being a blank line accidentally inserted before the required first line of the xml:[ A blank line here will cause the error ] <?xml version-"1.0"?>While installing the search engine "Nutch," I got this error as shown:
ellensmac:- ellen$ /Users/ellen/Sites/apache-nutch-1.1/bin/nutch inject crawl/crawldb urls

[Fatal Error] nutch-site.xml:7:6: The processing instruction target matching "[xX][mM][lL]" is not allowed.
Exception in thread "main" java.lang.RuntimeException: org.xml.sax.SAXParseException: The processing instruction target matching "[xX][mM][lL]" is not allowed.
        at org.apache.hadoop.conf.Configuration.loadResource (Configuration.java:1168 )
        at org.apache.hadoop.conf.Configuration.loadResources (Configuration.java:1040 )
        at org.apache.hadoop.conf.Configuration.getProps (Configuration.java:980 )
        at org.apache.hadoop.conf.Configuration.set (Configuration.java:405)
        at org.apache.hadoop.conf.Configuration.setBoolean (Configuration.java:585)
        at org.apache.hadoop.util.GenericOptionsParser.processGeneralOptions (GenericOptionsParser.java:290)
        at org.apache.hadoop.util.GenericOptionsParser.parseGeneralOptions (GenericOptionsParser.java:375)
        at org.apache.hadoop.util.GenericOptionsParser.<init>(GenericOptionsParser.java:153 )
        at org.apache.hadoop.util.GenericOptionsParser.<init>(GenericOptionsParser.java:138 )
        at org.apache.hadoop.util.ToolRunner.run (ToolRunner.java:59 )
        at org.apache.nutch.crawl.injector.main (Injector.java:231 )
Caused by: org.xml.sax.SAXParseException: The processing instruction target matching" [xX ] [mM] [lL ]" is not allowed .

etc.
The first line of my file appeared fine, and I didn't immediately see a problem with the XML, so I turned to Firefox. If your XML file appears fine at first glance, a good way to spot any errors is to validate the file by viewing it in Firefox. Firefox will check the file and point out any errors.
FTP a file from one server to another, automatically
We are using an ASP script to create iCal files from a database, so another department can display the events on their web-based calendar.
Their calendar page is outside the corporate firewall. The ASP script needs to reside on and IIS server within the firewall. I needed a fool-proof way to transfer the ical file nightly out to an external web server so it could be accessed by any calendar applications that need to use it. The best way I've found so far is to create a batch file with command-line FTP instructions, and add it to a Windows scheduled task.
- To do this with your own files, create a directory that will hold the batch file somewhere on the server. Since the batch file will contain your destination server's ftp password in plaintext, you will want to secure the directory. Create a Windows or domain account whose password will never change. I happened to have a "utility" domain-based account that already had access to some parts of the server, so I gave that account rights to the new directory.
- Create a new text file inside the directory called "fileup.bat". Enter the following text. The items in red need to be customized: add your ftp username and password, and the file-system path to the destination directory on the receiving server. Save the file. Test it by running it in the command window.
@echo off

  echo user ftpusername> ftpcmd.dat

  echo ftpuserpassword>> ftpcmd.dat

  echo cd /pathto/destination/directory/>>ftpcmd.dat

  echo bin>> ftpcmd.dat

  echo put %1>> ftpcmd.dat

  echo quit>> ftpcmd.dat

  ftp -n -s:ftpcmd.dat ftp.umhscompliance.net

del ftpcmd.dat - Test the file by running it in the command window:
E:\fileStorage\ftp>fileup E:\content\cbtlib\modules\test\rss\icalDemo.ics
Connected to external.server.com.
220---------- Welcome to Pure-FTPd [privsep] [TLS] ----------
220-You are user number 2 of 50 allowed.
220-Local time is now 12:40. Server port: 21.
220 You will be disconnected after 15 minutes of inactivity.
ftp> user ftpusername
331 User ftpusername OK. Password required230-User ftpusername has group access to: ftpusername
230 OK. Current restricted directory is /
ftp> cd /pathto/destination/directory/
250 OK. Current directory is /pathto/destination/directory/
ftp> bin
200 TYPE is now 8-bit binary
ftp> put E:\content\cbtlib\modules\test\rss\icalDemo.ics
200 PORT command successful
150 Connecting to port 4297
226-File successfully transferred
226 0.174 seconds (measured here), 331.30 Kbytes per second
ftp: 59172 bytes sent in 0.00Seconds 59172000.00Kbytes/sec.
ftp> quit
221-Goodbye. You uploaded 58 and downloaded 0 kbytes.
221 Logout. E:\fileStorage\ftp> -
Log in to the destination webserver and check that the file has arrived, in the right directory.
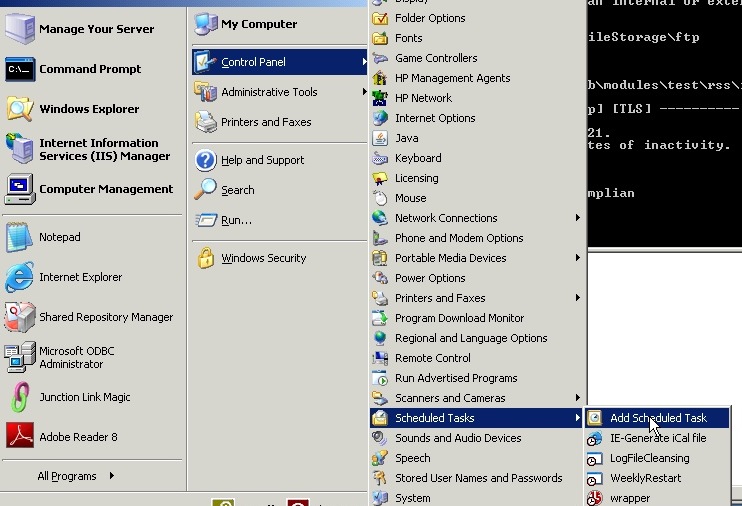
- Create a scheduled task for this procedure. Select Add Scheduled Task as shown.
- Click Browse to find the batch file you want to schedule.
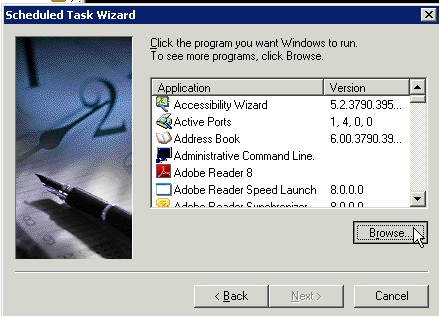
- Select the file and click Open.

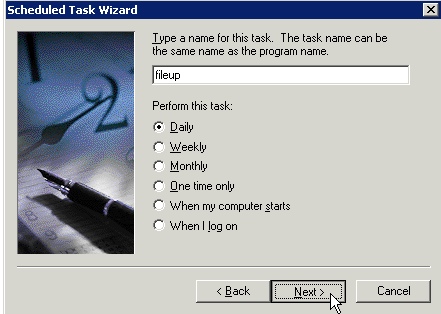
- Type a name for the task, and how often to perform the task. Click Next.
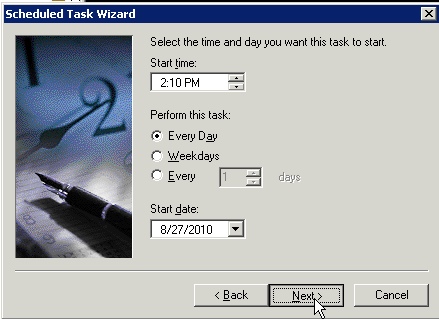
- Select a time and start date, and click Next.
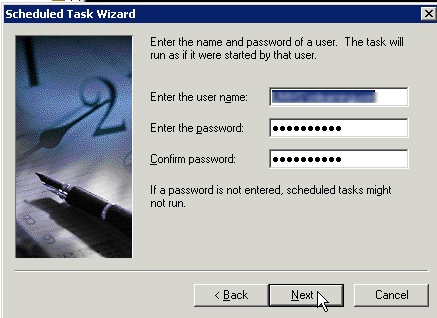
- Enter the name and password of the Windows "utility" user mentioned earlier. The password should never change, or the task will stop running.
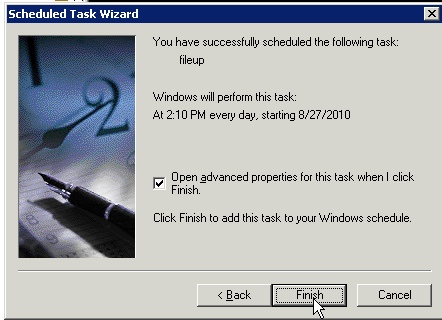
- Check "Open advanced properties for this task..." and click Finish.
- In the Run box, type a space after the name of your batch file, and add the filesystem path to the file you want to send to the other server. In the example shown here, the full entry reads:
E:\fileStorage\ftp\fileup.bat E:\content\cbtlib\modules\test\rss\icalDemo.ics

August 26, 2010
SQL Server or SQL Server Express: Connection Error: (provider: Shared Memory Provider, error: 0 - No process is on the other end of the pipe.
After a server containing a SQL Server database is restarted, you may get the errorConnection Error: (provider: Shared Memory Provider, error: 0 - No process is on the other end of the pipe.Or you may get an error like the one below:
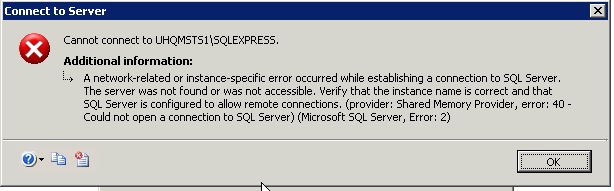
"A network-related or instance-specific error occurred while establishing a connection to SQL Server. The server was not found or was not accessible. Verify that the instance name is correct and that SQL Server is configured to allow remote connection.s (provider: Shared Memory Provider, error: 40 - Could not open a connection to SQL Server) (Microsoft SQL Server, Error: 2)"
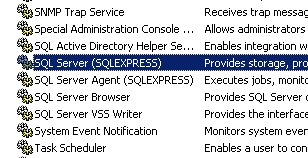
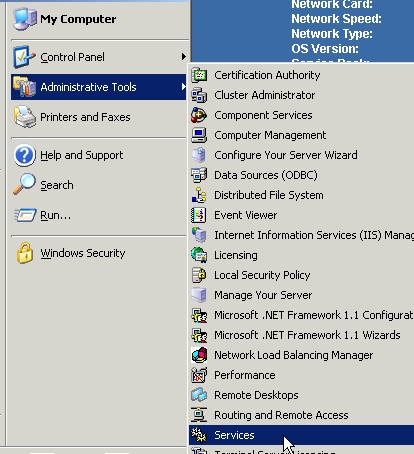
- Log on to the server and check the status of Services associated with SQL server. Open Services:
(Start > Administrative Tools > Services)." - Look for items starting with "SQL Server". There will probably be some that are not started.
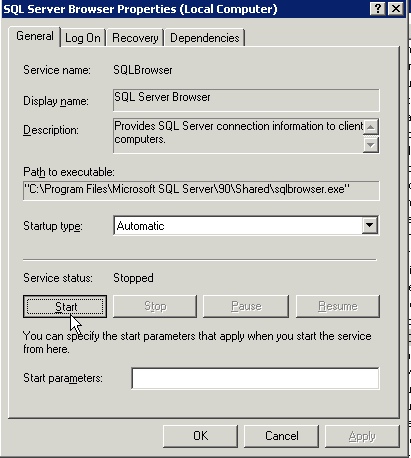
- Right click the stopped items and select Automatic Startup type as shown.
- Click the Start button and OK.

Fixing the error: JAVA_HOME is not set on a Mac
While setting up Nutch on a Mac, I kept getting this error in the terminal:
Error: JAVA_HOME is not set
To fix the error on OS X 10.6.x (Snow Leopard), enter the following at the command prompt:
export JAVA_HOME=$(/usr/libexec/java_home)
On 10.5 and above, the command line tool /usr/libexec/java_home dynamically finds the top Java version specified in Java Preferences for the current user. Using this method will allow the path to automatically change as software updates change Java versions.
So, if you try to run a command or script, and get the error (shown in red). . .
yourmac:~ username$ /Users/username/Sites/apache-nutch-1.1/bin/nutch inject crawl/crawldb /Users/username/Sites/apache-nutch-1.1/urls

Error: JAVA_HOME is not set.
. . .set the Java_Home environment variable, and then try to run the command again. This time the response is the correct output for the command (shown in green.)
yourmac:~ username$ export JAVA_HOME=$(/usr/libexec/java_home)

yourmac:~ username$ /Users/username/Sites/apache-nutch-1.1/bin/nutch inject crawl/crawldb /Users/username/Sites/apache-nutch-1.1/urls

Injector: starting

Injector: crawlDb: crawl/crawldb

Injector: urlDir: /Users/username/Sites/apache-nutch-1.1/urls

Injector: Converting injected urls to crawl db entries.

Injector: Merging injected urls into crawl db.

Injector: done

yourmac:~ username$
It only lasts for one session. To set it permanently, you can add:
JAVA_HOME=/usr/libexec/java_home

export JAVA_HOME;
to the file ~/.profile

To confirm you have java, enter this into the Terminal:
java -version
To determine the real path:
echo $JAVA_HOME
August 21, 2010
SQL Server Express tutorial: Add a built-in user to a database
- Open SQL Server Management Studio.
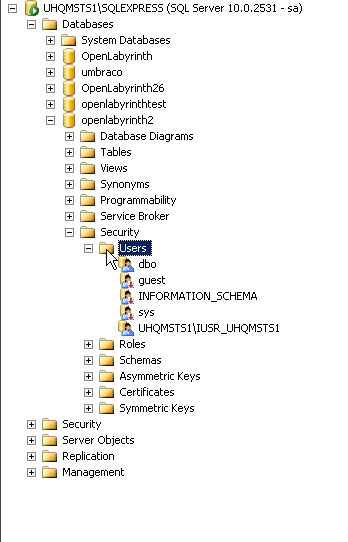
- Right click the folder "Users" in the path
Databases > Database Name > Security
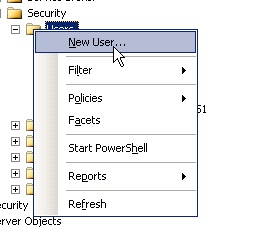
- Select New User. . . from the popup menu.
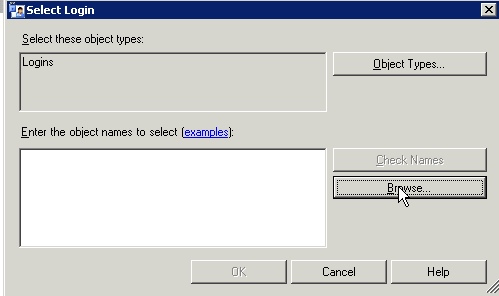
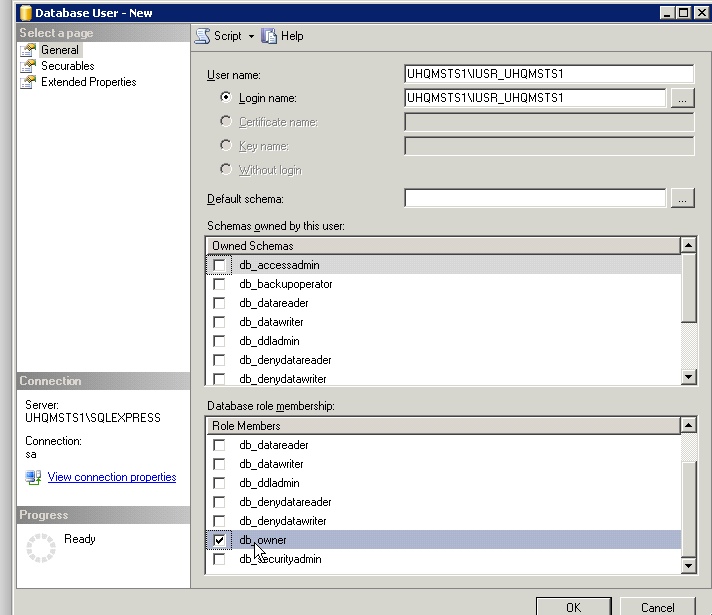
- The Database User window will open. Select Login name, and click the button to the right of the Login name text box.

- The Select Login window will open, defaulted to the "Logins" object type. Click the Browse button to choose from existing local accounts.
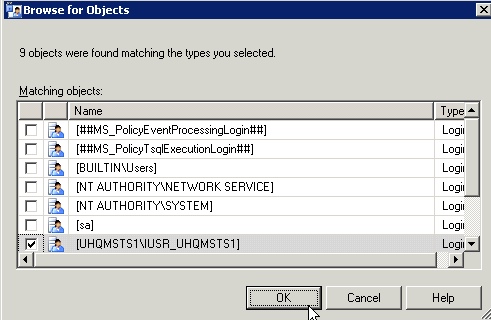
- Select [MachineName\IUSR_MachineName] from the list of available accounts and click OK.
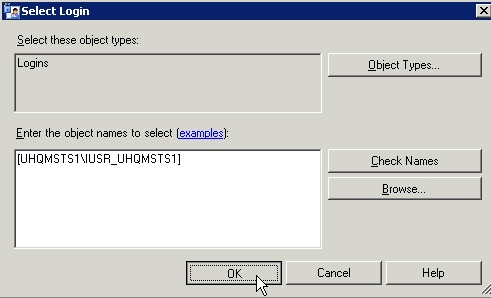
- The selected name will show up in the object names window. Click OK.
- You will be returned to the Database User window. The selected name will show up in the Login Name window. Copy and past the same name into the User Name box just above it.
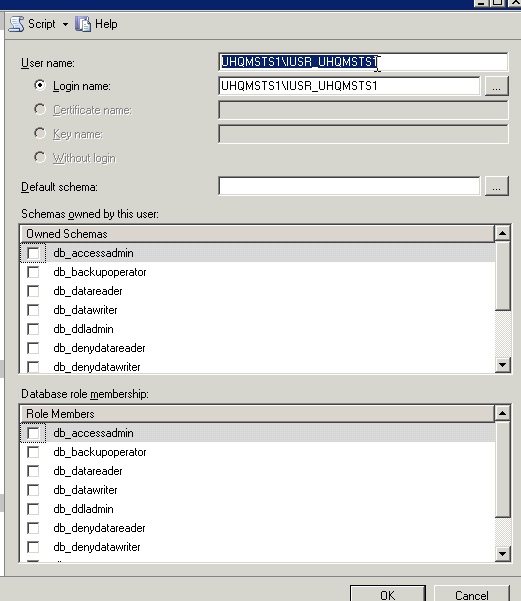
- Assign whichever schemas and roles are needed by the application. The one shown here, db_owner, is just for example and is too high for most applications. A more typical choice might be db_data reader and db_datawriter.
Configuring an ASP.NET 2.0 Application to Work with Microsoft SQL Server 2000 or SQL Server 2005
SQL Server tutorial: Copy database tables to another database
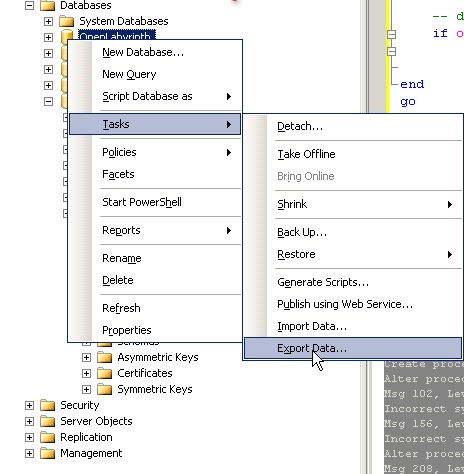
To export the table structure and data from one SQL Server database to another existing or new database, use the Export Data... function in SQL Server Management Studio. This procedure will not copy any of the other database objects such as constraints, stored procedures, or users.- In the Object Explorer, right click the name of the database. Select Tasks >Export Data...
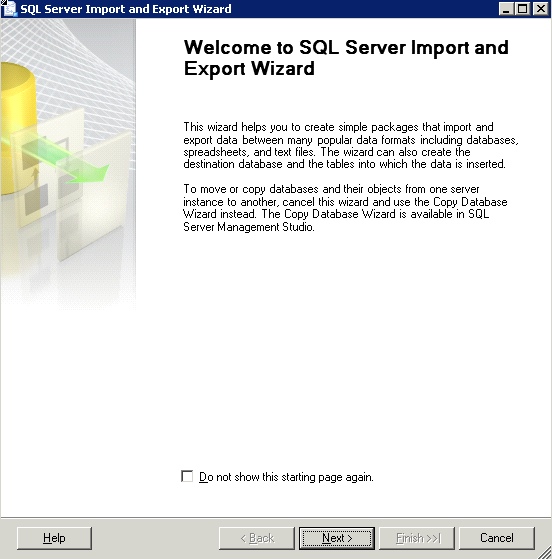
- The SQL Server Import and Export Wizard will open. Click Next.
- Select a Data source type and server name. Enter the DBA's login information, then select the source Database from the dropdown menu. Click Next.

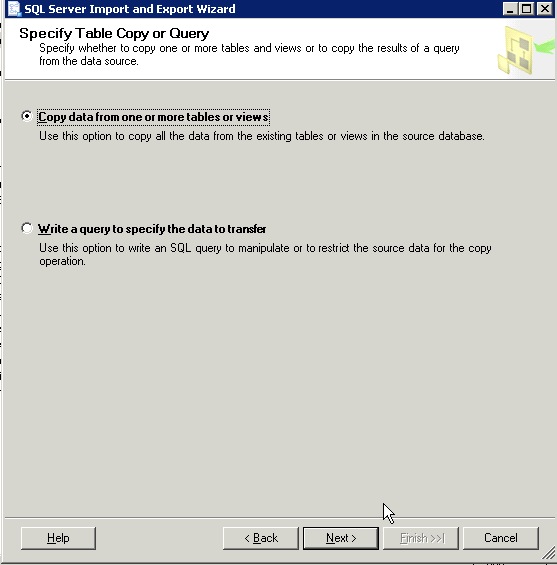
- You can either write your own query or use the wizard to select which tables to copy. For this example, we'll use the wizard. Select Copy data from one or more tables or views.
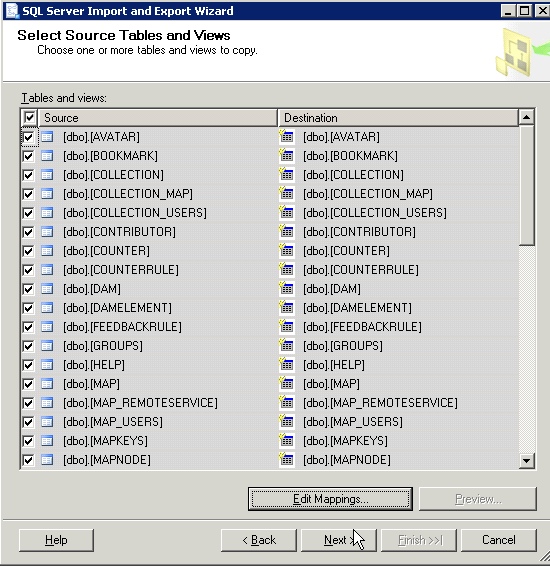
- Select specific tables to copy, or leave all selected to copy all tables.
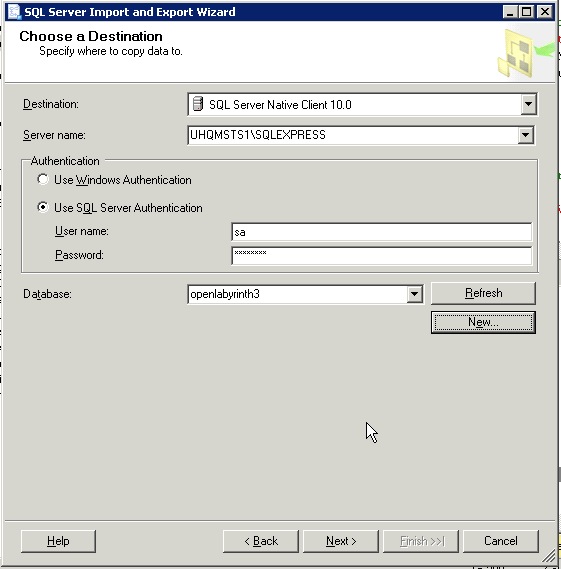
- Select the Destination database. Click New... to create a database from scratch to export the data to.
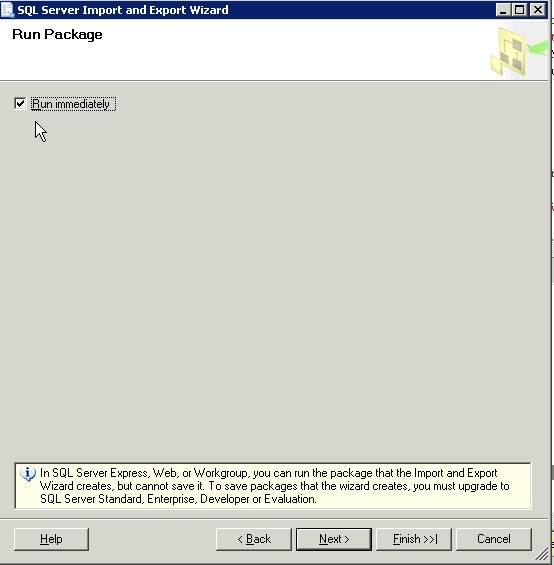
- Check Run immediately, and click Finish to start the process.

How to set up an ODBC Data Source for a SQL Server database on a Windows Server
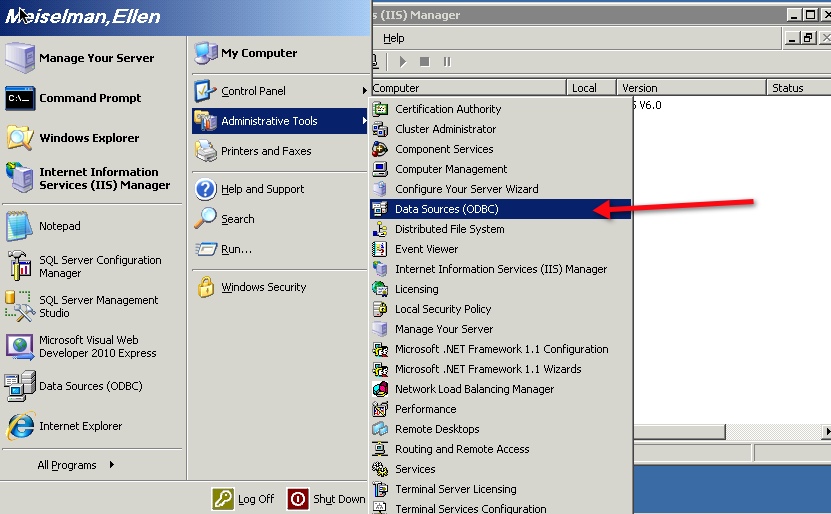
Many web applications require that you set up an ODBC Data Source which serves as a sort of pointer to a particular database which specifies which driver and credentials to use to connect. Here's how to set up one for SQL Server/SQL Server Express on a Windows 2003 server.- Select Start > Administrative Tools > Data Sources(ODBC)
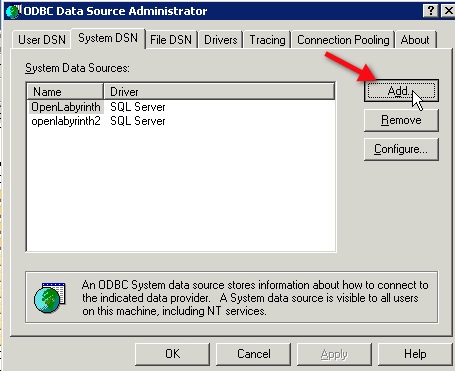
- Select the System DSN tab, and click the Add button.
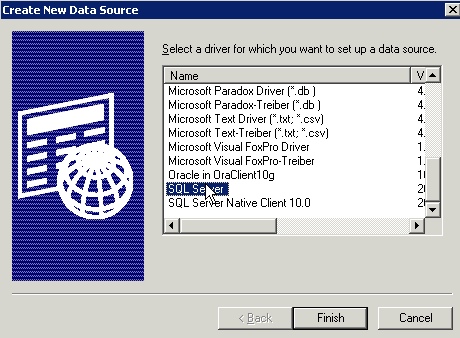
- Select the SQL Server driver, and click Finish.
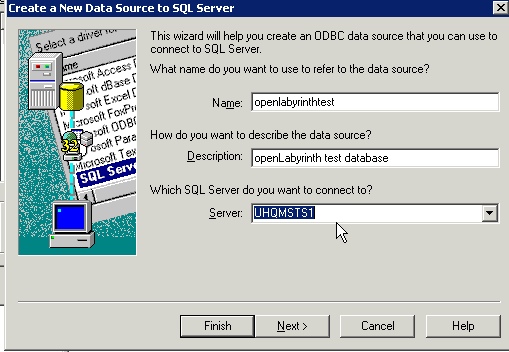
- The Create a New Data Source to SQL Server wizard will launch. Type a name for the data source, and a description. Then select the SQL Server name from the dropdown menu.
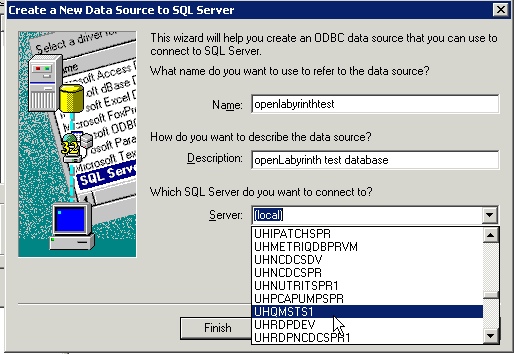
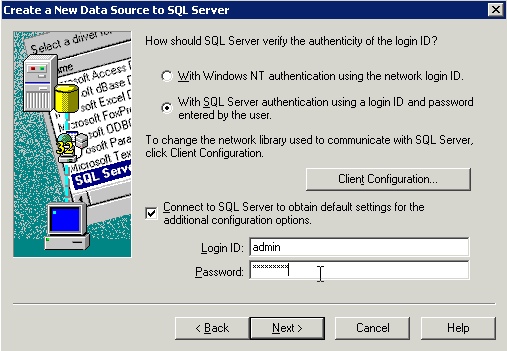
- If you are using a domain account to log in to SQL server, select the first option and the account name you are logged in to the Windows server with will be shown. In this example, I'm using a local SQL Server account, entered as shown. Enter the appropriate database administrator credentials and click Next.
- You'll be returned to the Create a New Data Source window. Click Next.
-
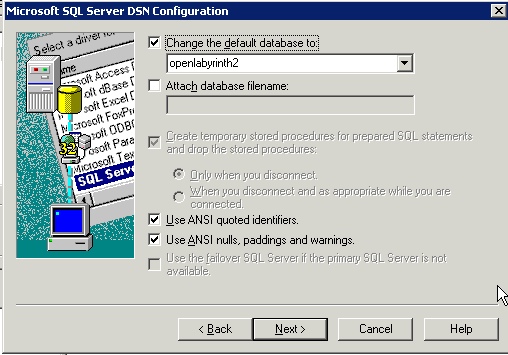
The name you chose for the database will show up as the default. Click Next.
- Leave the settings at the defaults, unless you want to log queries or statistics to a file. Click Finish.

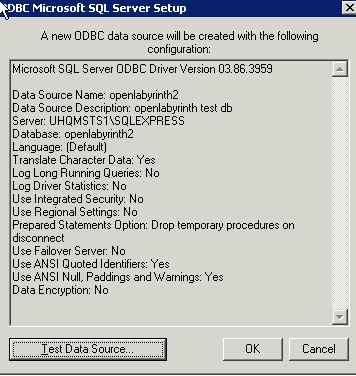
- Your chosen settings will be displayed. Test the Data Source to make sure it will connect, then click "OK."
August 20, 2010
jpeg previews not displaying in Finder in OS X

A quick troubleshooting tip for Mac users:
If you are having problems with image icons in the Finder that look like generic jpeg icons instead of icon previews, try relaunching the Finder.
Select Force Quit from the Apple menu. Select Finder, then click the Relaunch button.
Or, delete the Finder preferences and then relaunch the Finder.
(~User/Library/Preferences/com.apple.finder.plist)