September 27, 2006
Dreamweaver: Mass Detach from Template
There are times when you may find it necessary to detach hundreds of pages from their Dreamweaver templates. Unfortunately, within the Dreamweaver interface the only way to detach multiple files from their templates is to open each one, then select "Modify:Templates:Detach from Template" from the menu. A better way to go is to use a simple "grep" search in BBEdit:- Make sure you have a backup of your site. You can cause truly spectacular destruction with mass search and replace! OK, you've been warned!
- Open BBEdit, and select Find from the Search menu. The Find & Replace dialog will appear. (click to enlarge)
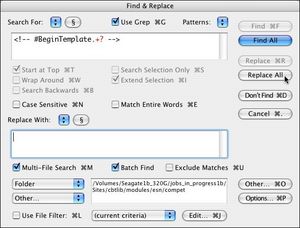
- Check "Use Grep" When you do this, you will notice it colors the grep wildcard characters red.
- paste this text into the Find box:
<!-- #BeginTemplate.+? -->
Leave the Replace With box blank (you want to replace the Begin Template tag with a blank). - Check the box for Multi-File Search, and Batch Find, then select select the folder on your local drive where the files reside.
- Click "Replace All." If you are the cautious type, and want to test it first, just click "Find" a couple of times, so that it will find the first result or two, and make sure it is highlighting the right tags.
- repeat using
<!-- #BeginEditable.+? -->
- Now uncheck Use Grep because the next two are standard exact match searches (no wildcards needed) then repeat the search and replace using
<!-- #EndEditable -->and then
<!-- #EndTemplate -->That's it - your files are now clean of template tags!
Drupal RSS feed not working
A drupal blog site I set up for a friend has an RSS link in the footer. Clicking it brought up a 404 page. I checked the Drupal.org forums, but the typical reason given for an RSS feed not working was that the atom feed module was conflicting with it, which isn't the case here. So I looked a little closer at the feed URL.
The site URL looks like:
http://mainsite.com/blog
The URL that clicking the RSS link brought up was:
http://mainsite.com/node/feed/
which is a directory up from where it should be.
Looking in the theme template (siteroot/blog/themes/chosenTheme/page.tpl.php), the link was coded as:
<a href="/node/feed/">RSS</a>
which means "relative to the site ROOT" not "relative to the current document".
Changing it to
<a href="node/feed/">RSS</a>
fixed the problem. The link now comes out
http://mainsite.com/blog/node/feed/
and the feed is indeed there!
September 24, 2006
Safari Slowdowns
After upgrading to 10.4.7 I started noticing frequent slowdowns in Safari. The "Spinning Rainbow Cursor of Death" was becoming a constant occurence.
There are plenty of recommendations about how to fix this common issue.
/System/Library/PrivateFrameworks/Syndication.framework
with a copy from a Mac OS X system that does not have problems
(subscription required)
turn off then on your router or cable modem (subscription required)
I've found that things improved after installing unlockupd, but am not certain the problem is gone yet.
Safari won't launch a Perception Quiz from the LMS, when all other browsers will
Our SumTotal (Docent) 6.5 learning management system uses SCORM to launch learning activities and quizzes. We had a case where several Perception Quizzes would not launch using Safari, but any other browser did launch them.
On carefully examining the launch URL's we found that for some reason they had been HTML encoded in the database. In other words, the & symbol was translated to &. When it was converted back to a "&", the quizzes launched fine in Safari.
September 13, 2006
Questionmark's Enterprise reporter reports displaying incorrectly?
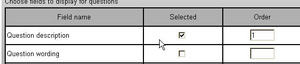
If you use HTML in your assessment questions, be careful when setting up your Enterprise Reporter reports. If you check "show question wording", HTML within the body of the question will not be escaped. This means the browser tries to render it, and this can corrupt the table layout of the report.
The workaround is to display only the question descriptions, which contain no HTML, and make sure they match the actual question as closely as possible.
Shown below is part of the settings screen for a survey report showing the correct settings to use when you have included HTML within a question, particularly table-generating HTML. Note that "question description" is checked, but not question wording.
September 9, 2006
A better Likert scale question template for Perception quizzes
The out-of the-box Likert Scale question created by Perception is really just a slightly modified multiple choice question. The choices are arranged vertically, as shown in the example screen shot below.
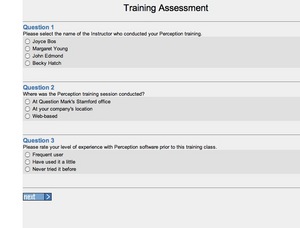
I prefer Likert Scale choices to be displayed horizontally as shown in the image below.
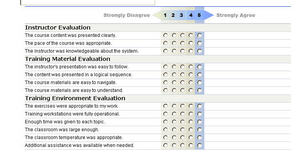
The horizontal format looks better, takes up less space and it makes it easier to answer all the questions quickly. Follow the steps shown to recreate the horizontal layout in your own quizzes.
- Question definition
Before starting you must decide whether to create a new type of question or to re-define the Multiple Choice question type. If you need to use standard multiple choice questions in the same block as the new Likert questions, you will want to define a new question type in the local format file or the template. If you need to use the special question analysis features which have been set up for multiple choice type questions in the Survey Report in Enterprise Reporter, you will need to redefine the Multiple Choice question type within a special template. - In the examples below, I've defined a new type of question: the MC_LK, "horizontal Likert Scale" type. Insert this into your local.format file. If you have decided to redefine the Multiple choice question type
# settings added to format or template file to create new horizontal likert scale question type

[DOCUMENT]

# #############################################################################
# settings added to create new horizontal likert scale question type

START_mc_LK=<!--START_mc_LK--><td valign="top" class="likertInput">
END_mc_LK=</td><!--END_mc_LK-->

START_QUESTION_mc_LK=<!--START_QUESTION_mc_LK-->
END_QUESTION_mc_LK=</td><td> </td></tr><!--END_QUESTION_mc_LK-->

#START_mc_LK=<!--START_mc_LK--><td valign="top" class="likertInput%CHOICE.NUMBER%">
#END_mc_LK=</td>
#START_QUESTION_mc_LK=<!--START_QUESTION_mc--><tr><td class="LikertQuestion">=
#END_QUESTION_mc_LK=</td><td> </td>


# ##################################
# map question type codes to text
[QUESTION TYPE]

MC_LK=Likert Scale Horizontal


# ###########################################
# define answer format
[ANSWER]

MC_LK=%START_QUESTION_mc_LK%%ANSWER.CONTENT% %END_QUESTION_mc_LK%%ANSWER.COMMENT%


# ###########################################
# define format of individual choices within a question
# these will be repeated for all choices in a question
[CHOICE]

MC_LK=
<!--MC_LK=-->
%START_mc_LK%
<INPUT TYPE=RADIO NAME="%QUESTION.ID%" VALUE="%CHOICE.ID%" %DO_MC% %CHOICE.CHECKED%>
</td>
<td class="LikertChoice">
%CHOICE.CONTENT%
%END_mc_LK%
- Style the questions
Add the following css either in the template itself or in css file that you link to the template..likertTable { font-family: Helvetica, Arial, sans-serif; font-size: 12px; margin-left:12px; border-top:1px solid #0033CC; } .LikertHeaderRow { color:#989898; font:bold 6px "Arial Black" "Helvetica Black" "Franklin Gothic Heavy"; height:42px; } .LikertHeading { font-weight: bold; text-align:center; } .LikertChoice { visibility:hidden; display:none; width:1px; } .LikertSeparator { background:#CCD1DB; height:1px; line-height:1px; font-size:1px; } .LikertSubhead { border-top:1px solid #cecfd4; background-color:#f1f2ec; } .LikertQuestion{ font-family: Helvetica, Arial, sans-serif; font-size: 12px; } .LikertInput1 { background-color:f1f1e8; } .LikertInput2 { background-color:ecece0; } .LikertInput3 { background-color:e9e7d9; } .LikertInput4 { background-color:e1e0cc; } .LikertInput5{ background-color:B1C4E2; } - Put header graphics into the "Resources" folder on your server
Download these graphics, and use them as the basis for your own header graphics. Put them in the "resources" folder on your Perception server. Download file - Table Header
In your assessment, each block of Likert Scale questions will be contained in a table. Each question will occupy one row of the table. Begin the table by inserting the following explanation question before the the likert scale questions. It contains the opening table and row tags, and the header row with the column labels. (Import the QML shown below):
<QUESTION DESCRIPTION="00. Likert_Table beginning" TOPIC="Surveys\Likert Scale header and footer" ID="1222225382874045" TYPE="text/plain" > <CONTENT TYPE="text/html" > <![CDATA[<div > <!--the following is necessary to get rid of some mysterious br tags that are being inserted, probably having to do with "tags" or "question header" values, but I was unable to find it. Simply moving the table up using relative positioning blocks the form fields above the table --> <style>br{line-height:0px;}</style> <table class="LikertTable" border="0" cellspacing="0" cellpadding="0" > <tr class="LikertHeaderRow" valign="middle"> <td width="323" class="LikertHeading"> <div align="right"><img src="%SERVER.GRAPHICS%disagree.gif" width="127" height="26" alt="Strongly Disagree"></div></td> <td width="12" class="LikertHeading"><img src="%SERVER.GRAPHICS%left_arrow.gif" width="21" height="26" alt="left arrow"></td> <td width="12" class="LikertHeading LikertInput1" ><img src="%SERVER.GRAPHICS%_1.gif" width="22" height="26" alt="1"></td> <td width="12" class="LikertHeading LikertInput2"><img src="%SERVER.GRAPHICS%_2.gif" width="21" height="26" alt="2"></td> <td width="12" class="LikertHeading LikertInput3"><img src="%SERVER.GRAPHICS%_3.gif" width="20" height="26" alt="3"></td> <td width="12" class="LikertHeading LikertInput4"><img src="%SERVER.GRAPHICS%_4.gif" width="22" height="26" alt="4"></td> <td width="12" class="LikertHeading LikertInput5"><img src="%SERVER.GRAPHICS%_5.gif" width="24" height="26" alt="5"></td> <td width="1" ><img src="%SERVER.GRAPHICS%right_arrow.gif" width="24" height="26" alt="right arrow"></td> <td width="1" class="mcchoice"></td> <td width="194" class="LikertHeading"><div align="left"><img src="%SERVER.GRAPHICS%agree.gif" width="107" height="26" alt="Strongly agree"></div></td> </tr>]]></CONTENT> </QUESTION> - Add the questions
Use the following QML example as a template for each survey question:<QUESTION STATUS="Normal" DESCRIPTION="01. The course content was presented clearly." TOPIC="Surveys\Instructor-led survey questions" ID="0641471410182539" TYPE="text/html" > <CONTENT TYPE="text/html" > <![CDATA[<tr class="LikertSeparator"><td colspan="14" > </td></tr> <tr> <td class="LikertQuestion" colspan=2>]]></CONTENT> <CONTENT TYPE="text/html" > <![CDATA[The course content was presented clearly. ]]></CONTENT> <CONTENT TYPE="text/html" > <![CDATA[</td>]]></CONTENT> <ANSWER QTYPE="MC_LK" SHUFFLE="N"> <CHOICE ID="1"> <CONTENT TYPE="text/plain">1</CONTENT> </CHOICE> <CHOICE ID="2"> <CONTENT TYPE="text/plain">2</CONTENT> </CHOICE> <CHOICE ID="3"> <CONTENT TYPE="text/plain">3</CONTENT> </CHOICE> <CHOICE ID="4"> <CONTENT TYPE="text/plain">4</CONTENT> </CHOICE> <CHOICE ID="5"> <CONTENT TYPE="text/plain">5</CONTENT> </CHOICE> </ANSWER> <OUTCOME ID="1" SCORE="1"> <CONDITION >"1"</CONDITION> <CONTENT TYPE="text/plain"></CONTENT> </OUTCOME> <OUTCOME ID="2" SCORE="2"> <CONDITION >"2"</CONDITION> <CONTENT TYPE="text/plain"></CONTENT> </OUTCOME> <OUTCOME ID="3" SCORE="3"> <CONDITION >"3"</CONDITION> <CONTENT TYPE="text/plain"></CONTENT> </OUTCOME> <OUTCOME ID="4" SCORE="4"> <CONDITION >"4"</CONDITION> <CONTENT TYPE="text/plain"></CONTENT> </OUTCOME> <OUTCOME ID="5" SCORE="5"> <CONDITION >"5"</CONDITION> <CONTENT TYPE="text/plain"></CONTENT> </OUTCOME> </QUESTION>
- Subheaddings to create sections within the table
If you need to put subheadings between sets of questions within a table, add an explanation question like this (shown in QML)
<QUESTION STATUS="Normal" DESCRIPTION="00.5.Instructor Evaluation" TOPIC="Surveys\Instructor-led survey questions" ID="7936541180429931" TYPE="text/plain" >
<CONTENT TYPE="text/html" >
<![CDATA[<tr class="LikertSeparator"><td colspan="14" > </td></tr><tr class="LikertSubhead"><td colspan=14 class="LikertSubhead"><B>Instructor Evaluation</B></td></tr>]]></CONTENT>
</QUESTION>
- Close off the table
The HTML for the table is closed by adding this explanation question last:<QUESTION DESCRIPTION="20.ending" TOPIC="Surveys\Likert Scale header and footer" ID="1504895870161078" TYPE="text/plain" > <CONTENT TYPE="text/html" > <![CDATA[<!--<td id="lastLikertCell"> </td>--> <tr class="LikertSeparator"><td colspan="14" ></td></tr> </tr></table> </div>]]></CONTENT> </QUESTION>
Posted by ellen at 5:38 PM
September 3, 2006
When target-disk mode doesn't work on the Mac
Target disk mode is a handy way to quickly transfer big files between a laptop and desktop Mac. You simply connect the 2 firewire ports, and restart the laptop while holding down the "T" key.
If the laptop disk does not appear on the desktop of the host Mac, there are a couple of things to check.
Apple recommends not having any other firewire devices connected to the host at the same time, but I've found that even if you forget, it still works.
However, the chief reason this has not worked for me is ill-fitting FireWire plugs that aren't plugged all the way in on the laptop. Another thing to try is unplugging and replugging the firewire cable: Mac OS X 10.2: FireWire Target Disk Mode Requires Hot Plugging for Some Computers
Using the Nord Electro updater and Nord Electro Tool
The new piano sounds available for the Nord Electro B3 clone keyboard only work with Nord operating system v. 3.0 or greater. So you may find that even if you haven't updated before, you will want to do so now.
The updater is pretty easy to use: simply download it from Update Nord Electro OS v3.00 (OS X) or
Update Nord Electro OS v3.00 (Windows)
You will need a midi interface, the Nord, and your computer. You may also need drivers for the midi interface, possibly even if you are using a Mac.
Connect the Nord midi Out and midi In to the midi interface, and the USB cable of the interface to your computer.
Nord's instructions for using the updater are at http://clavia.com/products/nordelectro/ne30.htm
The Nord Electro Tool allows you to load and rearrange piano samples on the keyboard. A small but tricky point is: this tool works THROUGH USB, NOT MIDI. You do NOT use the midi interface for this process. The Nord has a USB jack, which allows you to connect it directly to the computer. If you are using a PC, you will probably need the Nord USB drivers, available Here to enable the computer to recognize the Nord. If you are using a Mac, you won't need it. So, if you are trying to use a midi interface to load piano samples into your Nord, and are getting the error "Unable to detect Nord Electro. Check USB connections and try again," simply connect the Nord USB to the computer's USB, and it will probably work.
ReadMe Document (for the Nord Electro Tool)
Nord Electro 2 Manual v3.0
Nord Electro Tool Manual v2.0