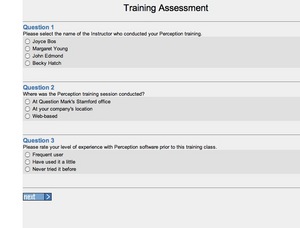
The out-of the-box Likert Scale question created by Perception is really just a slightly modified multiple choice question. The choices are arranged vertically, as shown in the example screen shot below.
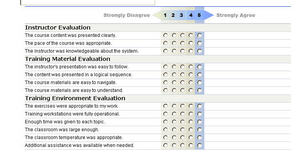
I prefer Likert Scale choices to be displayed horizontally as shown in the image below.
Ads by Google
Posted by ellen at September 09, 2006 05:38 PM The horizontal format looks better, takes up less space and it makes it easier to answer all the questions quickly. Follow the steps shown to recreate the horizontal layout in your own quizzes.
- Question definition
Before starting you must decide whether to create a new type of question or to re-define the Multiple Choice question type. If you need to use standard multiple choice questions in the same block as the new Likert questions, you will want to define a new question type in the local format file or the template. If you need to use the special question analysis features which have been set up for multiple choice type questions in the Survey Report in Enterprise Reporter, you will need to redefine the Multiple Choice question type within a special template. - In the examples below, I've defined a new type of question: the MC_LK, "horizontal Likert Scale" type. Insert this into your local.format file. If you have decided to redefine the Multiple choice question type
# settings added to format or template file to create new horizontal likert scale question type

[DOCUMENT]

# #############################################################################
# settings added to create new horizontal likert scale question type

START_mc_LK=<!--START_mc_LK--><td valign="top" class="likertInput">
END_mc_LK=</td><!--END_mc_LK-->

START_QUESTION_mc_LK=<!--START_QUESTION_mc_LK-->
END_QUESTION_mc_LK=</td><td> </td></tr><!--END_QUESTION_mc_LK-->

#START_mc_LK=<!--START_mc_LK--><td valign="top" class="likertInput%CHOICE.NUMBER%">
#END_mc_LK=</td>
#START_QUESTION_mc_LK=<!--START_QUESTION_mc--><tr><td class="LikertQuestion">=
#END_QUESTION_mc_LK=</td><td> </td>


# ##################################
# map question type codes to text
[QUESTION TYPE]

MC_LK=Likert Scale Horizontal


# ###########################################
# define answer format
[ANSWER]

MC_LK=%START_QUESTION_mc_LK%%ANSWER.CONTENT% %END_QUESTION_mc_LK%%ANSWER.COMMENT%


# ###########################################
# define format of individual choices within a question
# these will be repeated for all choices in a question
[CHOICE]

MC_LK=
<!--MC_LK=-->
%START_mc_LK%
<INPUT TYPE=RADIO NAME="%QUESTION.ID%" VALUE="%CHOICE.ID%" %DO_MC% %CHOICE.CHECKED%>
</td>
<td class="LikertChoice">
%CHOICE.CONTENT%
%END_mc_LK%
- Style the questions
Add the following css either in the template itself or in css file that you link to the template..likertTable { font-family: Helvetica, Arial, sans-serif; font-size: 12px; margin-left:12px; border-top:1px solid #0033CC; } .LikertHeaderRow { color:#989898; font:bold 6px "Arial Black" "Helvetica Black" "Franklin Gothic Heavy"; height:42px; } .LikertHeading { font-weight: bold; text-align:center; } .LikertChoice { visibility:hidden; display:none; width:1px; } .LikertSeparator { background:#CCD1DB; height:1px; line-height:1px; font-size:1px; } .LikertSubhead { border-top:1px solid #cecfd4; background-color:#f1f2ec; } .LikertQuestion{ font-family: Helvetica, Arial, sans-serif; font-size: 12px; } .LikertInput1 { background-color:f1f1e8; } .LikertInput2 { background-color:ecece0; } .LikertInput3 { background-color:e9e7d9; } .LikertInput4 { background-color:e1e0cc; } .LikertInput5{ background-color:B1C4E2; } - Put header graphics into the "Resources" folder on your server
Download these graphics, and use them as the basis for your own header graphics. Put them in the "resources" folder on your Perception server. Download file - Table Header
In your assessment, each block of Likert Scale questions will be contained in a table. Each question will occupy one row of the table. Begin the table by inserting the following explanation question before the the likert scale questions. It contains the opening table and row tags, and the header row with the column labels. (Import the QML shown below):
<QUESTION DESCRIPTION="00. Likert_Table beginning" TOPIC="Surveys\Likert Scale header and footer" ID="1222225382874045" TYPE="text/plain" > <CONTENT TYPE="text/html" > <![CDATA[<div > <!--the following is necessary to get rid of some mysterious br tags that are being inserted, probably having to do with "tags" or "question header" values, but I was unable to find it. Simply moving the table up using relative positioning blocks the form fields above the table --> <style>br{line-height:0px;}</style> <table class="LikertTable" border="0" cellspacing="0" cellpadding="0" > <tr class="LikertHeaderRow" valign="middle"> <td width="323" class="LikertHeading"> <div align="right"><img src="%SERVER.GRAPHICS%disagree.gif" width="127" height="26" alt="Strongly Disagree"></div></td> <td width="12" class="LikertHeading"><img src="%SERVER.GRAPHICS%left_arrow.gif" width="21" height="26" alt="left arrow"></td> <td width="12" class="LikertHeading LikertInput1" ><img src="%SERVER.GRAPHICS%_1.gif" width="22" height="26" alt="1"></td> <td width="12" class="LikertHeading LikertInput2"><img src="%SERVER.GRAPHICS%_2.gif" width="21" height="26" alt="2"></td> <td width="12" class="LikertHeading LikertInput3"><img src="%SERVER.GRAPHICS%_3.gif" width="20" height="26" alt="3"></td> <td width="12" class="LikertHeading LikertInput4"><img src="%SERVER.GRAPHICS%_4.gif" width="22" height="26" alt="4"></td> <td width="12" class="LikertHeading LikertInput5"><img src="%SERVER.GRAPHICS%_5.gif" width="24" height="26" alt="5"></td> <td width="1" ><img src="%SERVER.GRAPHICS%right_arrow.gif" width="24" height="26" alt="right arrow"></td> <td width="1" class="mcchoice"></td> <td width="194" class="LikertHeading"><div align="left"><img src="%SERVER.GRAPHICS%agree.gif" width="107" height="26" alt="Strongly agree"></div></td> </tr>]]></CONTENT> </QUESTION> - Add the questions
Use the following QML example as a template for each survey question:<QUESTION STATUS="Normal" DESCRIPTION="01. The course content was presented clearly." TOPIC="Surveys\Instructor-led survey questions" ID="0641471410182539" TYPE="text/html" > <CONTENT TYPE="text/html" > <![CDATA[<tr class="LikertSeparator"><td colspan="14" > </td></tr> <tr> <td class="LikertQuestion" colspan=2>]]></CONTENT> <CONTENT TYPE="text/html" > <![CDATA[The course content was presented clearly. ]]></CONTENT> <CONTENT TYPE="text/html" > <![CDATA[</td>]]></CONTENT> <ANSWER QTYPE="MC_LK" SHUFFLE="N"> <CHOICE ID="1"> <CONTENT TYPE="text/plain">1</CONTENT> </CHOICE> <CHOICE ID="2"> <CONTENT TYPE="text/plain">2</CONTENT> </CHOICE> <CHOICE ID="3"> <CONTENT TYPE="text/plain">3</CONTENT> </CHOICE> <CHOICE ID="4"> <CONTENT TYPE="text/plain">4</CONTENT> </CHOICE> <CHOICE ID="5"> <CONTENT TYPE="text/plain">5</CONTENT> </CHOICE> </ANSWER> <OUTCOME ID="1" SCORE="1"> <CONDITION >"1"</CONDITION> <CONTENT TYPE="text/plain"></CONTENT> </OUTCOME> <OUTCOME ID="2" SCORE="2"> <CONDITION >"2"</CONDITION> <CONTENT TYPE="text/plain"></CONTENT> </OUTCOME> <OUTCOME ID="3" SCORE="3"> <CONDITION >"3"</CONDITION> <CONTENT TYPE="text/plain"></CONTENT> </OUTCOME> <OUTCOME ID="4" SCORE="4"> <CONDITION >"4"</CONDITION> <CONTENT TYPE="text/plain"></CONTENT> </OUTCOME> <OUTCOME ID="5" SCORE="5"> <CONDITION >"5"</CONDITION> <CONTENT TYPE="text/plain"></CONTENT> </OUTCOME> </QUESTION>
- Subheaddings to create sections within the table
If you need to put subheadings between sets of questions within a table, add an explanation question like this (shown in QML)
<QUESTION STATUS="Normal" DESCRIPTION="00.5.Instructor Evaluation" TOPIC="Surveys\Instructor-led survey questions" ID="7936541180429931" TYPE="text/plain" >
<CONTENT TYPE="text/html" >
<![CDATA[<tr class="LikertSeparator"><td colspan="14" > </td></tr><tr class="LikertSubhead"><td colspan=14 class="LikertSubhead"><B>Instructor Evaluation</B></td></tr>]]></CONTENT>
</QUESTION>
- Close off the table
The HTML for the table is closed by adding this explanation question last:<QUESTION DESCRIPTION="20.ending" TOPIC="Surveys\Likert Scale header and footer" ID="1504895870161078" TYPE="text/plain" > <CONTENT TYPE="text/html" > <![CDATA[<!--<td id="lastLikertCell"> </td>--> <tr class="LikertSeparator"><td colspan="14" ></td></tr> </tr></table> </div>]]></CONTENT> </QUESTION>
