July 31, 2003
Buttons don't work and Sounds don't play in a Powerpoint for Web presentation
This afternoon, I was asked for help with a web presentation generated by using the "Save as Webpage" command in Powerpoint. The presentation had a narration, and "continue" buttons at the bottom right of each page. The web presentation seemed to work fine on an older computer but the Continue buttons did not work and the sounds would not play on all slides on an XP machine.
It turns out that part of the textbox on many of the slides was overlapping the arrow buttons, and the arrow buttons were sitting on top of the little speaker icon for the sound in each slide. When objects with actions are overlapped by other objects, the actions don't run correctly. It wasn't possible to see this overlapping when she did the presentation because the default setting when a narration is generated is to shut off the icons for the speech so they can't be seen.
To turn them back on again (this is in PPT 2002) select from the menu: Slide Show: Custom Animation. This will bring up the custom animation palette on the right. Each custom action or transition will be listed. The sound will be listed as "Media 1, 2, 3" or whatever. Select the Media line, and click on the arrow to the right of the name to bring up the popup menu. Select Effect Options and deselect "Sound settings: Hide while not playing." Then you will be able to see the little speaker icon and move it out from under whatever is on top.
Wacom Tablet Driver fails to load in OSX on startup...
I have a 6x8 Intuos 2 Wacom tablet, a real hand-saver. I use it on my right hand and a Kensington Orbit (the smaller version) trackball on my left, for easy tasks like scrolling and big mouse moves. This has saved me so far from the fate of many of my graphic designer/computer programmer friends who are virtually crippled now by hand problems, like carpal tunnel syndrome.
However, I have had a problem since getting the tablet: it would intermittently fail to load the driver on startup. I'm using Jaguar, and a dual screen setup - and the tablet is plugged into the back of one of the screens.
I finally got around to writing Wacom, and they suggested checking the driver version, or that the tablet is getting enough power: ie. it is NOT plugged into the monitor.
"...The last thing I can think of is that the tablet is not getting enough
power. Make sure its plugged directly into the back of the computer. (Not through the keyboard, monitor, etc.)
If it has to be plugged into a hub, we have found that the Keyspan powered
usb hubs always work with our tablets because they are the only one's known
to regulate their power correctly."
I think this is the most likely cause: after starting up from being shut down overnight the monitor doesn't come to full power right away, and probably starves the poor tablet so it isn't recognized enough to kick the driver into loading. It usually loads on restarting.
July 27, 2003
Flash Newbie Discovery
Flash experts can skip this, for sure.
OK - this is so I don't forget again!
The key to getting things to work in Flash is simply: Everything MUST be named!
Every instance, scene beginning, significant frame, movie clip, etc. must have a name, and hopefully one that makes sense to you a week after creating the project.
I got used to the tellTarget syntax in older versions, but with correct relative target paths, it's easy to specify what action you want what object to perform, and it is more generally correct - the same syntax works in all cases. For example to get a button object to play a doubly nested MovieClip:
on (release) {

ContainerClip.NestedClip1.NestedClip2.gotoAndPlay(2);

}
July 22, 2003
Upgrading to PHPWebsite .9x
I run a fish club website, built around a phpwebsite framework. The software recently underwent a major upgrade, so I finally decided to try to update one of them to the new version. A lot has changed apparently, but I followed the directions carefully.
It was a complete disaster. It was as if I had hacked my own site! The database structure is now different, and fields were missing, names were wrong, and permissions got screwed up and seemingly could not be fixed (I have no idea why). I have not been able to find a reliable upgrade path described online. Fortunately, I had it backed up, and reinstalled the older version.
If anyone has a for-sure method of upgrading to the new version, let me know!
July 17, 2003
Create Database-Driven Sites the Easy Way with GoLive 6
PHP/MySQL for the rest of us!(originally published Spring, 2002)
Intro:
Designers now have a new tool to help them create php/mySQL-based
dynamic sites using without a steep learning curve. It is now
almost as easy to create a simple database-driven site as an html-based
one. Adobe's GoLive 6 has improved their dynamic link module and
completely integrated it into the application. It now includes
php/mySQL support and plenty of help and templates for creating
your first database-driven website.
There are two good really reasons to leave the domain of the static html-based site: Interaction and Maintenance.
A dynamic site allows user interaction. Visitors to your site can search, select, and customize their information, or contribute to the site by adding new information, such as messages or articles. But the really big advantage is in the maintenance. Maintenance of a rapidly changing site is always a big issue. Clients rarely take the true cost of keeping a static site updated into account in their development budgets.
If a site require frequent changes, you should consider making it database-driven. When new content such as product information, images, or articles is added to the database, it propagates through the site without someone having to edit every page it appears on. As users search for products or select articles, the content is merged with page templates on the fly using "queries" which grab the right information from the database to fill each region of the web page.
The efficiency of a dynamic site is obvious, but until recently, the programming skills required to develop one in PHP/MySQL have been a barrier for many web designers.
However, designers now have two new tools to help them create dynamic sites: Adobe GoLive 6, and soon to come, Macromedia Dreamweaver MX. Both applications do similar tasks, and both will handle PHP/MySQL as well as several other language/database combinations, but since only GoLive is currently out, we'll use it to illustrate the steps in developing a dynamic site. This is not meant to be a complete tutorial, but will show you how easy it can be.
The first step is to plan out what you want your site to do, because this will determine the kinds of pages required. This could be in the form of a flow-chart or site map. If you are new to designing dynamic sites, it is a good idea to begin by looking at the example sites provided with GoLive.
These sample sites demonstrate how to set up a photo album, a product catalog, a shopping cart, a user forum, calendar, and an E-zine. A set of dynamic pages works together to create what is called a "web application." Because they issue instructions to each other and to the database, they are functioning as software, rather than as a simple set of links. It is important to make sure that the site you are designing will have all the pieces necessary so that the application actually returns responses to the user that make sense, or you will have very frustrated users. At first, you may wish to simply adapt the sample sites to your own needs rather than starting from scratch.
There are two parts to any database-driven site: the front end
- the web pages which contain instructions for selecting and displaying
data; and the back end - the database containing all the data.
Once you have planned your site, you may have to design the database,
unless you are using a pre-existing one. A good beginner's guide
to SQL databases is in an article by Kevin Yank: Build
your own Database Driven Website using PHP & MySQL - Part
2: Getting Started with MySQL
How to talk to MySQL without a phD.
Setting up a MySQL database the first time can be a daunting task.
But if you use a web-based interface such as PHPMyAdmin, it makes
the process much easier. PHPMyAdmin is easy to install, and is
available free from: http://PHPwizard.net/projects/PHPMyAdmin/.
Often it comes pre-installed by your webhost when you ask for
a site with database support.
PHPMyAdmin simplifies tasks like adding a table to your database,
specifying field properties, and entering the data. It may also
help to have an example of a similar database to the one you wish
to create so you can imitate the field types and values. Here
again, GoLive's sample sites can come to the rescue. Each contains
instructions for designing a database that will work with the
site.
![]()
Figure 1 - the interface for editing a field's
properties in PHPMyAdmin
Click image to see it full-sized.
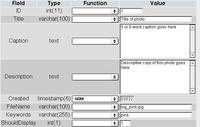
Figure 2 - the interface for editing a record
and its properties via PHPMyAdmin.
Click image to see it full-sized.
Setting up the site in GoLive.
Once the database is in place on the server, you can start setting up a new site in GoLive. GoLive will need to be given the right settings to communicate with it the server and database, and the location of the files you will edit - usually on a local drive or server. There is staging-server and webDAV server capability also.
The program walks you through the process of specifing the path and user settings necessary to connect. Even so, there is enough variation in server setups and path configurations that you may not be successful the first time. A PHP troubleshooting page is automatically generated by GoLive to help you solve connection problems that may arise. The kinds of issues that come up typically fall into the categories of path problems and permissions problems, although occasionally PHP may not be installed correctly.
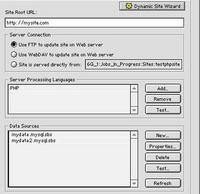
Figure 3 - Specifying a database and server processing
language
Click image to see it full-sized.
Once you have connected to the server, and chosen and connected to a database, the next step is create a page in the site, make it dynamic, and specify which subset of the database the dynamic information on your page will be drawn from.
Adding Dynamic Content to your page.
In GoLive's terminology, this subset (defined by a query) is called a "content source." An example of a content source would be to filter the records in a list of photos by whether or not the field "ShouldDisplay" is set to 1 or 0, or by whether certain keywords are present.
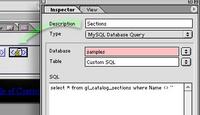
Figure 4 - creating a content source.
Click image to see it full-sized.
Nearly any page element, such as text, tables, form fields, or images can be bound to content sources. A dynamic table can have multiple fields poured into it like a spreadsheet.

Figure 5 - the Dynamic Content palette, showing containers, dynamic tables. record navigation objects, and dynamic form objects.
Click image to see it full-sized.
Once a content source is attached to a page, any object can be bound to specific fields. Here a photo is being linked to a source called Products, which contains the name of an image from a field in the database, with an instruction to concatenate it with the relative path to the small versions of the images (images/smallimages/FileName), so that the correctly sized image will be picked up on this page. When the small version is clicked, another instruction will be executed "Show Details of Current Record." This content will be displayed on the linked page, ie. "detail.PHP." Both a link action containing instructions for selecting data, and a standard html link reference must be specified, as seen in figure 7 below.
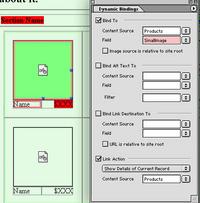
Figure 6 - binding an image to a content source,
and adding a link action.
Click image to see it full-sized.
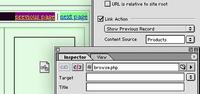
Figure 7 - Specifying the Link Action and the link
reference for a navigation button.
Click image to see it full-sized.
Testing the site must be done on a server that understands PHP and MySQL. This can be the remote hosting server, or if you have a Windows or OSX machine, you can install a preconfigured Apache server that comes with GoLive to do your testing. Hopefully if you have created your content sources and bindings correctly, troubleshooting will not be too difficult.
I won't say "that's all there is to it," because this is just the beginning, but hopefully this small taste of what's possible will whet your appetite for some of that dynamic site "power!"
Importing Quizzes directly into Questionmark Perception using list styles
Since we have no Questionmark Perception manuals at my office, most of my knowledge of Questionmark comes from trying out things in the application itself or digging around in the questionably organized Questionmark support site. (Any altruistic Info-Architects need a project?)
While so engaged one day, looking for an answer to something else, I found out I could have been importing multiple choice quizzes using Microsoft Word documents! Fortunately I haven't done too many so far. Here are the directions:
The document must be formatted as a list.
Each question is a level 1 line, each choice is a level 2 (indent once). There should be no excess copy in the document, just
1. Question
     a. choice 1
     b. choice 2
     c. choice 3
     d. choice 4

2. Question

     a. choice 1

     b. choice 2

     c. choice 3

     d. choice 4
etc.
Select All. Choose Format: Bullets and Numbering In the dialog that comes up, click the Customize button.
For Level 1 (Questions), make the bullet <Q>
For Level 2 (Choices), make it <C>
Set the Number and Text postions to 0".
Hit OK.
All the bullets will be changed to the QML markers you have just defined.
<Q> Question
<C> choice 1
<C> choice 2
<C>. choice 3
<C> choice 4

<Q> Question

<C> choice 1

<C> choice 2

<C> choice 3

<C> choice 4
Change all the "correct" choice markers to
<C+>
Save as a text file.
In Question Manager in Perception choose the topic into which you wish to import the questions.
Select File: Import: ASCII and select your text file. Hit the "Import" button.
More detailed instructions are available to registered users on the Questionmark Support site in Knowledge Base Document ID "ques027".
July 16, 2003
Exporting graphics from MS Office
I couldn't believe how difficult it is to get graphics back out of Microsoft Office documents. Someone came to me today for help with recovering graphics from a Powerpoint file. They had inserted the graphics and since lost the original scans, so all that remained were the ppts.
First thing anyone thinks of in Windows is right-click to save the image, which she did. Nothing. (She's probably still on Windows NT/ Word 97). So she copied all the graphics out of the powerpoint, then couldn't figure out what do do with the clipped images, so pasted them into Word! And sent me the resulting Word documents. I figured, no problem, just copy each graphic and paste into Photoshop, then save. Nooooooo! You lose a lot of quality that way. You can see nice subtle grayscale antialiasing in the word version, but the photoshop version looks like a bad xerox.
First thing anyone thinks of in Windows is right-click to save the image, which she did. Nothing. (She's probably still on Windows NT/ Word 97). So she copied all the graphics out of the powerpoint, then couldn't figure out what do do with the clipped images, so pasted them into Word! And sent me the resulting Word documents. I figured, no problem, just copy each graphic and paste into Photoshop, then save. Nooooooo! You lose a lot of quality that way. You can see nice subtle grayscale antialiasing in the word version, but the photoshop version looks like a bad xerox.
What I finally came up with - and it does NOT work in Office 97 products - was to save the files as web pages. This process exported the graphics each as a separate jpeg, albeit with a little lower quality than was in the original. Powerpoint seems to do a slightly better job, but it could be my imagination at this point.
Update: See this post for updated instructions on exporting graphics and pictures from Word.
July 10, 2003
Lessons in dubbing from VHS thru a miniDV deck
I was using a Sony GVD-1000 MiniDV deck at work yesterday, trying for the first time to copy a VHS tape from a standard VCR. I plugged the outs from the VCR into the handy little Y cable they give you with the Sony, which goes into a single analog audio/video Input jack. I had been told you could pretty much use the little deck as an analog/digital converter, much better behaved than the Dazzle and Pinnacle card I also have. So.... I plugged in the firewire cable to the back, and turned on "record-pause" and started the VHS tape rolling.
The result was - Nothing. After hunting the manual for menu commands that might switch the input, and looking at each and every jack (there are a lot of them!) on the Sony, to see if I had it right - I suddenly realized: The reason "DV-In" was sitting there on the screen was that the firewire cable was plugged in. That overrides the other input.
It seems you can use the Sony as a flow-thru going OUT from the computer, but not IN to the computer. You need to record first to a miniDV cassette, then capture from that to FinalCut or whatever.