June 20, 2013
Movable Type: How to emulate an MTEntryIfNotExtended tag
Movable Type has a built in container tag
<MTEntryIfExtended>
which is often used to show the "More" part of a long entry, or anything else that should be displayed only if the entry is extended:
<MTEntryIfExtended>
    <$MTEntryMore$>
   <div>Special text or page elements for Extended Entries go here</div>
</MTEntryIfExtended>
But what if you want something to show up only if the entry is NOT extended? There is no corresponding <MTEntryIfNotExtended> tag.
Fortunately that functionality is simple to replicate using Movable Type variables.
Create a new template variable called "isExtended" and set it to 0, which will be the default, unless the entry is Extended.<mt:Var name="isExtended" value="0">
Add an MTEntryIfExtended container tag, and inside it, change the value of "isExtended" to 1. This means that it will equal 1 only if the entry is Extended. This must come before the next code block.
<MTEntryIfExtended>
   <mt:SetVar name="isExtended" value="1">
</MTEntryIfExtended>
Add an mt:If container tag that checks the value of "isExtended" and inside it, add the special text or page elements that should appear only if the entry is NOT extended.
<mt:If name="isExtended" eq="0">
   <div>Special text or page elements for Non-extended Entries go here</div>
</mt:If>
June 19, 2013
Movable Type: Publish error in Master Archive Index:
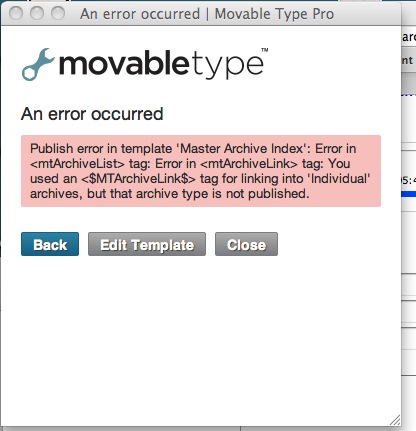
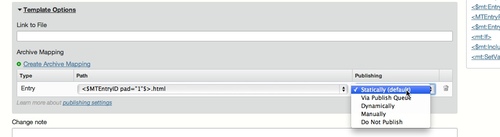
Occasionally when re-publishing my whole site after modifying the templates, I get this error:
Error in <mtArchiveList> tag: Error in <mtArchiveLink> tag: You used an <$MTArchiveLink$> tag for linking into 'Individual archives, but that archive type is not published.This happens when the changes to the template cause it to revert to "Not Published" for some reason. To fix, just select a publishing option for the template that did not publish, as shown.
June 13, 2013
Mechanical Turk for transcribing audio recordings and captioning
I sometimes record lectures or meetings for later reference, and have found Mechanical Turk to be an efficient and affordable method for transcribing them. It can be quite confusing to get started using MTurk though, and the available blogs on the subject don't really help you navigate the current MTurk interface, so here is the step-by-step process I use to have a lecture transcribed:
Cut your audio into 5 or 10 minute clips
Download Audacity - a free audio editing tool that works on both Windows and Mac.
Import your voice-recording file. (File > Import >Audio)
If you see a warning about FFMpeg being missing, just ignore it.
Click on the waveform-timeline and drag to the right or left to select an area about 10 minutes long.
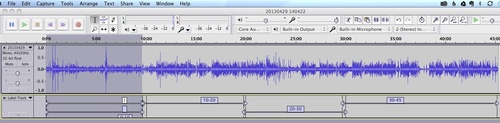
Select Add Label At Selection from the Tracks menu.
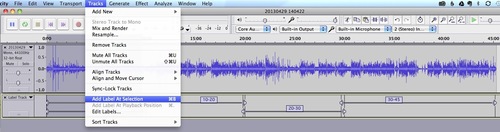
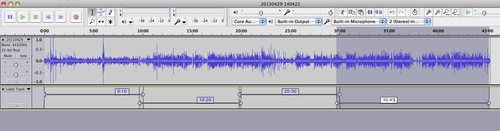
Select slightly overlapping regions of similar duration and label each one until you reach the end of the recording.
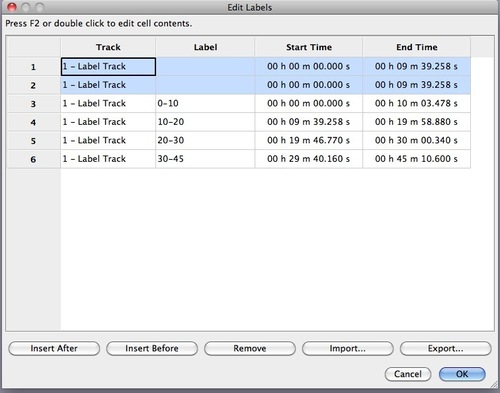
If you make a mistake and need to delete a label, select Edit Labels...
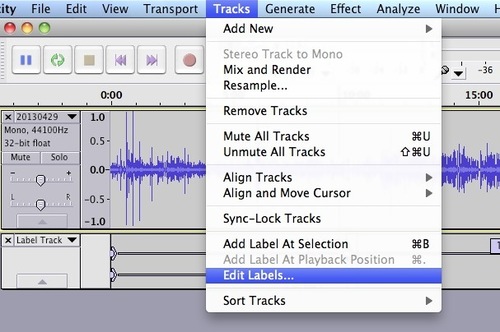
Edit or remove labels in this dialog.
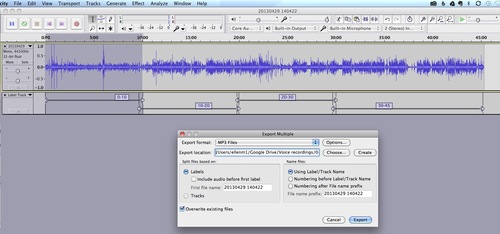
Once your labels are set correctly, select Export Multiple from the File menu.
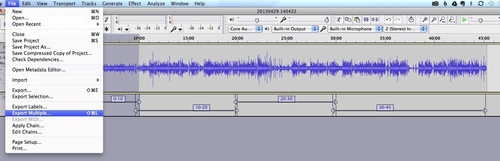
Select a directory to save to, and choose naming options for the files.
Set up your HITs on Mechanical Turk
Once the files are exported, upload them to some publicly accessible location like an ftp site, a public folder on box.com, a public folder on Google Docs, etc.
Go to Amazon's Requester page for Mechanical Turk, at https://requester.mturk.com/
Create an account on MTurk and put some money in it for paying the workers.
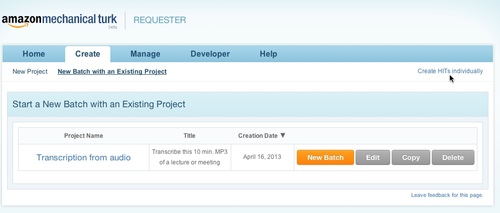
I create my HITs (Human Intelligence Tasks) individually because I usually only have a few of them, but if you have a lot of audio to transcribe, you will probably want to create a batch. I would test your batch-making process first, using a small set of HITS in a CSV file. Don't risk going live with a lot of incorrect HITs.
To create an individual HIT, click Create HIT's Individually:
Fill out all the fields marked in yellow. I usually put some numbering (1 of 4, 1 of 3) in the title, so I can tell at a glance which of the recording segments this HIT covers.
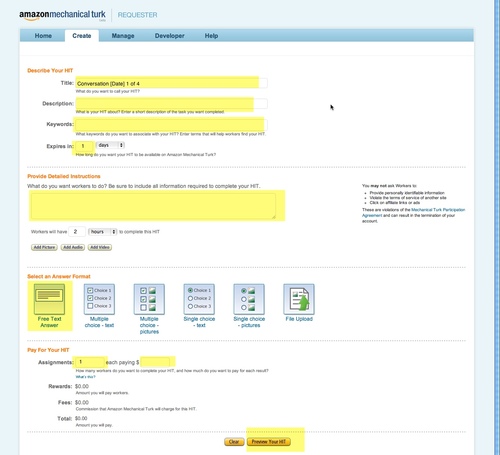
In the title, it is helpful to the worker to put the duration of the audio, so they can tell what the real rate is on the HIT. A typical title I would use would be:
Transcribe this 10 min. MP3 of a lecture or meeting [Learning Lecture 4-29-13 30-45]
For instructions I usually put something like:
Listen to a short audio clip and transcribe what is said. Do not include "hmm" and "errs" in the transcription. Do not correct for grammar mistakes but transcribe as spoken. Use punctuation where appropriate. Indicate different speakers with "speaker 1" or "speaker 2".
There are some people who speak extremely softly on the clip - don't try too hard to transcribe them, just get what you can of them and indicate inaudible parts with "[inaudible]". If you get a few words from them that's great. Concentrate on the clearer speakers.
Audio is at:
http://path.to.recording/audio.mp3
Always test the location given for the recording, since the worker will be forced to write and ask for help if the audio is not where it is supposed to be.
I use both a typed path to the audio AND click the "Add Audio" button just below the instructions field. I've found that sometimes the audio gets lost when you just use the button to create a link.
I usually set the HIT to expire in 12 hours and give the worker a few hours to complete it after they accept it.
What to pay:
The higher the payment offered, the more likely your HITs will be completed quickly by high-quality workers. Most of the transcription HITs are from big crowdsourcing companies who have to add a percentage. Scanning the available HITs on mturk.com, the prices are all over the map, mostly very low. I've seen recommendations of $2.00 for 5 minutes of audio, but it seemed too low, so for transcription for my own use, I pay $5.00 for 10 minutes or $30.00 for an hour of audio. Basically, pay as much as you can afford to pay, given the volume of HITs you intend to offer.
Once you have previewed and submitted the HIT, you will get the chance to create another new HIT based on the one you just completed.
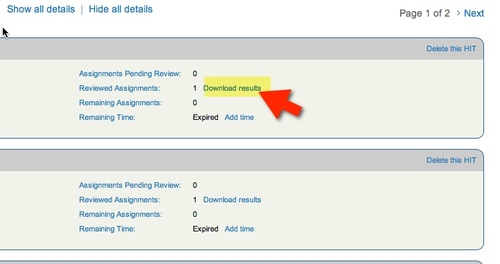
When you get a message that the hits are completed, make sure and approve them quickly. Go back to the Requester site and click Manage HITS individually. HITS you have not yet approved are in blue, approved ones are gray. Check over the transcription, check the Approve box and click Submit.
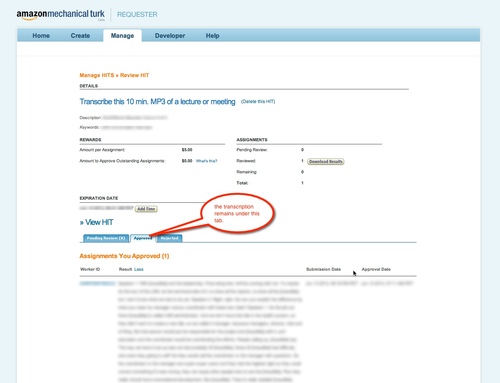
Approved individual HITS will remain in your "Manage HITS individually" area unless you delete them. To review a transcription after you've approved a HIT, go to "Manage HITs individually."

Click Download Results.
Although the text will look like a solid block of words in this screen, I've found that if I select the text and "Copy", then paste it into a Google Doc, all the paragraph spacing reappears. The CSV file doesn't preserve the formatting in the same way.
For more information on Mechanical Turk, see the references below.
Resources
June 11, 2013
Drupal 7: It is recommended to install the PECL uploadprogress library
When installing Plupload module to work with Media module on a Hostgator site, I got the error:
Your server is capable of displaying file upload progress, but does not have the required libraries. It is recommended to install the PECL uploadprogress library (preferred) or to install APC.Looking at the suggested library (pecl.php.net) it was a shell script that pretty obviously required privileges that I would not have on a shared host. However, Hostgator has another library already installed that implements PECL: CodeGen_PECL. It just has to be enabled.
In the HostGator Control Panel, in Software/Services, find the icon labeled PHP Pear Packages:
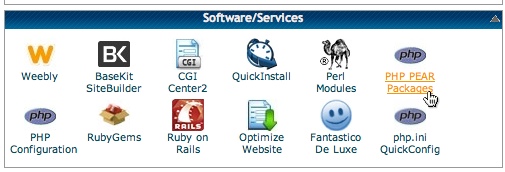
Type PECL in the Search box, and it will find CodeGen_PECL. Click Install.

June 8, 2013
How to make a diff file on Mac
I had occasion to make a patch file the other day, and since I do this so rarely, it took some time to look up how to do it. So here, in a nutshell is how to use diff on a Mac.
Open terminal.
At the prompt, type
diff -up newfile oldfile
But really the easiest way to get the paths right is to type:
diff -up
...then drag first the new file, then the old file from the desktop onto the terminal window right at the end of the line after -up . It will fill in the paths for you.
A complete dictionary of all commands you can use with "diff" are available by typing
diff --help
at the command prompt - and also reproduced below the break.
 -i  --ignore-case  Ignore case differences in file contents.

  --ignore-file-name-case  Ignore case when comparing file names.

  --no-ignore-file-name-case  Consider case when comparing file names.

  -E  --ignore-tab-expansion  Ignore changes due to tab expansion.

  -b  --ignore-space-change  Ignore changes in the amount of white space.

  -w  --ignore-all-space  Ignore all white space.

  -B  --ignore-blank-lines  Ignore changes whose lines are all blank.

  -I RE  --ignore-matching-lines=RE  Ignore changes whose lines all match RE.

  --strip-trailing-cr  Strip trailing carriage return on input.

  -a  --text  Treat all files as text.
-c -C NUM --context[=NUM] Output NUM (default 3) lines of copied context.
-u -U NUM --unified[=NUM] Output NUM (default 3) lines of unified context.
--label LABEL Use LABEL instead of file name.
-p --show-c-function Show which C function each change is in.
-F RE --show-function-line=RE Show the most recent line matching RE.
-q --brief Output only whether files differ.
-e --ed Output an ed script.
--normal Output a normal diff.
-n --rcs Output an RCS format diff.
-y --side-by-side Output in two columns.
-W NUM --width=NUM Output at most NUM (default 130) print columns.
--left-column Output only the left column of common lines.
--suppress-common-lines Do not output common lines.
-D NAME --ifdef=NAME Output merged file to show `#ifdef NAME' diffs.
--GTYPE-group-format=GFMT Similar, but format GTYPE input groups with GFMT.
--line-format=LFMT Similar, but format all input lines with LFMT.
--LTYPE-line-format=LFMT Similar, but format LTYPE input lines with LFMT.
LTYPE is `old', `new', or `unchanged'. GTYPE is LTYPE or `changed'.
GFMT may contain:
%< lines from FILE1
%> lines from FILE2
%= lines common to FILE1 and FILE2
%[-][WIDTH][.[PREC]]{doxX}LETTER printf-style spec for LETTER
LETTERs are as follows for new group, lower case for old group:
F first line number
L last line number
N number of lines = L-F+1
E F-1
M L+1
LFMT may contain:
%L contents of line
%l contents of line, excluding any trailing newline
%[-][WIDTH][.[PREC]]{doxX}n printf-style spec for input line number
Either GFMT or LFMT may contain:
%% %
%c'C' the single character C
%c'\OOO' the character with octal code OOO
-l --paginate Pass the output through `pr' to paginate it.
-t --expand-tabs Expand tabs to spaces in output.
-T --initial-tab Make tabs line up by prepending a tab.
-r --recursive Recursively compare any subdirectories found.
-N --new-file Treat absent files as empty.
--unidirectional-new-file Treat absent first files as empty.
-s --report-identical-files Report when two files are the same.
-x PAT --exclude=PAT Exclude files that match PAT.
-X FILE --exclude-from=FILE Exclude files that match any pattern in FILE.
-S FILE --starting-file=FILE Start with FILE when comparing directories.
--from-file=FILE1 Compare FILE1 to all operands. FILE1 can be a directory.
--to-file=FILE2 Compare all operands to FILE2. FILE2 can be a directory.
--horizon-lines=NUM Keep NUM lines of the common prefix and suffix.
-d --minimal Try hard to find a smaller set of changes.
--speed-large-files Assume large files and many scattered small changes.
-v --version Output version info.
--help Output this help.
FILES are `FILE1 FILE2' or `DIR1 DIR2' or `DIR FILE...' or `FILE... DIR'.
If --from-file or --to-file is given, there are no restrictions on FILES.
If a FILE is `-', read standard input.
Wordpress: SimpleLDAP plugin updated to work with v3.5
The SimpleLDAP plugin by Cliff Griffin is exactly what I needed for a proof-of-concept WordPress site I'm working on, but it hasn't been officially updated in a while and was not entirely compatible with WordPress v.3.5.
I've updated the plugin to eliminate the errors I was getting, and it now works fine on my site, but it could probably use some TLC from someone more experienced with working with WordPress.
The original version of the plugin I used as a basis is v1.4.0.5.1, available at http://wordpress.org/plugins/simple-ldap-login/.
I've provided my full set of updated files, zipped, and also the diff patches for the two files that were altered: Simple-LDAP-Login.php and Simple-LDAP-Login-Admin.php
I hope this helps someone else trying to get LDAP going with WordPress.
Download a zipped version of the updated plugin here:
simpleLDAPupdated_for_WP3.5.zip
Patches for the two files that were altered are given below.
Patch for Simple-LDAP-Login.php:
@@ -8,7 +8,7 @@ Author: Clifton H. Griffin II

 Author URI: http://clifgriffin.com

 */

 require_once( WP_PLUGIN_DIR."/simple-ldap-login/adLDAP.php");

-//require_once( ABSPATH . WPINC . '/registration.php'); //removed for WP5.3.5.1. compatibility

+require_once( ABSPATH . WPINC . '/registration.php');


 //Admin

 function simpleldap_menu()

@@ -18,10 +18,7 @@ function simpleldap_menu()


 function simpleldap_admin_actions()

 {

-   add_options_page("Simple LDAP Login", "Simple LDAP Login", "create_users", "simple-ldap-login", "simpleldap_menu");

-  // per http://tumbledesign.com/fix-notice-has_cap-was-called-with-an-argument-that-is-deprecated-since-version-2-0-in-wordpress/

-  //changed this for WP5.3.5.1. compatibility

-   // add_options_page("Simple LDAP Login", "Simple LDAP Login", 10, "simple-ldap-login", "simpleldap_menu");

+    add_options_page("Simple LDAP Login", "Simple LDAP Login", 10, "simple-ldap-login", "simpleldap_menu");

 }

 function simpleldap_activation_hook()

 {

@@ -56,7 +53,6 @@ $sll_options=array(

 	"domain_controllers"=>explode(";",get_option("simpleldap_domain_controllers")),

 );


-//"$sll_options=".print_r($sll_options); //debug

 //For OpenLDAP

 $ar_ldaphosts = explode(";",get_option("simpleldap_domain_controllers"));

 $ldaphosts = ""; //string to hold each host separated by space

@@ -68,7 +64,6 @@ foreach ($ar_ldaphosts as $host)

 }

 define ('LDAP_HOST', $ldaphosts);

 define ('LDAP_PORT', 389);

-//define ('LDAP_PORT', 636); //I prefer 636 as default

 define ('LDAP_VERSION', 3);

 define ('BASE_DN', get_option('simpleldap_base_dn'));

 define ('LOGIN', get_option("simpleldap_ol_login"));

@@ -104,9 +99,7 @@ function sll_authenticate($user, $userna

 	$auth_result = sll_can_authenticate($username, $password);

 	if($auth_result == true && !is_a($auth_result, 'WP_Error'))

 	{

-			//$user = get_userdatabylogin($username); //http://codex.wordpress.org/Function_Reference/get_userdatabylogin

-			$user = get_user_by('login', $username);//changed because get_userdatabylogin is deprecated

-

+			$user = get_userdatabylogin($username);


 			if ( !$user || (strtolower($user->user_login) != strtolower($username)) )
Patch for Simple-LDAP-Login-Admin.php
 //If admin options updated (uses hidden field)
-if ((isset($_POST['stage']))&& ($_POST['stage'] == 'process') )
-//if ($_POST['stage'] == 'process')
+if ($_POST['stage'] == 'process')
 {
     update_option('simpleldap_account_suffix', $_POST['account_suffix']);
 	update_option('simpleldap_base_dn', $_POST['base_dn']);
@@ -104,21 +103,20 @@ if ((isset($_POST['stage']))&& ($_POST['

 }
 //Test credentials
-elseif ((isset($_POST['stage']))&& ($_POST['stage'] == 'test') )
-//elseif ($_POST['stage'] == 'test')
+elseif ($_POST['stage'] == 'test')
 {
 	global $bool_test;

 	//Temporarily change security mode for test. Store old setting.
 	$temp_holder = get_option("simpleldap_security_mode");
-	update_option("simpleldap_security_mode", "security_low");
-	//	update_option("simpleldap_security_mode", "security_high");
+	update_option("simpleldap_security_mode", "security_high");

 	$test_user = wp_authenticate($_POST['test_username'],$_POST['test_password']);

 	//Restore security mode setting.
 	update_option("simpleldap_security_mode", $temp_holder);
-	if ((isset($test_user->ID) )&&($test_user->ID > 0))
+
+	if ($test_user->ID > 0)
 	{
 		$bool_test = 1;
 	}
Resources
June 7, 2013
Drupal 7: CTools module error: Failed: PDOException: SQLSTATE[23000]: Integrity constraint violation:
When I re-installed CTools (Chaos Tools Suite) during a Drupal 7 upgrade, it resulted in this error:
Failed: PDOException: SQLSTATE[23000]: Integrity constraint violation: 1062 Duplicate entry '29'According to this post, it may have something to do withinsufficient memory allocation to PHP preventing hook_install from running when the module tries to load.
Since I had just increased the memory in the php.ini file, I instead disabled all CTools-related and uninstalled the CTools dependent modules like File Entity and Media, then re-enabled them in one by one order of dependency. This time there was no error.
Drupal 7: Fatal error: Allowed memory size of 52428800 bytes exhausted
Working with Drupal 7, you may get an error like the one below. (The actual number may be different.)
Fatal error: Allowed memory size of 52428800 bytes exhausted If you don't have one already, add a text file called "php.ini" to the root directory of the Drupal 7 site, and add a line like:
memory_limit = 96M memory_limit = 128M June 4, 2013
HTML 5 Treasure Hunt game framework
I'm working on an HTML version of a Flash Treasure Hunt training game I built a couple of years ago. When it's done, this will be more of a flexible framework than a specific game, capable of being used for any of the many situations in healthcare that require finding the right tool, part or medication quickly and accurately. Searchable anesthesia carts, cardiac arrest team "crash carts", cardiac catheterization tubing racks, operating rooms, and even patient rooms are just some of the possible settings that could be portrayed in the game.
This version is still in a very rough draft form, but I thought it may still be useful to someone trying to get started with HTML 5, canvas, or Kinetic.js.
Download it here: treasurehuntHTML5.zip
Try it out here: http://thedesignspace.net/misc/treasurehuntHTML5/
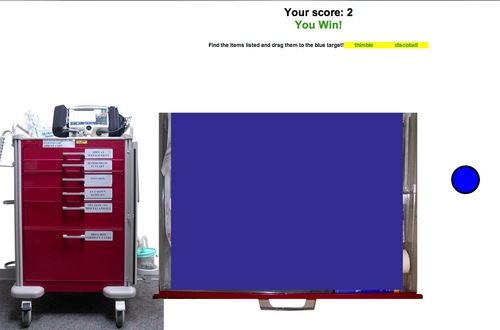
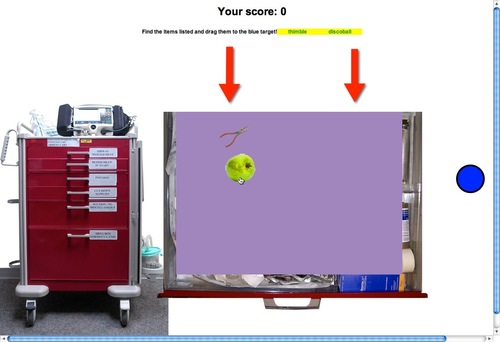
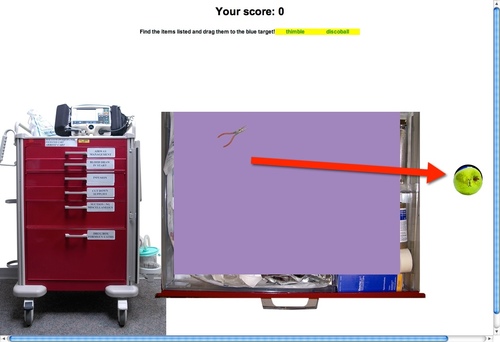
Game Play:
The user is instructed to find the items listed at the top of the page, in this case the thimble and the discoball. In this draft of the game, the "correct items" to be found are hard coded. In the future, I'll add a choice of having the game select a number of correct items randomly from the item list, or allowing the author to specify which ones should be found for as many rounds as they want to make available.
Click the drawer handles on the cart to open drawers and find the right items. Dragging a correct item to the blue target results in a sort of swirling "flush" animation, and the item vanishes. Dragging an incorrect item results in the item being sent back where it came from. Correct items get one point, and you have to find them all to win. There's no functionality around stopping the game or setting up new rounds yet.
Here's the opening screen:

When a drawer handle is clicked, the corresponding drawer slides open:
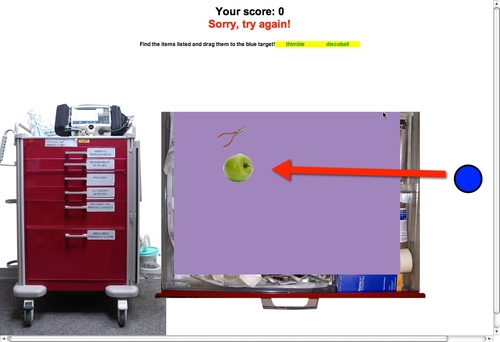
Dragging an incorrect item to the target...
...results in the item being sent back, with the target blinking red for a moment.
Dragging both correct images results in a "You Win!" message. Both items disappear when dragged to the target.