November 26, 2011
A few rough spots in iCloud
iCloud looks great on paper, but the effects of choices you must make to enable it are not obvious, so, as a busy person with more than enough troubleshooting to do, I am shutting it off for now.
No replacement for iDisk yet.
I'm probably one of the few people that use iDisk, but I do use it. I store my Papers library on it, and a variety of assets I use at work and at home. It was a great little server, without any hassle. According to this technote, I have to save my files and get ready for it to disappear.
I never used the iWeb or MobileMe Gallery features, but it looks like all of that is disappearing also. iCloud is neither a hosting service, nor an unstructured file-server. Documents can be stored by apps, but probably not dragged there by you, as far as I can tell.
AppleID confusion.
With the advent of iCloud, your AppleID takes on new importance. iCloud's functions include backup of your purchased music and apps, backup and syncing for email, photos, calendars, and contacts. Each device can utilize some or all of the available functions.
The problem is, many of us have accidentally acquired more than one AppleID.
If you purchased your Mac or device online, it is likely that you used one AppleID to purchase it, then created a MobileMe account once it was up and running. That MobileMe account is likely what you use to sync data across devices - at least until now.
If you have been using MobileMe to sync data across devices, and another AppleID to purchase apps and music, you have a problem: the two accounts cannot be merged into one iCloud account. In several cases, even though I have a me.com address registered on one or the other device, it wants me to make another one! I am not even certain what result the choice of one or the other AppleID will have, but experimenting with it is likely to result in data loss.
Time to upgrade to Lion? I think not...
Where MobileMe worked across all devices, iCloud will require OS X 7+ on desktop Macs. I tested Lion pretty thoroughly a couple of months ago, and decided not to use it for reasons ranging from software incompatibility to apparent bugginess and network problems. Perhaps by the time MobileMe goes away I'll be able to switch, or perhaps I'll simply have to live without iCloud on the desktop.
November 22, 2011
Thread: Changing maxAllowedContentLength
In a .NET application used to deliver quizzes, attempting to import a large quiz from another server resulted in this error:
"The request filtering module is configured to deny a request that exceeds the request content length." A second message stated:
"Request filtering is configured on the Web server to deny the request because the content length exceeds the configured value."
To fix this error we need to increase the maxAllowedContentLength setting in the relevant web.config file.
Here's how to use the appcmd.exe command-line tool to make changes to the the web.config or applicationhost.config file.
Click Start, type "command prompt" in the Start Search box, right-click Command Prompt in the Programs list, and click Run as administrator.
If you are prompted for an administrator password or for confirmation, type your password, or click Continue.
Change to the right directory by typing
cd \windows\system32\inetsrv
then click Enter.
Type
appcmd set config /section:httpRedirect /enabled:true
then click Enter, or if you want to make the change only for one application, type:
appcmd set config "Default Web Site/" -section:requestFiltering -requestLimits.maxAllowedContentLength:1000000
Thanks to Thomas Deml for this tip.
- IIS forums: Thread: Changing maxAllowedContentLength
- Microsoft Support: How to use the Appcmd.exe command-line tool to enable and configure HTTP logging and other features in Internet Information Services 7.0
November 20, 2011
Captivate: settings that don't seem to "take"
There have been several times when I've discovered that settings changes I make in Captivate Preferences or Properties are not being honored - my changes can be seen in the Preferences or Properties panels after closing and reopening the Preferences or properties, but they are not being used.
This includes things like changing reporting preferences, quiz behavior, scoring, clickbox link URL's, changes to link targets, and other types of changes.
Usually the solution is to change the setting to something totally different, then SAVE the file. Reopen the file and make the change to the correct setting, and save again.
November 15, 2011
Captivate: Change background images on imported Powerpoint slides to repositionable Captivate images
Captivate allows you to import a Powerpoint file to use as the starting point for your learning activity. It's often easier for people to "think" in Powerpoint, so many users prefer to rough out a project in Powerpoint, then import it and continue working in Captivate.
When a Powerpoint file is imported this way, its images become part of the Background element of the slide in Captivate. Backgrounds are not easily repositionable, or croppable, but it's not hard to bring the background image up onto the slide as a regular image element that can be moved around, edited, and included in actions.
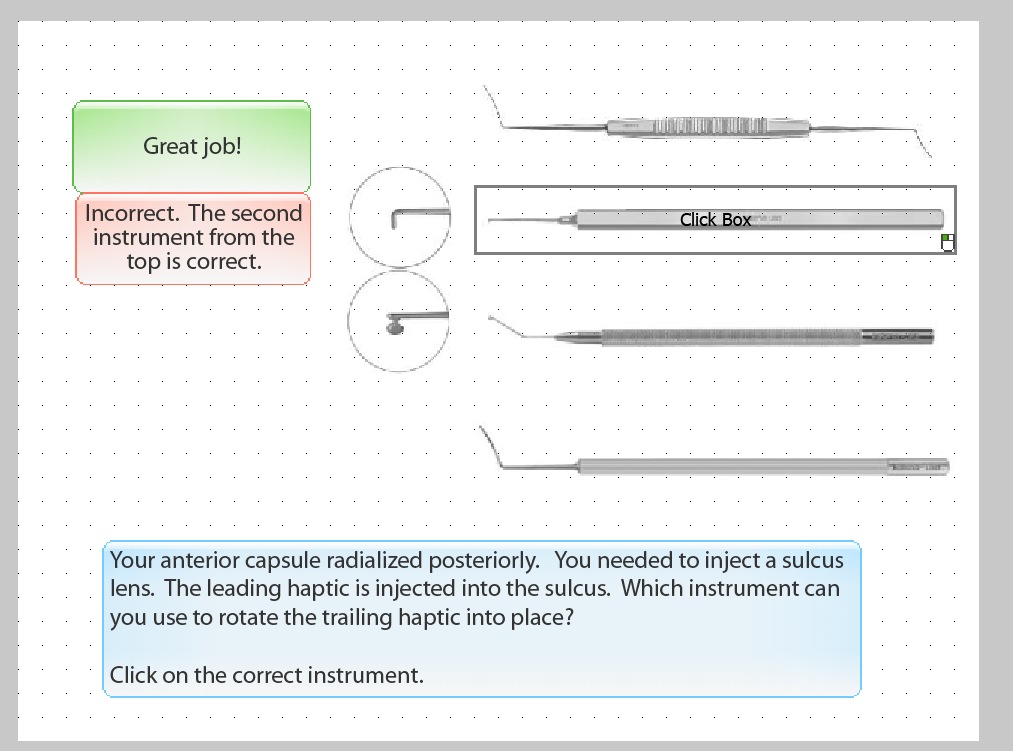
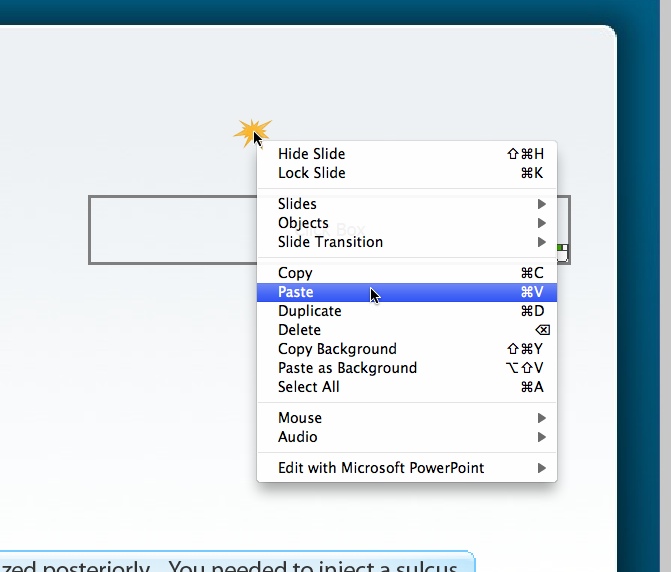
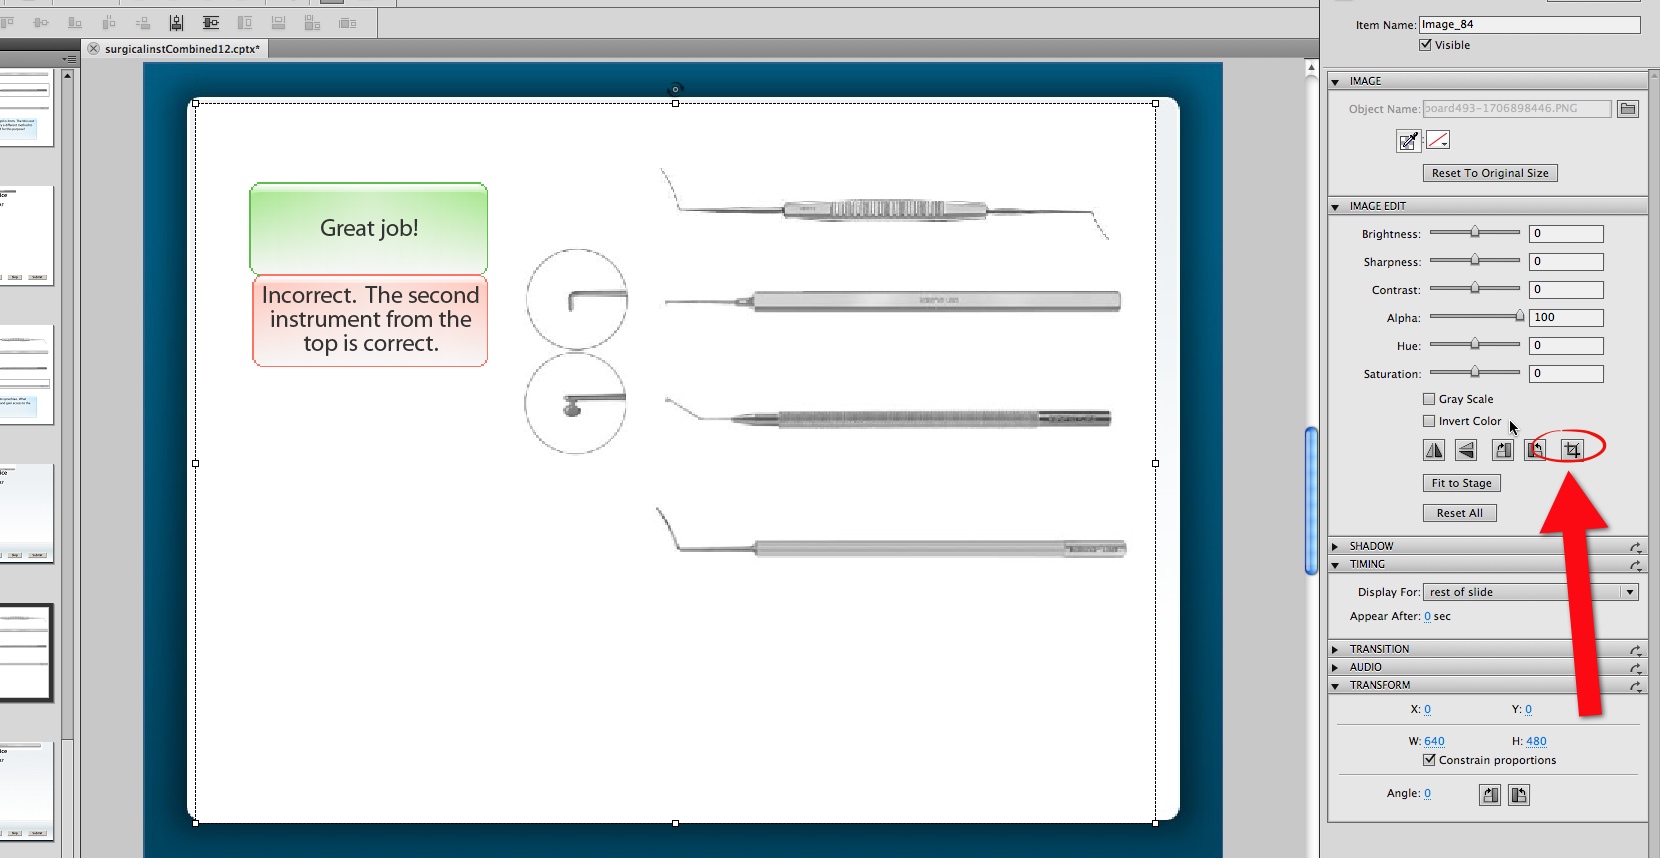
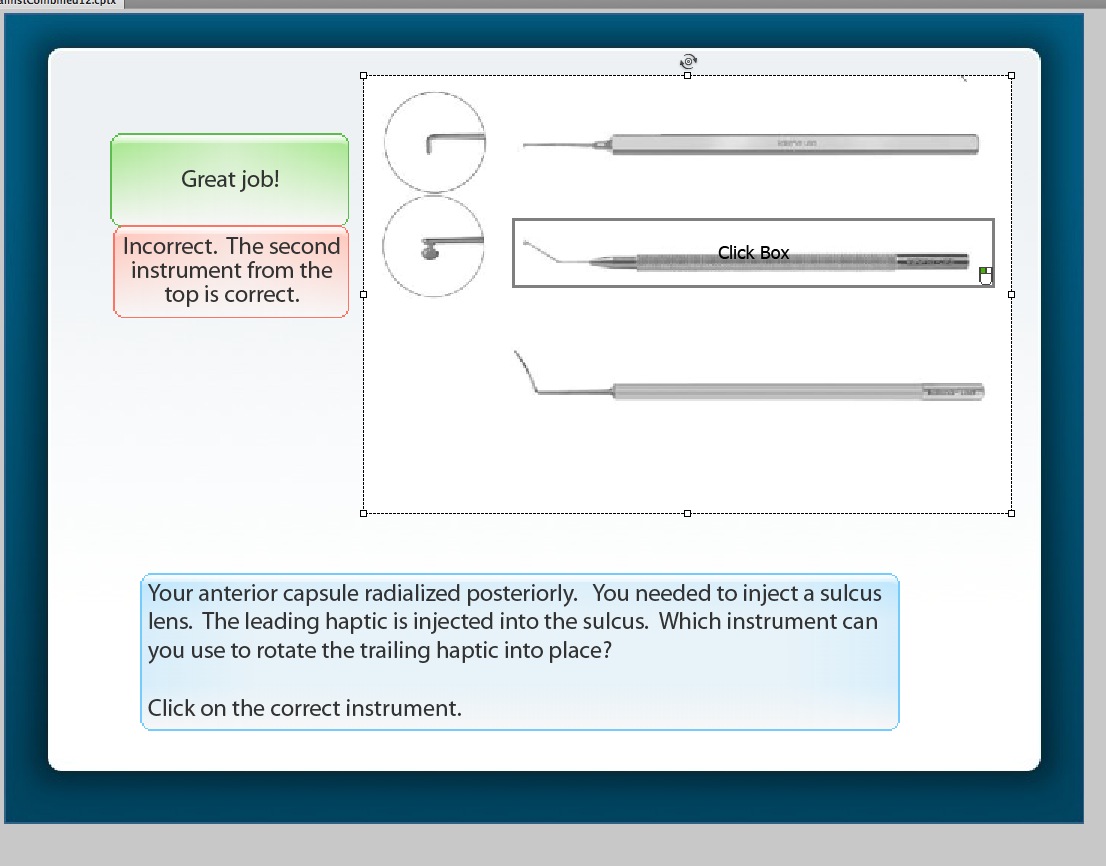
The slide below is an example of an imported Powerpoint slide. The image of the instruments is part of the background. This is a problem because the image needs to be cropped, and because we also want to use a consistent background template throughout. If we add a background now, it will merely replace the image of the instruments.
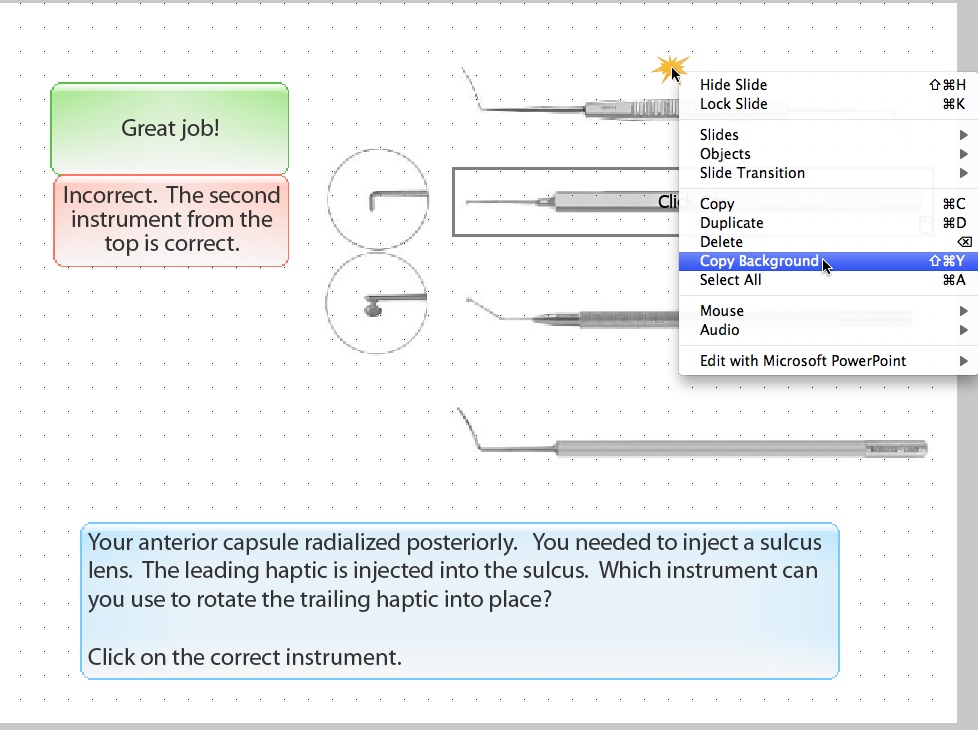
To bring the background image up to the top, right-click (Control-click on Mac) on the background area of the slide, and select Copy Backgroundfrom the menu.
Before pasting the image in the clipboard back onto the slide, let's apply the template. Click on the Slidelayer in the timeline tab below the slide to see the properties for the slide in the Properties panel on the right. Then select the correct template from the properties menu for the slide.
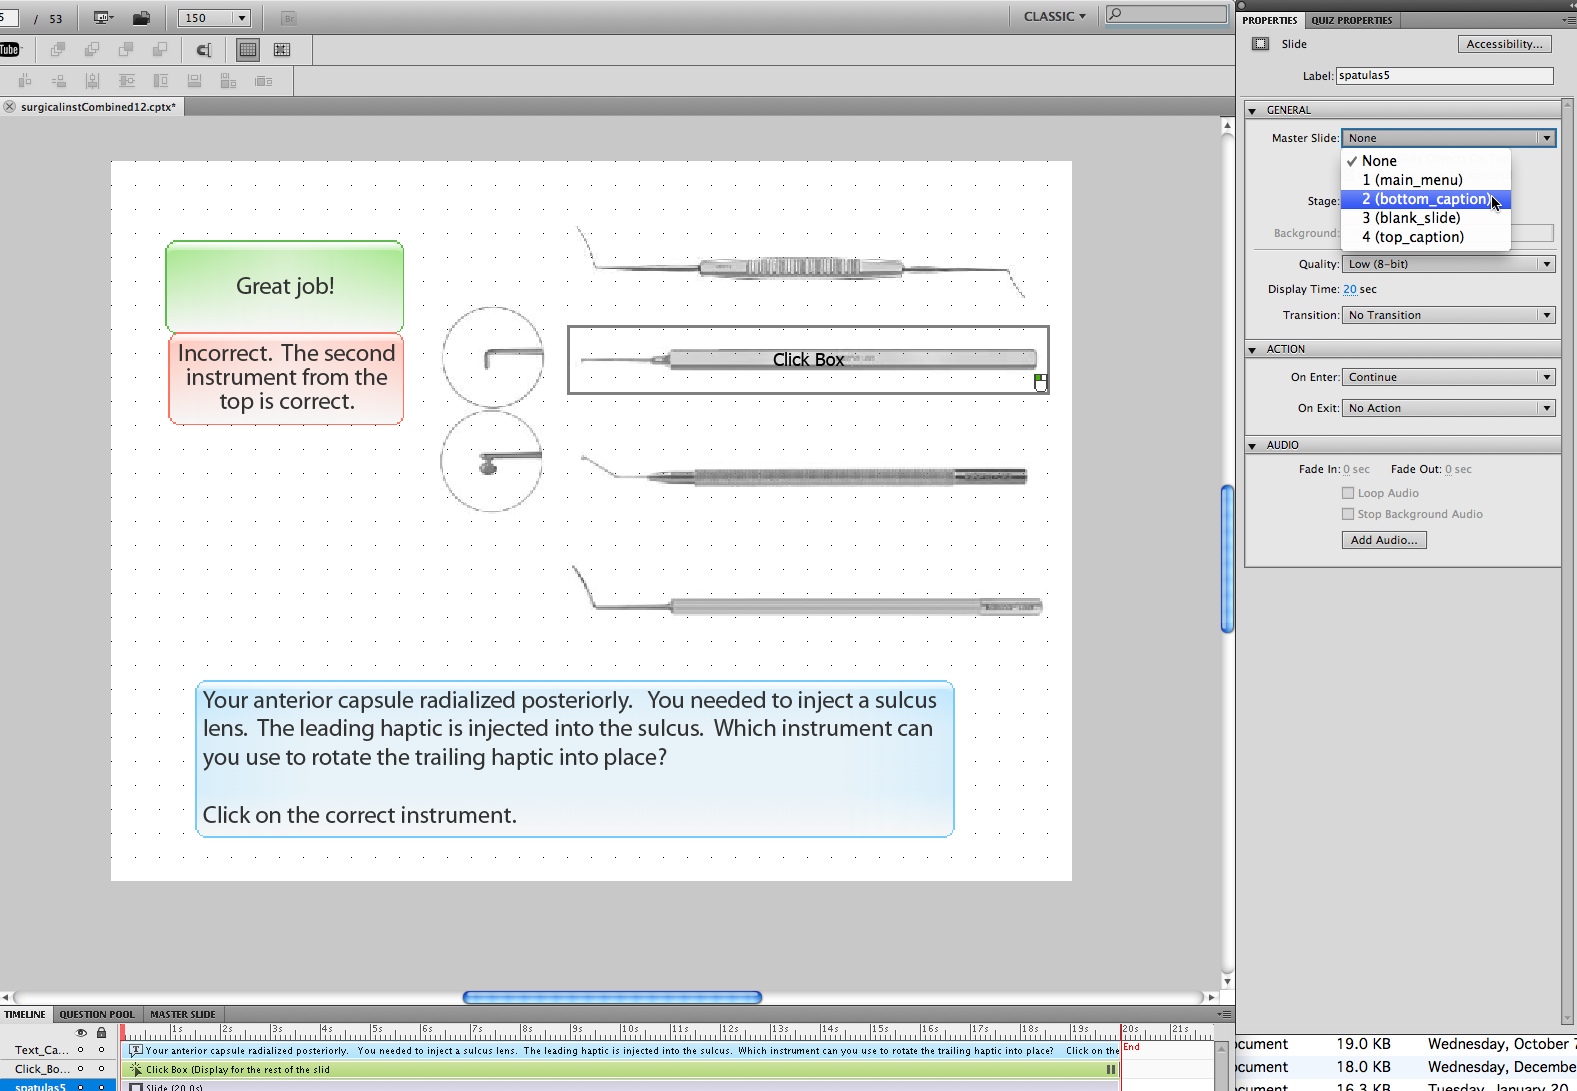
The template will now fill the background of the slide.
Right click (Control-click on Mac) in the background area and select Pastefrom the drop-down menu.
The image you copied earlier will be pasted on top of everything else. With the new image still selected, click the cropping tool icon as shown.
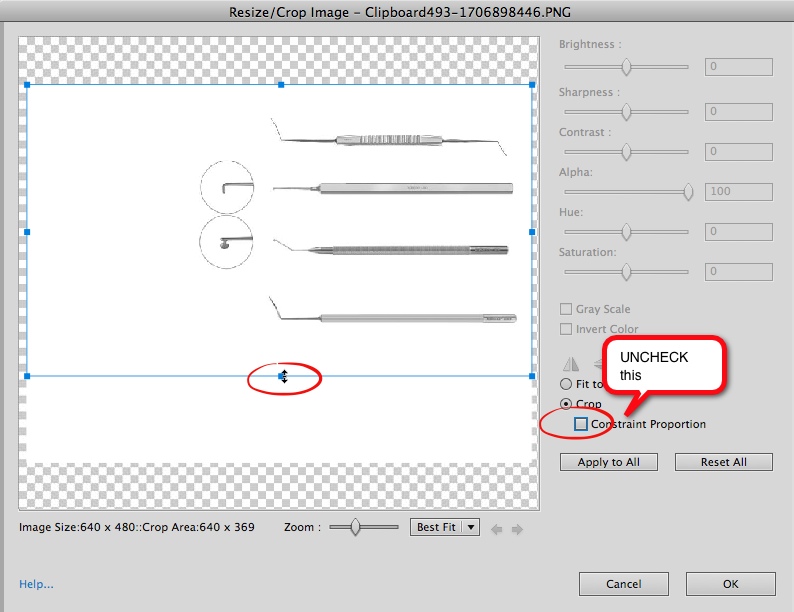
The Resize/Crop Image window will open. Uncheck the Constraint (sic) Proportions checkbox. This will free up the cropping guides so you can move them to create any size rectangle. Adjust the handles of the image until you are satisfied with the cropping. In this case we wanted to eliminate the top instrument entirely.
Click OKwhen you are done cropping the image.
The image will have shifted to the top left corner. Move it into the correct position.
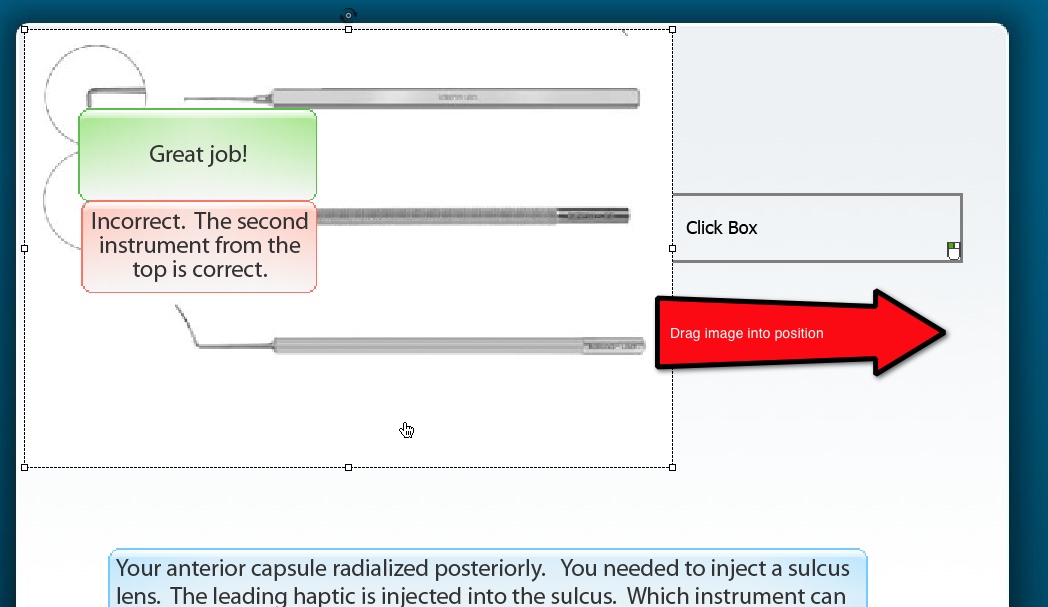
Note that the image is sitting on top of the click box. Fix this in the timeline by shifting the image's layer down below the click box layer.
Before shifting the layer:
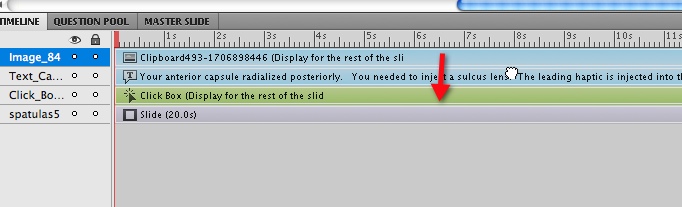
After:

The click box now appears on top of the image. It will be invisible once published.
November 4, 2011
Windows Journal crashing on Windows 7
If Windows Journal starts crashing every time you try to open it, these instructions might just fix it (thanks to David Bradley):
- Close all open instances of Windows Journal.
- Open up windows explorer
- Type %localappdata% in the address bar
- Go to Microsoft\Journal\Recover
- Move all .bak files to a temp folder on your desktop
- Restart Journal
- Delete temp folder
November 1, 2011
Captivate Reporting to Internal Server
Adobe Captivate provides two methods of tracking quiz results that don't require you to have an LMS: Acrobat.com reporting and Internal Server reporting. An E-mail reporting option is also available, but it would require some custom development to make any sense of the data.
Before deciding which option to use, it is necessary to understand the requirements involved for each method.
The Acrobat.com option requires that...
- The Captivate quiz must be available to your learners on the web.
- An Adobe ID must be created to use for reporting
- The person responsible for creating the reports must have Adobe Air and the Results Analyzer Air application installed on their computer
- Your learners must be willing to make free Adobe IDs for themselves, and must be willing to allow their data and quiz answers to reside on Adobe's server.
The internal server tracking option requires that...
- The Captivate quiz must be available to your learners on the web.
- You must have a PHP-enabled web server available to receive results, AND the folder that will store the results must be available through the local network to the computer running the Results Analyzer application. In other words, you must be access the folder through a shared drive. If you aren't on a network with webservers you could use, you could probably set up a little web share on your own computer, and use that. However, you would need to have a static IP. Another alternative is to download the Captivate Results folder to a local disk whenever you want to report on it.
- Your learners all have email addresses.
In a recent project, it turned out that our learners (doctors) would not appreciate having to make Adobe ID's nor sending quiz data to Adobe, so we decided to use Internal Server reporting instead of Acrobat.com.
How to set up Internal Server reporting:
Find the file internalServerReporting.phpin the Captivate Install directory:
[InstallDirectory]/Adobe Captivate 5/Templates/Publish/
Put the file onto your server. In the example shown below, I've put it right into the same folder as the published Captivate quiz. It does not have to be there, but it does have to be both accessible from the web AND accessible to the Results Analyzer software using a file system path. Note the web URL to the file (e.g. http://yourserver/internalServerReporting.php).

In the Captivate file that contains your quiz, open Preferencesand click on Quiz > Reportingin the Categorycolumn at left.
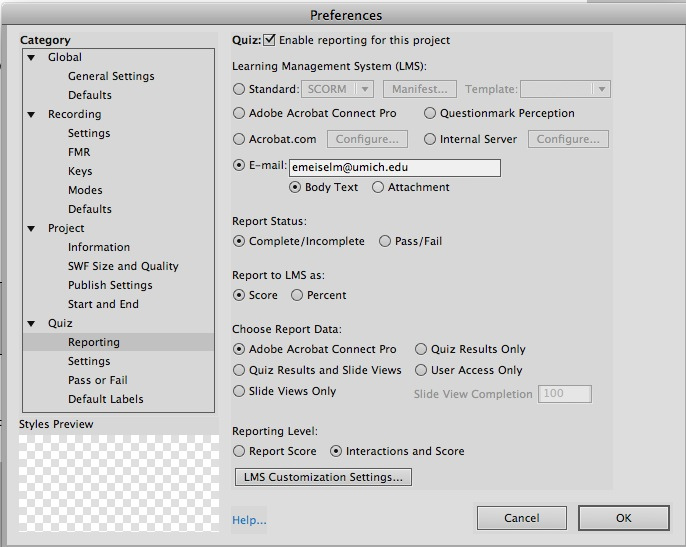
Select these settings:
- Quiz: Enable reporting for this project.
- Learning Management System: Internal Server
- Report Status: Pass/Fail
- Report to LMS as: Percent
- Choose Report Data : eitherQuiz results Only orQuiz Results and Slide Views .
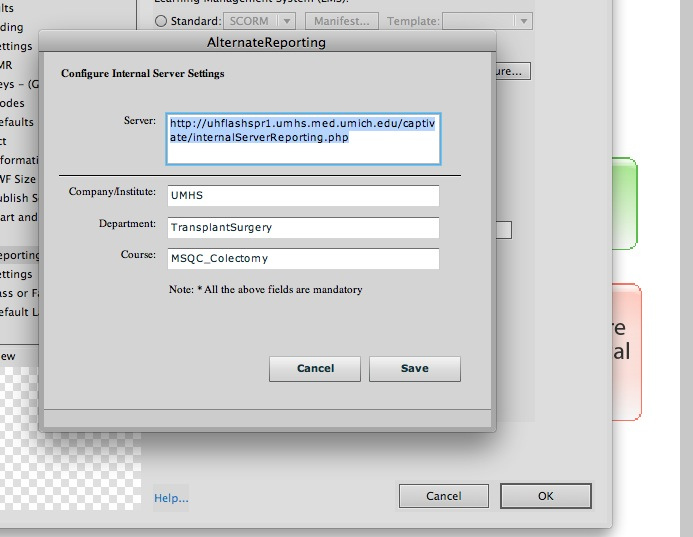
Click the Configure...button next to Learning Management System: Internal Server.
Enter the web URL to the
InternalServerReporting.php file
By default, at the end of the quiz, the learner will be asked for their name and email address, so at least you have those identifiers to track people with. If you need them to provide additional identifiers, make sure that you select "Report Interactions and Slide Views" in the preferences as shown above, you can ask for additional identifying information using Short Answer question slides, and then view the information in reports. I've asked for Full Name below, but it could be a user id, address, phone number, etc.
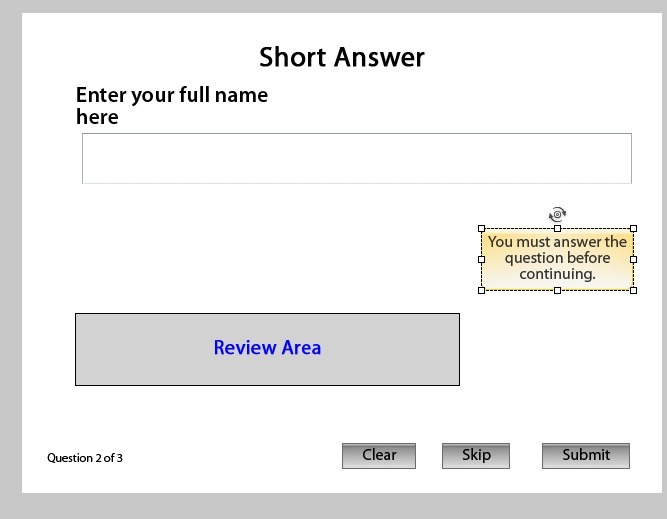
To set up a short answer question to record unknown data, set the "Correct answer" to a random word that no one would ever use. This way everyone will get it wrong. This way you know they will all get the incorrect answer caption. Then just simply set the action triggered by incorrect answers to "Continue" or "Jump to next slide".
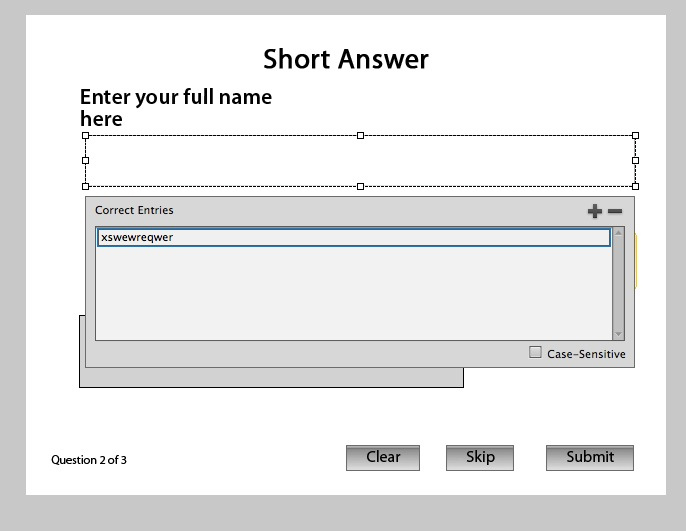
Set the points for this question to 0. Allow only 1 attempt at a right answer, so it will immediately execute the action triggered by the wrong answer.

What the Learner sees
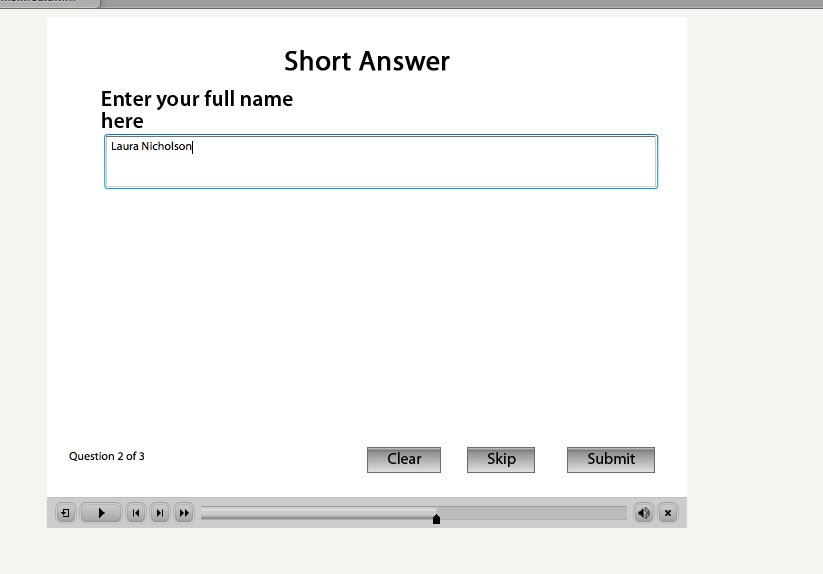
Here's how my short little 2-question quiz looks to the learner. First they are presented with a True/false question.

Then the Short Answer question asking for an identifier.
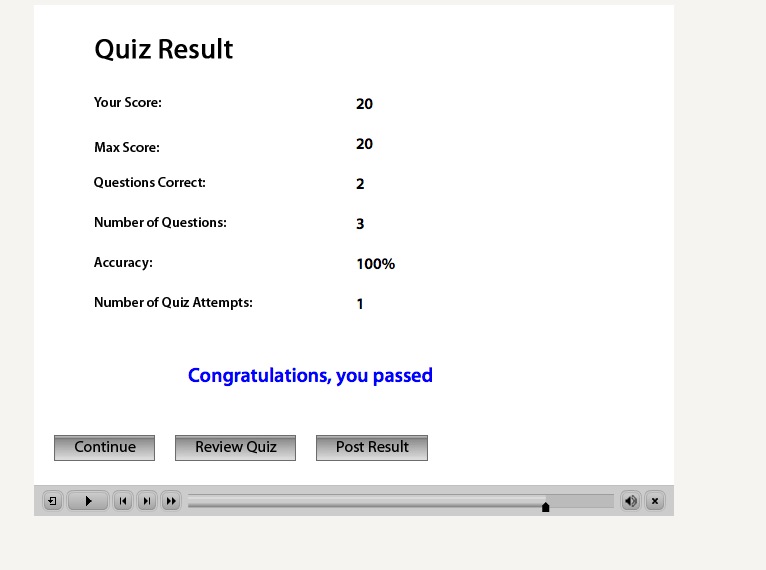
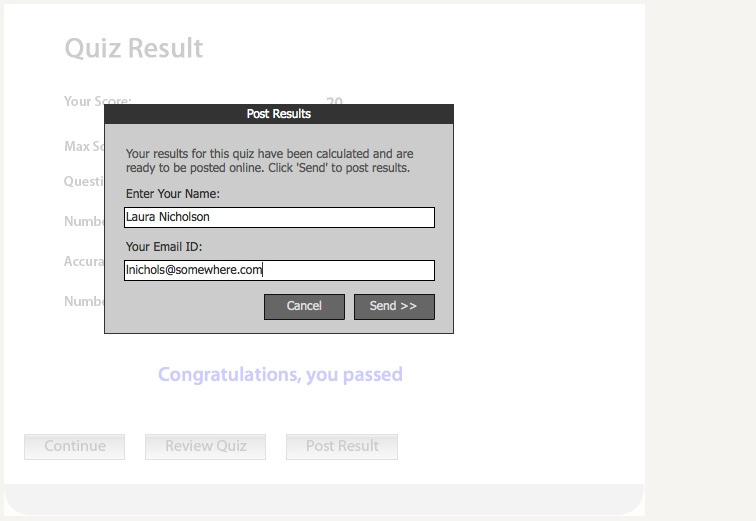
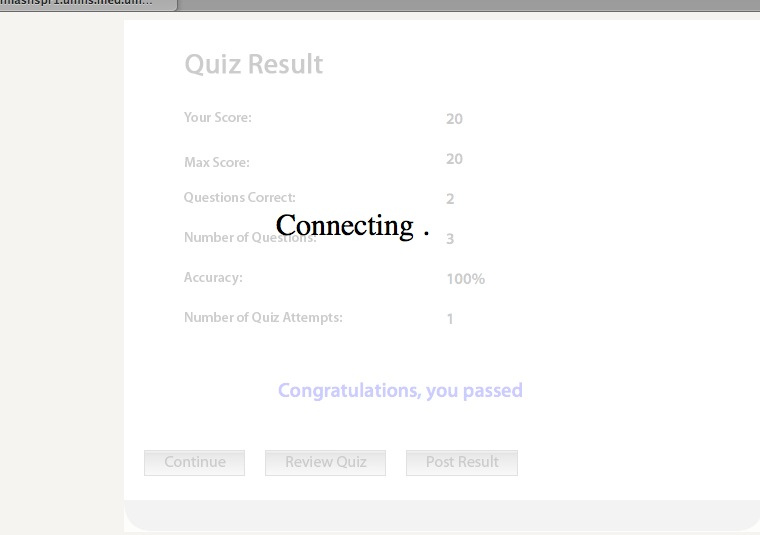
Then the results page. Note the Post Result button which they must click to record the results.
Upon clicking the Post Result button, they are presented with a dialog asking for Name and Email ID.
If your path to internalServerReporting.php is correct, the Connecting message will be followed by a confirmation screen.

Once results are posted, a new xml file has been added to the course directory.
![]()
Reporting
Download and install Adobe Air [ http://get.adobe.com/air/]
Download and install Adobe Quiz Results Analyzer [ www.adobe.com/go/cp5_quizanalyzer]
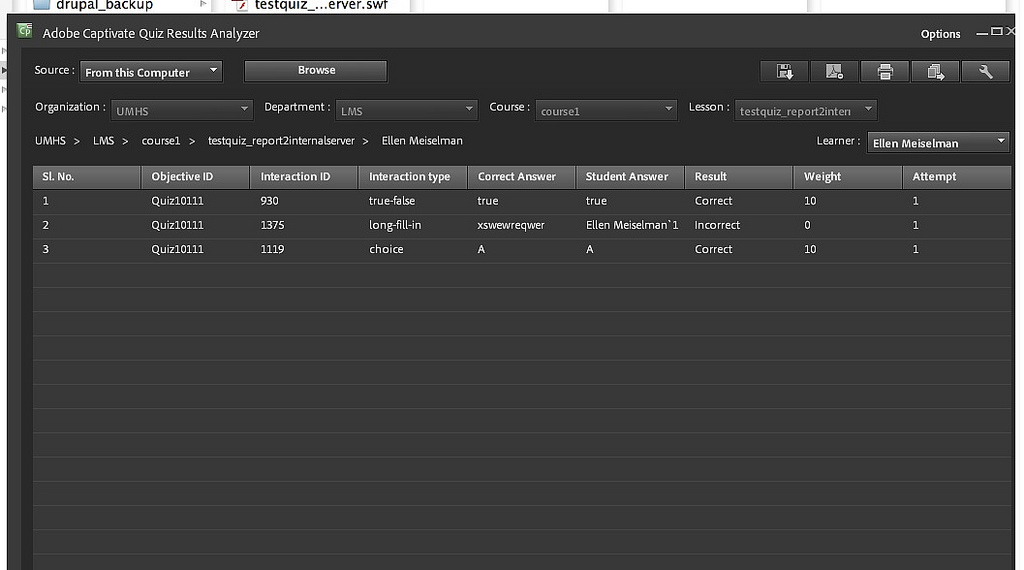
After taking the quiz a few times to create some results, launch the Results analyzer and point it at the Captivate Results folder (see below) which is created by the internalServerResults.php file the first time the Post Results button is clicked by a learner. It will create folders for each quiz and an xml file for each attempt at a quiz.

Click on any learner's name to drill down and see the details of their answers and interactions. Reports can also be exported to Excel for easier distribution and analysis.